RECOMMENDATION: If you are using a version of The Portal Connector higher than 4.0, we strongly recommend utilizing the MVC based widgets and components to create your site. This documentation is for legacy purposes only and will soon be deprecated.
Widget Type:
Page Widgets
TPC Version:
  • 4.2 +
VideoLogos

Power BI Report is a multi-perspective view into a data set, with visualizations that represent different findings and insights from that data set. The report is highly interactive and highly customizable and the visualizations update as the underlying data changes.

PBI-Doc

Configuration

Basic Configuration 

Before configuring the Power BI widgets, you must have a Power BI instance set up. If you are planning on using Power BI embedded then you will also need to configure that in the back-end settings, see more information here.

Drag and drop a Power BI Embed widget to your page and click on the edit, it will open the widget designer.

In the basic settings tab, you can select the type of Power BI Reports either Publish to Web Report or Embedded Reports/Dashboards/Tiles. Based on your selection you will have to provide the necessary information.

PLEASE NOTE:  There are some limitations when embedding Dashboards instead of reports. You can read more about them here.

Appearance

There are number of settings you can change in the appearance tab , which are listed below. 

  • Initial Page: Determines the page to be loaded when the widget is first rendered
  • Width & Height: The width and height of the report display area
  • Show Navigation: Displays the navigation bar.
  • Show Filter Pane: Displays the Filter pane at the side of the report.

Filters

Please Note: This feature is only available in TPC 6.0.

The Filters tab contains a myriad of options to filter the report chosen. For example, you can filter a report by the logged-in contacts' ID or by a query string value. There are two main types of filter you can use, which are listed below.

  • Basic: Basic filters have a single operator with one or more values.
  • Advanced: Advanced filters have a single logical operator and accept one or two conditions that have their own operator and value.

Steps to create a filter:

  1. Start by adding a title to the filter.
  2. Next, select the type of filter that you want to use.
  3. Write down the Table and Column names of the information you want to filter.
  4. From the drop-down box, then select the operator you would like to use with this filter.
    1. Basic filters have the following operators:
      1. In: Only values specified. Values can be a comma-separated list. e.g.: value1, value2, value3
      2. Not In: All values except the specified. Values can be a comma-separated list. e.g.: value1, value2, value3
      3. All: Will select all the values in the target table
    2. Advanced filters have the following operators:
      1. Is less than: Suitable for numbers.
      2. Is less than or equal: Suitable for numbers.
      3. Is greater than: Suitable for numbers.
      4. Is greater than or equal: Suitable for numbers.
      5. Contains: Suitable for texts.
      6. Does not contain: Suitable for texts.
      7. Starts with: Suitable for texts.
      8. Does not start with: Suitable for texts.
      9. Is: Suitable for all values.
      10. Is not: Suitable for all values.
      11. Is blank: Suitable for all values.
      12. Is not blank: Suitable for all values.
  5. Then select the value type. For internal value types (contactID, userID, etc.) you don’t need to specify the value in the next field.
While you are changing the values, you can see the preview of the filter that you are building. Once you finish building your filter, click on the plus button to add the filter to the filter list.

Notes:

  • If you are creating an Advanced filter with only a single condition, then the logical operator should be set to "And".
  • The filters must match exactly the Table and Column names of the report dataset (you can find these names when you edit your report on Power BI Online or Power BI Desktop).


Below is an example of how to use the Filter tab:
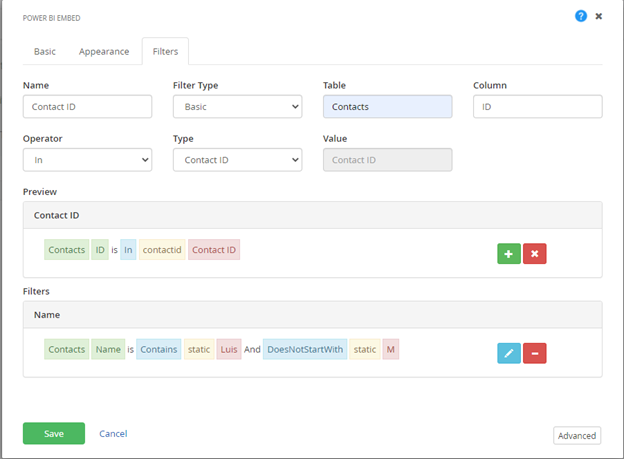

Filter Example

Widget Properties

Basic Properties

Advanced Properties

Advanced properties provide additional functionality. They can be accessed by clicking on the "Advanced" Button in the bottom right corner of the widget designer.

API

get_report

If set to Power BI, it will return an iFrame. Else, if set to power Bi embedded, it will return Power BI Embedded Report Object.

Returns

Power BI Object

get_element()

Returns the element of the widget.

Returns

jQuery Object

get_container()

Returns the container element of the widget.

Returns

jQuery Object

get_reportPages()

Returns the Power BI Embedded Report Array.

Returns

Array

show()

Shows the widget on the page.

Returns

None

toggle()

Toggles the visibility of the widget.

Returns

None

hide()

Hides the widget from the page.

Returns

None

get_model()

Returns the model object of the widget, which contains several useful properties related to the widget.

Returns

Object