Deployment and Lifecycle Management with The Portal Connector and Sitefinity
Hosting and Deployment Methods
Azure
Azure is generally the recommended option for The Portal Connector and Sitefinity when you are developing a project that needs to be delivered fast and automated.
For all stages of the development lifecycle we recommend at a minimum the Azure “Standard S2” tier. The Azure Standard tier provides multiple slots for staging, daily backups, and generally enough power for most Sitefinity sites.
This pricing tier applies to all deployment slots of your Azure website, so when the project is put into production, or has higher load requirements, we suggest you scale up the pricing tier or instances to achieve the best performance out of your Portal. We recommend at least “Standard S3” for all production instances of Sitefinity.
For more information on the Azure deployment method see the following links:
Deploy Projects in the Cloud
Azure Deployment Videos
Hosting recommendations
On-Premise
On-Premise deployments are usually recommended when you require full control of your ecosystem for compliance and/or performance reasons. On-Premise hosting is also required when you need to connect to an on-premise Dynamics CRM instance behind a firewall. We recommend on-premise deployments for development instances for quick iteration time.
For the Portal Connector, we commonly recommend the Sitefinity mid-sized production environment specifications to ensure a smooth and stable portal experience, below are the specifications:
|
|
CPU
|
Memory
|
HDD
|
|
IIS Node
|
4 CPUs
|
4 GB RAM
|
50 GB HDD
|
|
SQL Server
|
4 CPUs
|
8 GB RAM
|
80 GB HDD
|
For larger or higher load sites take a look at the Sitefinity large and extra large production environment specifications.
More information about the On-Premise deployment method can be found at the following links:
Deploy project on a server
Hosting recommendations
System requirements
Lifecycle Methodologies
There are three common methodologies when it comes to deployments with practically any site. The methods listed below are only the most common scenarios that our team has used in the past, they will change based on your business process requirements.
- Production Only – A production only setup is the simplest form of deploying and managing a Sitefinity site. This involves using the built in Sitefinity content lifecycles to stage your changes (Draft, Published, Unpublished). Any and all changes made to the site would not have to be replicated anywhere.
- Development & Production – Development (DEV) and Production (PROD) is the next simplest deployment and management process for a Sitefinity deployment lifecycle. This involves making any and all changes on the DEV instance, testing on the DEV instance, and then deploying to PROD. Production configurations should never be touched and only modified when a deployment from the DEV instance has been completed.
- Development, QA, UAT, Staging, Production – The most common deployment scenario for enterprise customers who require all stages of a common development lifecycle. Changes in this model should all propagate from the DEV instance. Any changes made in an instance later in the chain will likely get overwritten depending on the migration method.
More information on lifecycle management with Sitefinity can be found at the following links:
Architecture diagrams
Content Migration Types
There are many options available for Portal Connector users to migrate content from one environment to another, below is a list of all of the types of methods known currently, with their pros and cons:
|
Migration Method
|
Pros
|
Cons
|
|
Database Restore
|
- Quick
- Minimal effort required
|
- Overwrites all content
- Overwrites all users
- Portal Metadata may require full resynchronization for different CRM instances
- Sites must be based on the same copy of each other
|
|
Site Sync
|
- Pick and choose individual content
- Can be automated
- Full synchronization API
|
|
|
Import/Export
|
- Free with every Sitefinity license
- Can migrate only certain content types
|
- Cannot pick and choose individual content; all or nothing per content type
|
|
Migrations
|
- Free with every Portal Connector License
- Pick and choose pages
- Automatically detects dependent content and resources
- Ability to schedule
|
- Only exports detected related content, forms, templates. Other content not related to your selected pages will not be exported
- Sites must be able to communicate with each other for an automatic migration
|
Database Restore
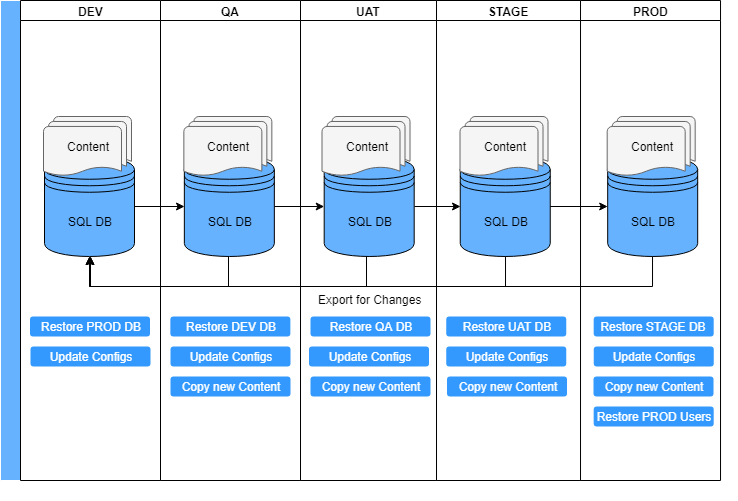
Database restore is one of the most common scenarios of migration. When developing using with a lifecycle that uses Database Restore to migrate changes you must remember that all changes to anything needs to be done in the root level of the chain. In the diagram below, you can see that all changes originate from DEV. If any issues are found in the next stages of the lifecycle, fixes are implemented in DEV and deployed forward.
The only case where there is an exception is when you find issues or need to make changes in PROD. The PROD database would be exported to DEV to be used as the new development instance with the latest data.

A potential issue with the Database Restore migration type is that when migrating from STAGE to PROD, all production users are lost. This is easily remedied by an SQL script to copy users from PROD to STAGE before swap, and downtime is usually only seconds if the environments are configured correctly.
A typical database migration process from DEV to QA would look something like this:
- Ensure DEV site is operational and ready for migration.
- Stop the QA site and App Pool.
- Backup the DEV database and site files.
- Backup the QA database and site files (to restore if something goes wrong).
- Restore the DEV database over the QA database.
- Restore the DEV site files over the QA site files (overwrite all).
- Change the Sitefinity database connection string in the DataConfig.config for the QA site.
- Change the CRM connection string in the PortalConnectorConfig.config for the QA site.
- Start the QA site and App Pool.
- Test to ensure the migration was successful.
- Optional: Migrate users from DEV to UAT (this will only work if you are using a single Dynamics CRM instance, otherwise the contact IDs will not match up and all users must be recreated).
The above steps are flexible and will work with any migration stage. They can also be fully automated and handled by Azure, more information on this and instructions to set it up can be found in Sitefinitys’ video series here.
Migrations
The migration utility facilitates moving configurations from one environment to another. This feature allows users and admins to create a continuous delivery model for their dev, test, uat and production environments. The process is as simple as selecting a few pages and pressing migrate, the migrations utility finds all of the related content required to import the page and includes them in the migration to ensure a seamless transition.
Please read and follow the guide for configuring the Migrations addon.
Development Best Practices
Below are some of the best practice recommendations that The Portal Connector team recommends for custom development with Sitefinity:
- Develop locally – Develop locally on your workstation machine, this saves time by avoiding time-consuming deployments to external servers and avoiding the hassle of remote debugging.
- Share a database – Share a database among the developers in your team. All developers working on their local machines connected to the same shared database.
- Code separation – Move all custom code to a separate .NET project within the Solution. This makes deployments and upgrades significantly easier.
- Create custom modules – When developing custom widgets or processes for Sitefinity, use the Sitefinity module API to handle installs, upgrades, and uninstalls of your customizations.
- Uninstall unused modules – Deactivate and uninstall any and all Sitefinity modules that you will not be using in your site, this will significantly speed up site startup time.
- Compile with Roslyn – Compiling with Roslyn increases site compile times by up to 500%
- Reference generic versions – When adding references to Sitefinity or The Portal Connector dlls, ensure that these references have the SpecificVersion property set to False to make upgrades and deployments easier.
- Precompiled MVC Templates – Install the RazorGenerator.MsBuild NuGet package when you are developing MVC widgets to ensure that all of your MVC templates are precompiled.
More information on development best practices can be found at the following links:
Sitefinity Startup Time Improvements
Sitefinity Speed and Performance
Sitefinity Load Times with Roslyn
Code Flow Deployment Strategy
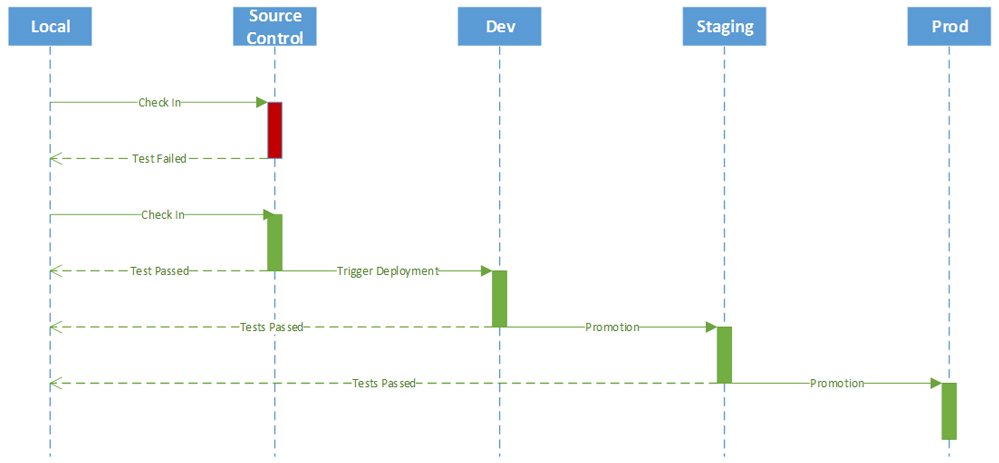
Below is an architecture diagram on the code flow deployment strategy outlined by Sitefinity. The Portal Connector team recommends similar code flow strategies when dealing with custom portals and custom code.

In this diagram, all changes originate from your Local development environment and then into Source Control. From Source Control, if all tests pass, the changes are then pushed and deployed from Source control to Dev or another environment using one of the migration methods explained above.