Adding a Grid to a Page
Adding a grid of data to a Page follows similar steps to Adding a Form to a Page, except you use a different Widget. Navigate to the Page you wish to update by clicking Pages on the menu and the page you wish to edit. Scroll on the right to The Portal Connector list of Widgets. Drag in the Grid Widget on the page.

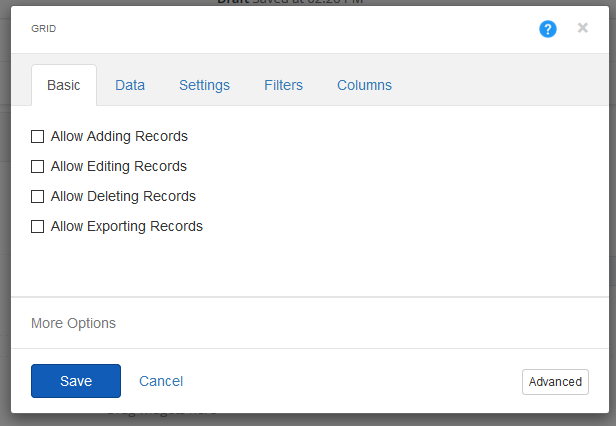
Click the Edit on the Widget to define the settings.

This Widget allows you to define whether End Users can add, edit or delete data in your grid.
This grid binds directly to the data in Dynamics CRM. Any data modifications made using the Widget will modify data in your Dynamics CRM system immediately.
If you wish to allow users to Add a record to your grid, check the Allow Adding Records box and select an appropriate Form you have already created from the drop down list.
The same applies if you wish End Users to be allowed to Edit a record.
Enabling or disabling the deleting, filtering or exporting of records is done by one simple click.
To enable filtering of the grid records the page that contains the grid requires that Viewstate be enabled for the page. Viewstate can be enable when creating the page or after by editing the page properties.
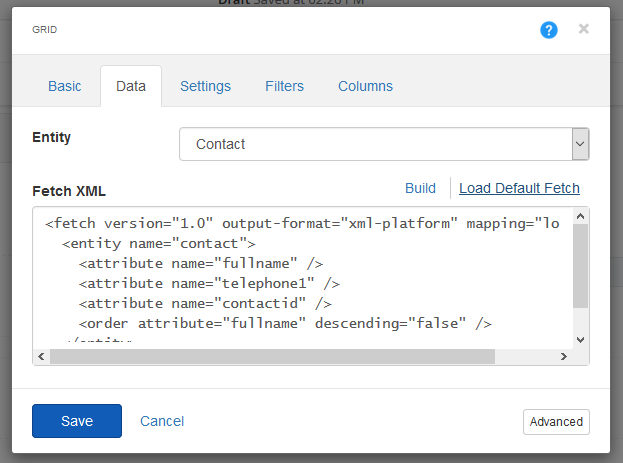
After you have defined how the data can be manipulated, you can set what data will display in the grid.Click the Data link at the top of the Edit Widget screen.

Select the Entity you wish to display and enter the necessary FetchXML. If you are not familiar with FetchXML, no problem. Click the Load Default Fetch to have The Portal Connector automatically build the FetchXML for the default view for that entity in Dynamics CRM.
Or you can use Dynamics CRM to build a more custom FetchXML statement.
Open Dynamics CRM and use the Advanced Find feature to build the exact list and layout of data you require. Then in the Advanced Find Query mode click the Download FetchXML button. You can then copy and paste that FetchXML into the Datasource field on this Widget.
When you are done click Save.
Publish you page and you will not have a live grid of Dynamics CRM data on your page.
Filtering a Grid by the Contact ID
Now that you have a grid of data on your Portal Page, you may wish to filter the data so End Users only see what is related to them. Navigate to the Page and Widget you wish to filter.

For this example we will use the Grid Widget and filter the data to show only the Dynamics CRM Cases that are related to the logged in Portal User who is a Contact in Dynamics CRM.
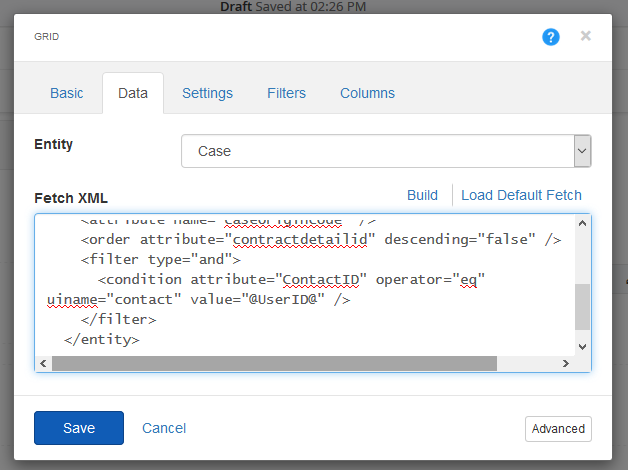
Click the Edit on the Grid widget. Click the Data tab at the top and select the Case Entity (used for this example).
Load the appropriate FetchXML and add a filter statement. In that statement set the value to equal a variable name in quotes with an @ sign on both ends. In this example we used the variable name UserID.
Click the Filters link at the top and set the Variable name to the same thing as you defined in your FetchXML (UserID). Then make sure the Type is set to ContactID. This refers to the Contact GUID that is associated with the logged in Portal User Record in Sitefinity.
Click Save and Publish your Page. Now your data grid will be filtered to only show Cases that are related to the logged in User.
