-
Connecting Portal Connector to Dynamics
-
Connecting Dynamics to Portal Connector
-
Create a Portal User from CRM
-
Creating a Form
-
Adding a Form to a Page
-
Adding a MVC Grid to a Page
-
Filtering a Grid by the Contact ID
-
Summary & Helpful Links
Connecting Portal Connector to Dynamics CRM
Portal Connector can connect to both Dynamics CRM (2011, 2013, 2015, 2016, 2016 Online) and Dynamics 365 in the same way.
To connect Portal Connector to CRM, Login to your Sitefinity site backend (yoursite.com/sitefinity), navigate to Administration > The Portal Connector > Configuration and select CRM Connection Settings on the left-hand side of the page.
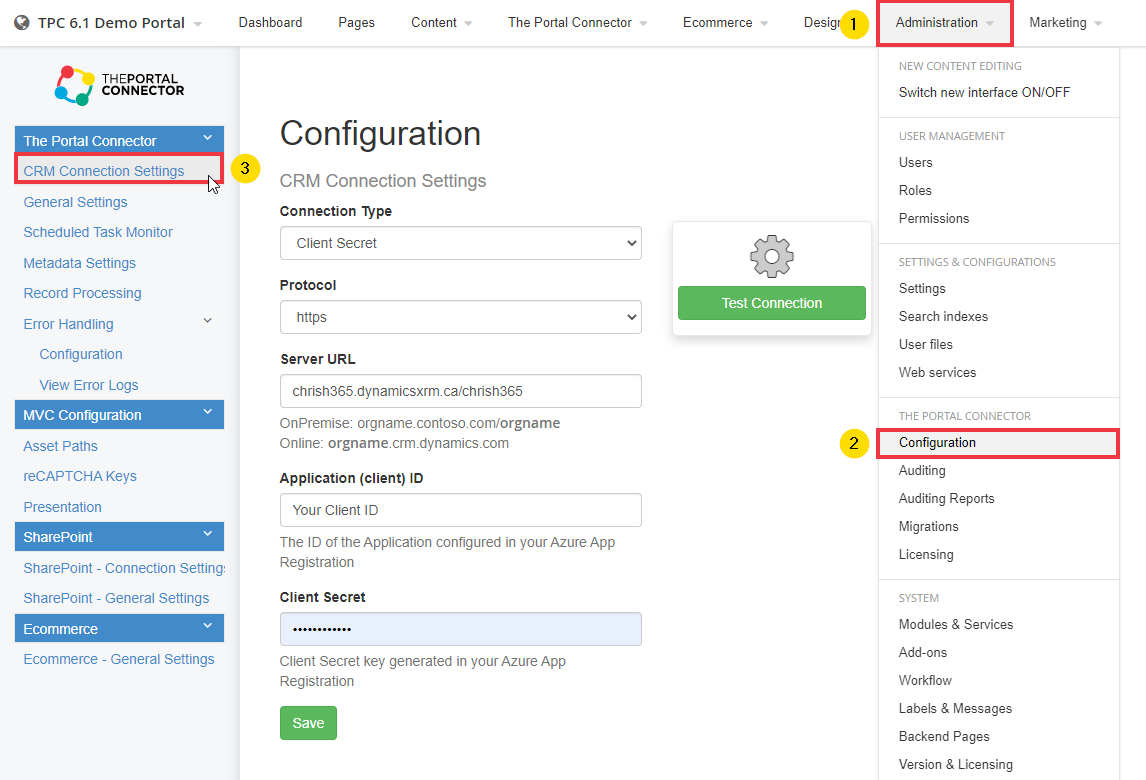
Depending on the Connection Type chosen, your options will vary. See the How-to articles for setting up Client Secret Connections or OAuth 2.0 Connections for more information on those connection types.
Please note: Your Server URL will differ from the example. Sometimes, the URL will also be appended with an Organization Name affixed to the end of the URL which will also be preceded by a slash. For example: crm.pavliks.com/organizationName
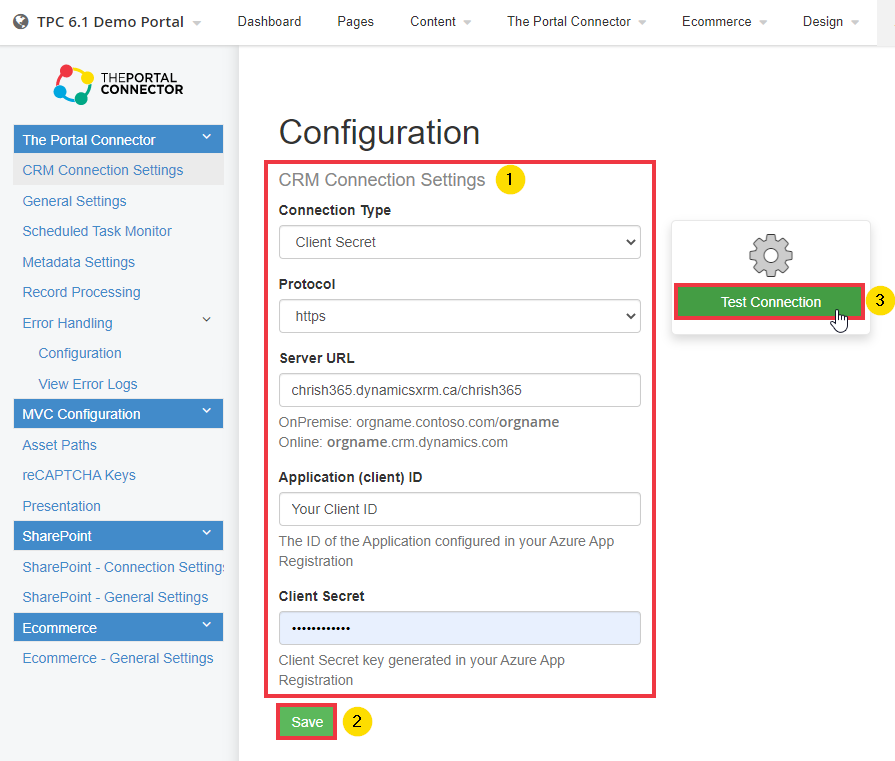
Once you complete entering your CRM server details, click Save then the Test Connection button. If your entered details are correct, you should see a green bar after a few seconds informing you that the connection test was successful. If you see a red bar instead, please check your details as something may be incorrect.
Connecting Dynamics CRM to Portal Connector
Step 1 - Installing the Dynamics CRM Solution
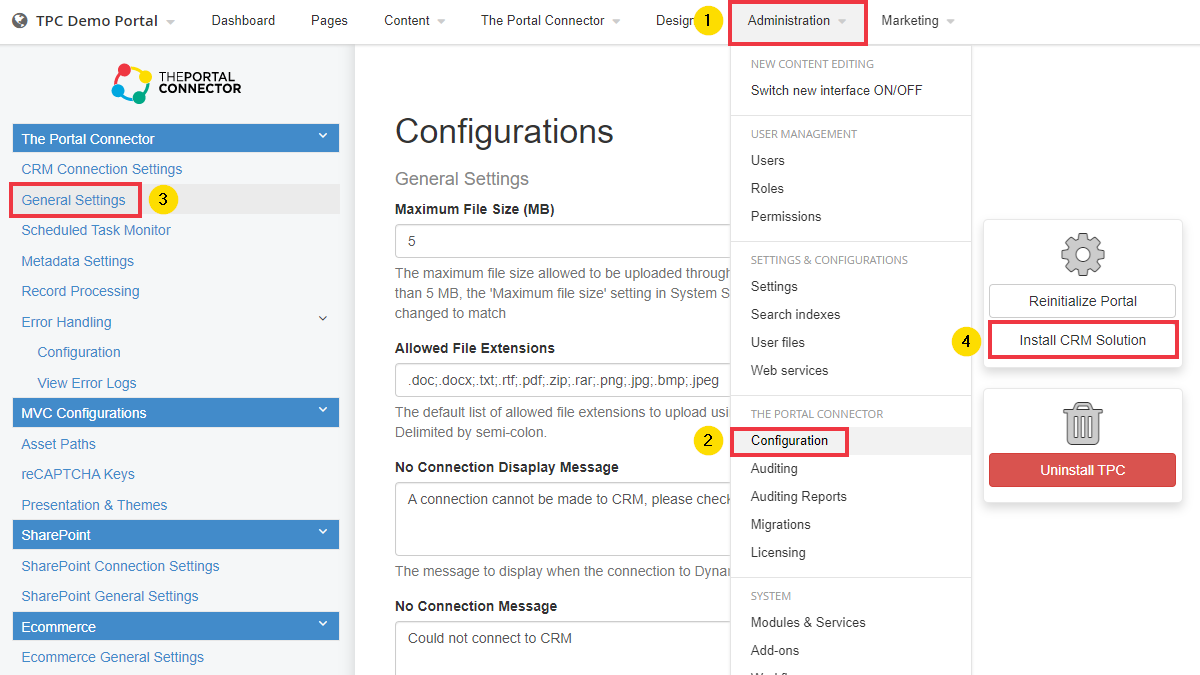
To install CRM Solution, go to the Sitefinity backend and click Administration > The Portal Connector > Configuration. Once the page loads, click General Settings on the left-hand side of the page.
Next, click on the Install CRM Solution button. This task will take several minutes to complete. If your Portal is accessible, then CRM will proceed to automatically add the Portal Connector Solution.
Step 2 - Adding a Portal Record
Once the Solution is installed, you need to point Dynamics CRM to your Portal.
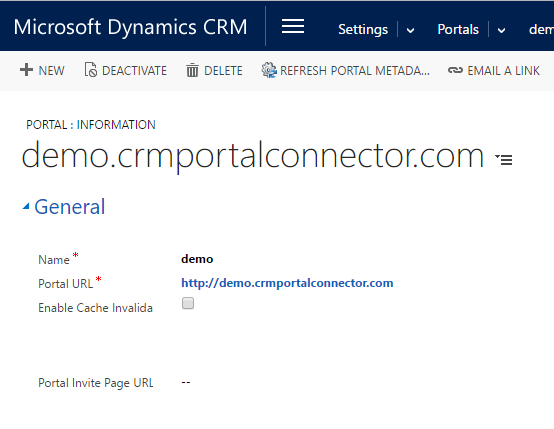
Go in to your CRM > Settings > Portals. This is where you add one entry for each Portal you wish to link to Dynamics CRM. Once you are in the portal section, click on the New Button to Add a new Portal.

Give the Portal a Name and enter in the URL for where the Portal currently resides. You can also provide information for Portal Invite Page and Proxy Url.
Step 3 – Creating Portal Roles
Roles are used to allow Portal Connector Administrators to control which Contacts from Dynamics CRM can view which pages within your Portal.
Roles are simply logical groupings of Portal Users which may or may not view a page or element on a page in your Portal. There is no need for any other permission settings on the Dynamics CRM side of the system.
Please Note: You have the ability, at a very granular level, to define in The Portal Connector What Roles can and cannot view.
Any Roles you create in Dynamics CRM will be pushed out and synchronized with Portal Connector when users are assigned the role.
By default, there are no Roles defined within Dynamics CRM. You need to create roles that align with your business requirements.
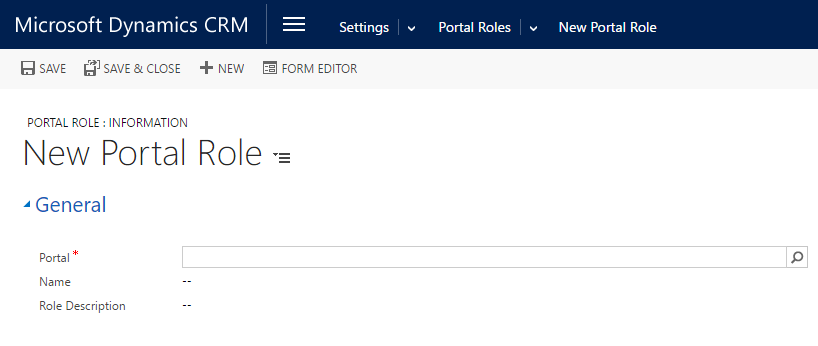
To create a new Role, in Dynamics CRM navigate to > Settings > Portal Roles. Click the New button and give the Portal Role a name.

You can also give the Role a description for better identification purposes and you can create many roles as you may require.
How to Create a Portal User from CRM
Creating a Portal user from a CRM Contact will allow this Contact to log onto your Sitefinity site with a provided set of credentials. For this How To, you will navigate to your CRM instance and assign a Contact with a username, password, and portal role. This allows the Contact to log onto your website. In order to do this, you must do the following
1.Log into your Microsoft Dynamics CRM instance and navigate to the Contacts page.
2.Choose any one of your Contacts from the provided list, double-clicking on their profile to bring it up in edit mode.
3.Click on the ellipses (...) from the Contact Information page in the main toolbar and select Manage Portal Roles.
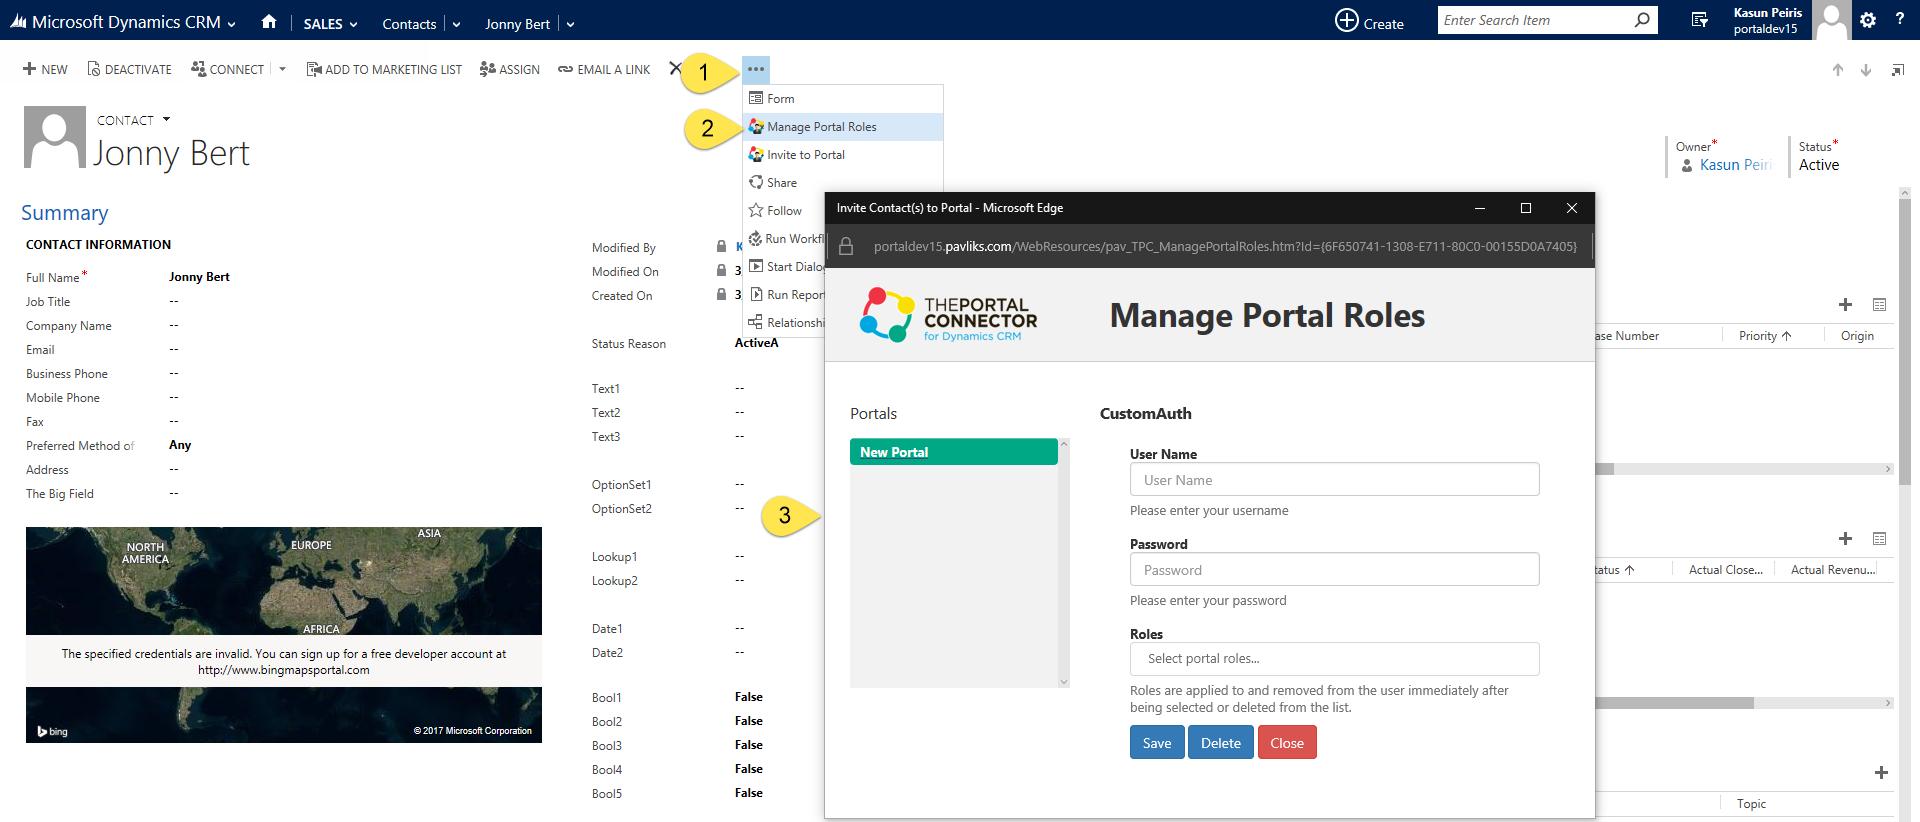
The prompt will allow you to associate a Contact with your Portal as a user in addition to assigning them a role. The Portals list on the left will display a list of active Portals associated with your CRM
4.Assign the Contact a username and a password. Please note that the password must follow CRM criteria which is seven (7) characters minimum.
5.Click on the save button for the changes to take place immediately. You will then be allowed to also select roles for the user.
6.Click on the save button for the changes to take place immediately. You will then be allowed to also select roles for the user.
7.You may now log onto the user in your Portal.
Creating a Form
The following steps outline the quickest way to create a new MVC Form that allows users to enter data directly into Dynamics CRM. There are many options and variations available and not all are covered in this section.
Step 1 – Create a Blank Form
Once logged into the Administration area of Sitefinity go to Content > Forms > Create a Form at the top.

Once logged into the Administration area of Sitefinity go to Content > Forms > Create a Form at the top.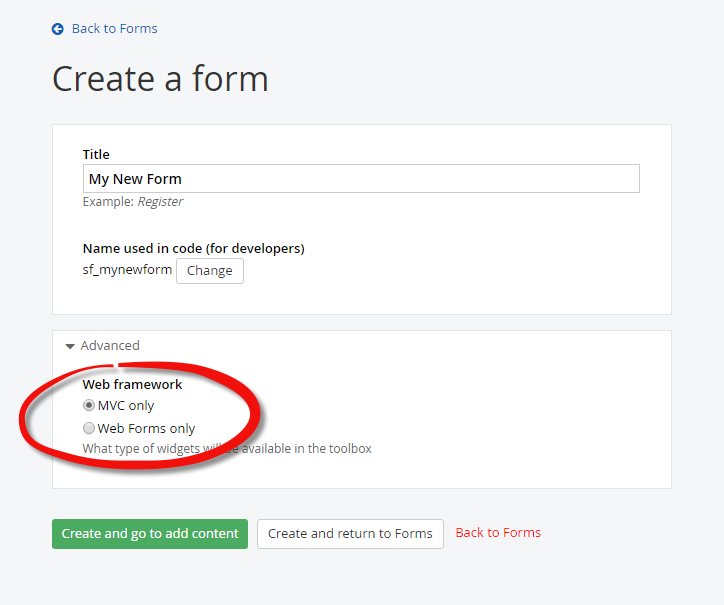
Step 2 – Define the Form Layout
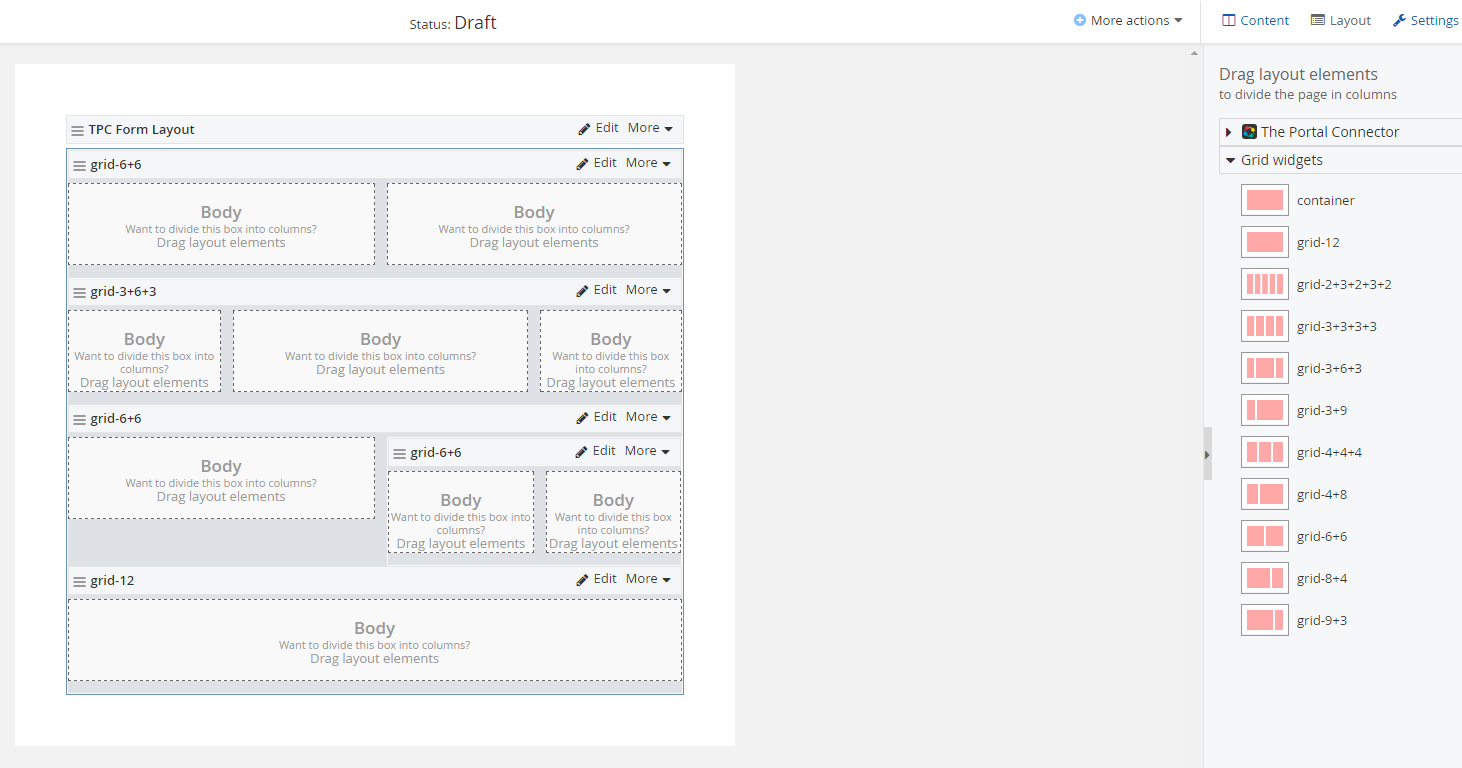
First, from the form designer, go in to the Layout tab > The Portal Connector > and drag and drop a TPC Form Layout. This TPC form layout defines the form area that Portal Connector Widgets interact with the CRM.
Please Note: You can create a Form that is not linked to Dynamics CRM and simply emails you the results of the submission, but if you want the Form to be linked with Dynamics CRM you need to define the specific area that will contain Dynamics CRM fields by adding the TPC Form Layout.

This is now the container in which you will place all Form Widgets you want linked to Dynamics CRM.
Now you can click the Grid widgets list to see all the options you have for creating a flexible Form design. Drag on a two, three, four or five column layout elements
INSIDE your TPC Form Layout element. Put as many layout elements you wish to create the form design you need.
Step 3 – Link the Form to an Entity
Once you have the layout defined, you can switch to the Content designer by clicking the Content Tab at the top right.
Click on The Portal Connector list on the lower right to reveal the CRM specific Form Widgets you can place on your Form.
One of the most important form widgets that you must place on every Dynamic CRM linked form, is the Form Configuration Widget. This widget will allow you to define the entity that this form will work with.

You can place this widget anywhere in your form within the TPC Form layout. The purpose of this widget is to tell The Portal Connector that every CRM Widget inside this TPC Layout Control is linked to a specific CRM Entity.
Click the Edit link on the Form Configuration Widget and select to which Entity you want this Form linked. Then click Save.
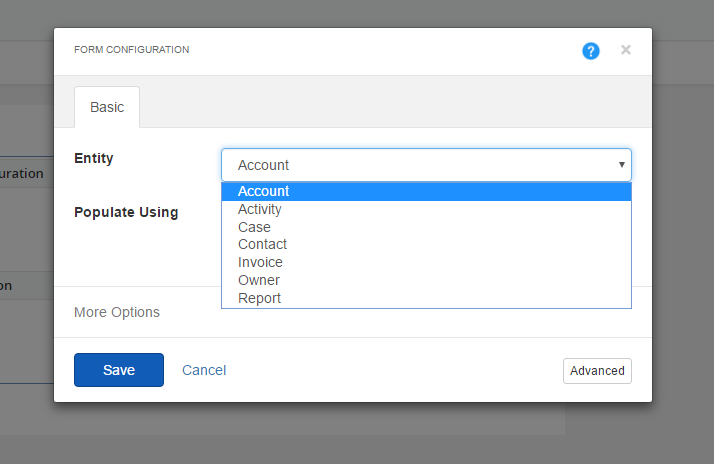
You can now drag the Submit Button Widget to any place on the form you wish.
A submit button will automatically be added when you place your first widget on the form if you haven't already added one. If you want to change the default Submit button text or size, click the Edit link on that Widget.
Please follow this link to the documentation for all the Portal Connector form widgets and their functionalities.
https://www.crmportalconnector.com/developer-network/documentation/portal-connector-widgets/tpc-form-widgets/mvc-based
Step 4 – Define the Form Settings
Now that you have defined the layout of your form and added the required fields, you can now control what will happen when a form is submitted.
Click the Settings button on the top right to display your options.
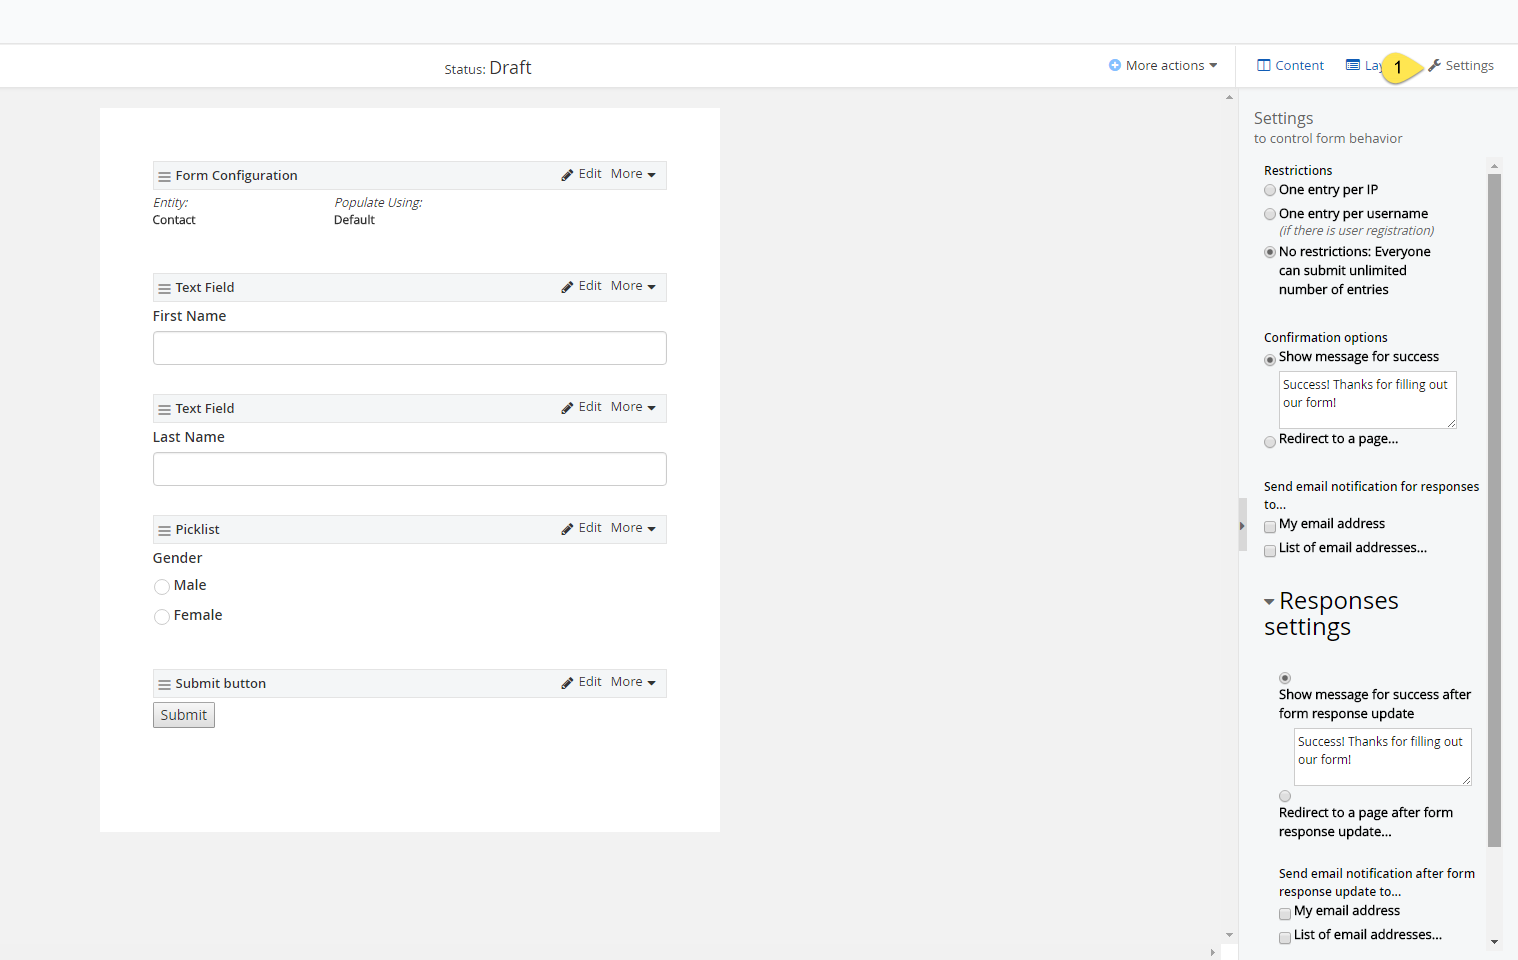
Specify your Restriction on the Form and control whether a user can fill the form our multiple times or only once.
You can also choose to have a Confirmation message displayed on successful submission of the form OR have the form redirect to another webpage.
When a form is submitted, a notification email can be sent to one or many email addresses with the form submission data. This notification email comes from Sitefinity and Portal Connector, not from Dynamics CRM.
Step 5 – Publish Your Form
Once you have built your form, you need to click the Publish button so it will be available to add to a page on your website.
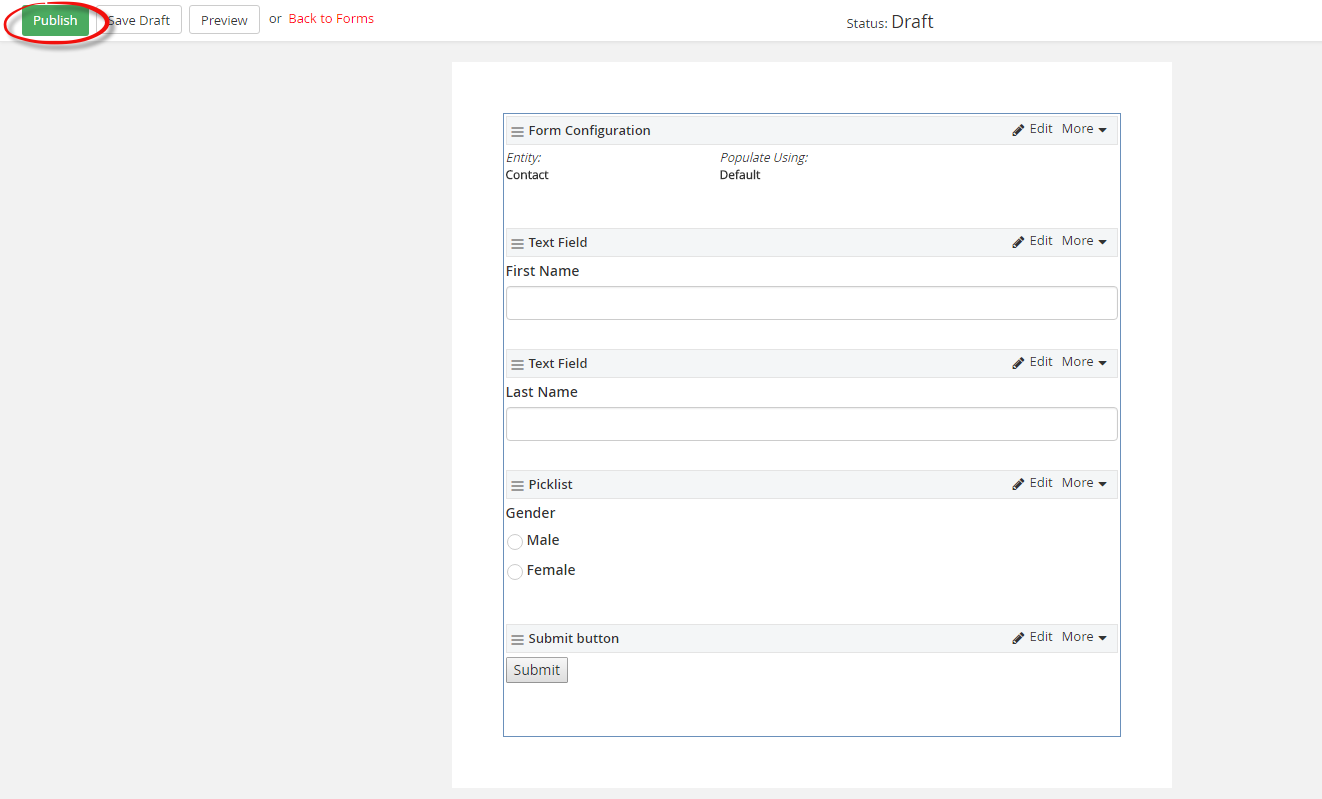
At any time during the development of your Form you can click the Save Draft button to save your work so far.
Adding a Form to a Page
To make a Form available in your Portal you need to add it to a Page. First you need to create a new page.
Once logged into the Administration area of Sitefinity go to Content > Pages
Step 1 – Create a New Page
Click the Create a page button at the top left.
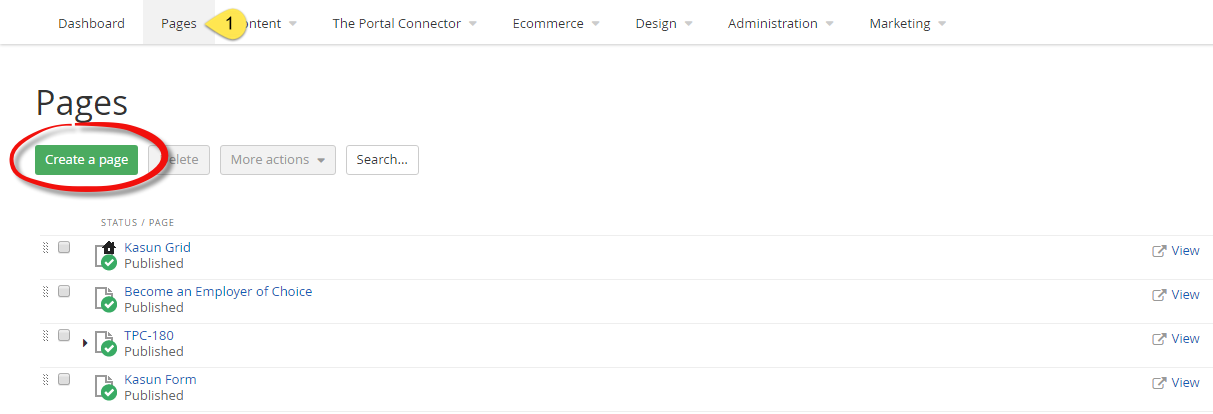
The Sitefinity CMS platform contains an extensive feature set for creating and controlling web pages. For this Quick Start Guide we will accept all the generic default options that don’t directly affect the adding of a Form to a page.
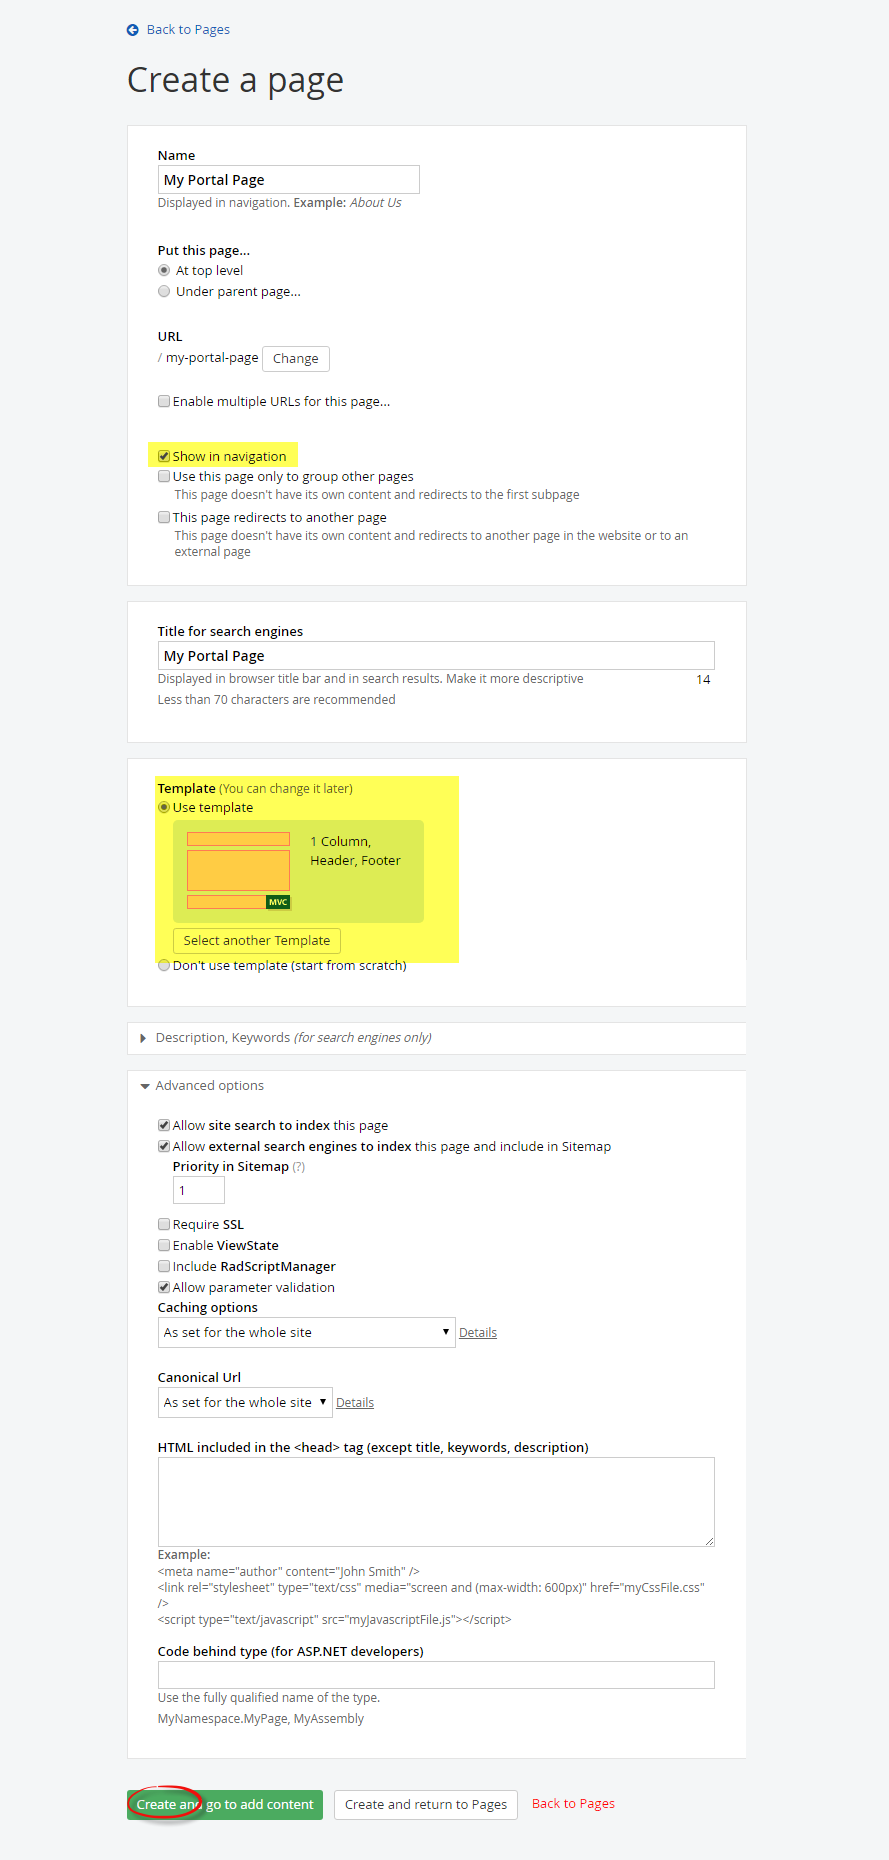
Give the new page a Name and decide whether you wish this page be made available in whatever navigation structure you have created for your Portal.
You can choose a specific template or start form a completely blank page. Also, keep in mind that all these setting can be changed and updated later.
When you are ready click Create, and go to add content.
Please Note: To enable filtering on grid widgets View state needs to be enable on the page. To enable View state, expand the Advanced Options section and select Enable View state.
Step 2 – Defining the Page Layout
-
Connecting Portal Connector to Dynamics
-
Connecting Dynamics to Portal Connector
-
Linking to Entities In Dynamics CRM
-
Creating a Form
-
Adding a Form to a Page
-
Adding a MVC Grid to a Page
-
Filtering a Grid by the Contact ID
-
Summary & Helpful Links
Step 3 – Adding the Form to a Page
Click the Content tab from the right-side menu, and you will notice many widgets available to build your page. These widgets are arranged in logical groupings by purpose.
Click on The Portal Connector Section to view the widgets and you will see a list of widgets that are available in page level. These are the specific widgets you can use that link directly with your Dynamic CRM instance.
To add a Form to a Page, drag the TPC Form Manager and onto the Page where you want the form to appear.
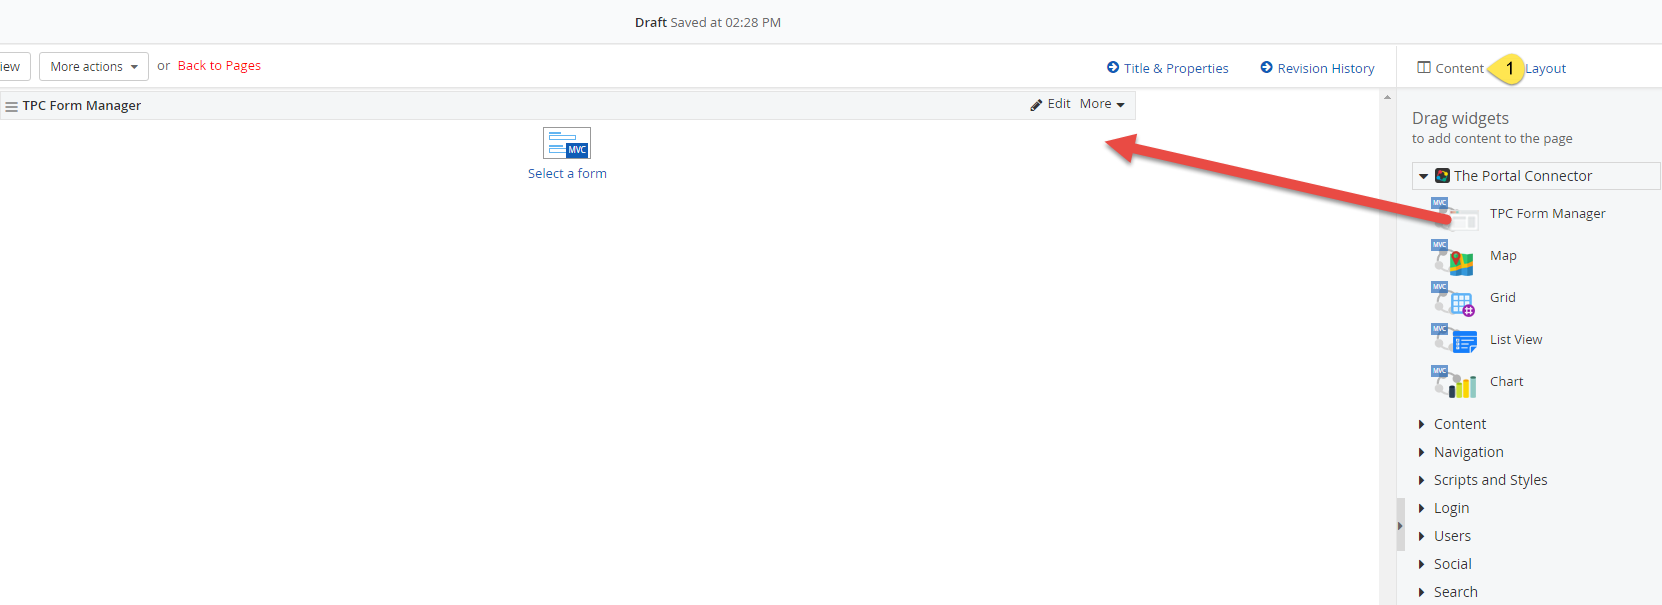
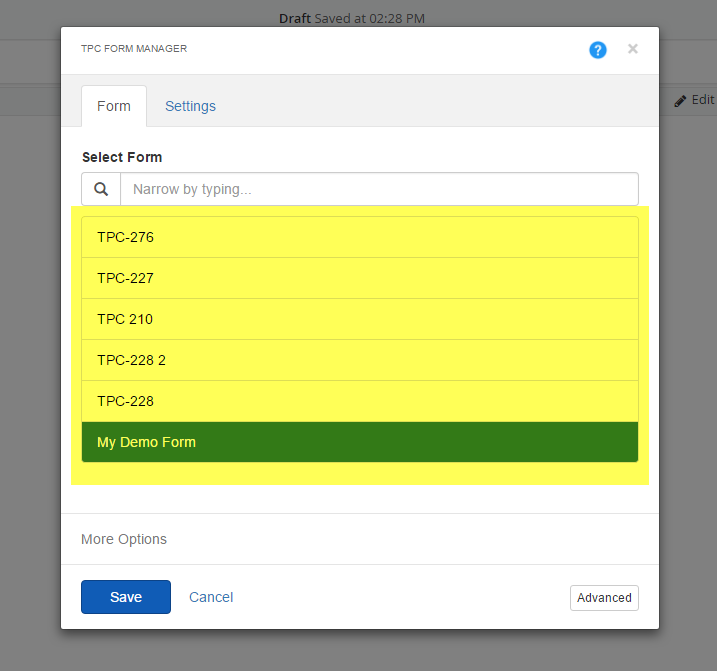
Click Select a form to define which from you wish to display. Displayed will be a list of all the Forms you have created already. Choose the desired form and click Save.
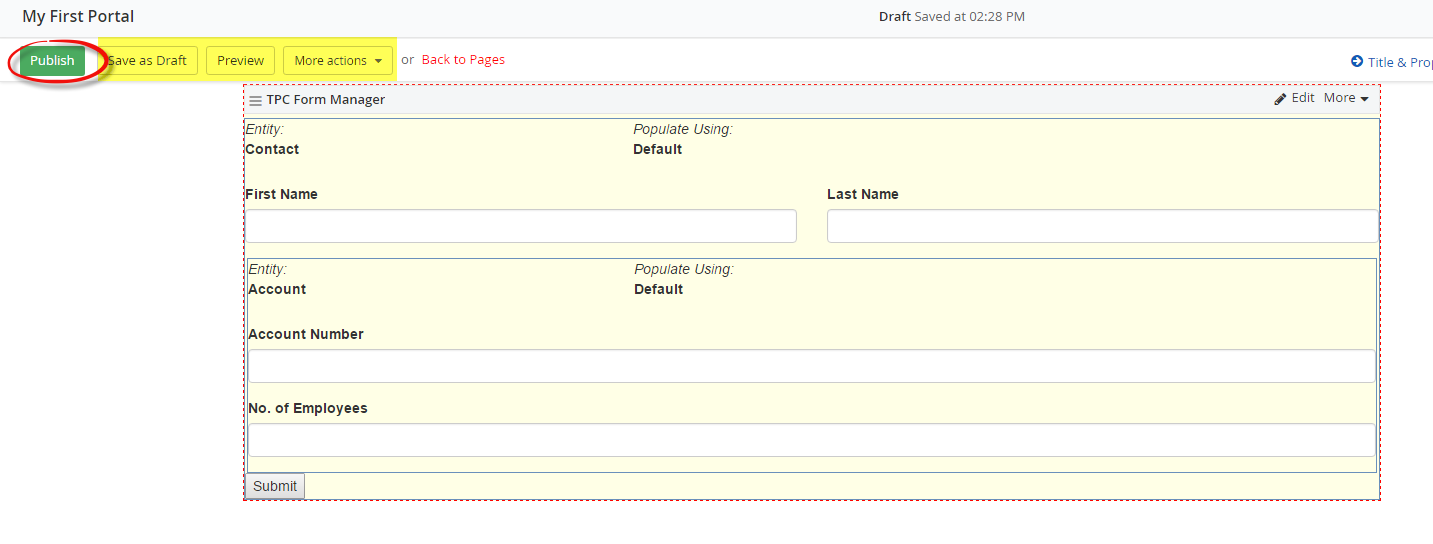
Continue to modify your page as you wish adding other content widgets such as images, or text. When you are ready, it is time to publish your Page.
Just like with a Form, a Page cannot be made available on your Portal until you Publish it. Click the Publish button at the top left or you can Save as Draft if you wish or even Preview how your Page will look before Publishing.
Adding a MVC Grid to a Page
Adding a grid of data to a Page follows similar steps to Adding a Form to a Page except you use a different widget.
By now you know what are the steps to create a new page. Therefore, create a new page and drag and drop a Grid widget from The Portal Connector section.

Click the Edit link on the Widget to define the settings.
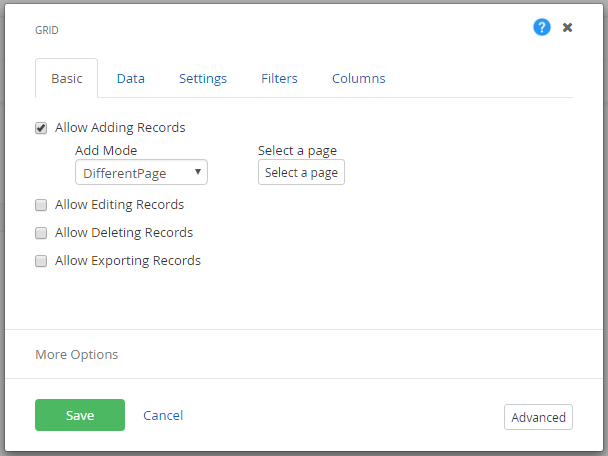
This widget allows you to define whether End Users can add, edit or delete data from your grid.
This grid binds directly to the data in Dynamics CRM. Any data modifications made using the widget will modify data in your Dynamics CRM system immediately.
Please follow the detail instructions on how to configure the grid widget.
http://www.crmportalconnector.com/developer-network/documentation/portal-connector-widgets/tpc-page-widgets/mvc-based/grid
Filtering a Grid by the Contact ID
Now that you have a grid of data on your Portal Page, you may wish to filter the data so End Users only see what is related to them.
For this example, we will use the MVC Grid widget and filter the data to show only the Dynamics CRM Cases that are related to the logged in Portal User who is a Contact in Dynamics CRM.
Navigate to the Page with the Grid widget you wish to filter. Click the Edit link on the MVC Grid widget. Click the Data tab at the top and select the Case Entity (used for this example).
Click Load Default Fetch to load a starting point FetchXML. Click Build to load the FetchXML builder. Click Add Filter to add a filter statement. In that statement set the Attribute to Customer, Operator to Equals and the Value to @ContactID@. Once set, click the Save & Close button in the bottom left corner.
Next, click the Filters tab at the top and set the Name to ContactID same as in the FetchXML. Set the Filter Type to ContactID. This refers to the Contact GUID that is associated with the logged in Portal User Record in Sitefinity.
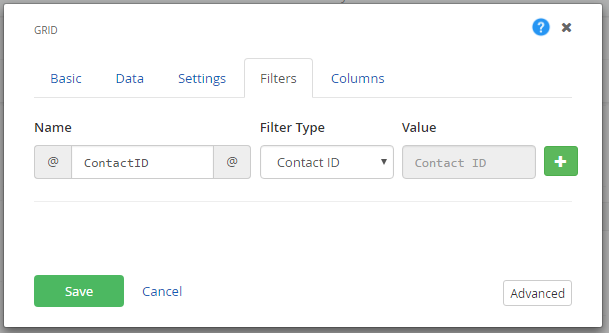
Click Save than Publish your Page. Now your data grid will be filtered to only show Cases that are related to the logged in User.