Configuring The Portal Connector Form Flow Widget
Getting Started
In order to configure a Form Flow in a single step, it is important to have your forms and pages created beforehand. You do not need to have them complete, you can always edit the page or form using a button in the Form Flow designer, but they should at least be created and (in the case of forms) be configured for the entity and how to load data.
This example will use 3 forms and a page that contains the 3 forms in read-only mode. This page is used to show the submitted data. This is configured by creating a new page and dragging 3 TPC Form Managers onto the page, selecting each of the 3 forms and checking the Read Only option on the Settings tab. The 3 forms contain the following info:
- Name and email address
- Address
- Marketing permissions
The 3 forms above contain just a few basic fields. We will not cover creating forms in this post, it is assumed that you are familiar with creating forms in The Portal Connector. If not, please refer to our documentation on creating forms.
Configuration
With the forms created, the next thing to do is to create a new page.
- From the Sitefinity backend, click the Pages menu item and once the page loads, click the new page button.
- Give the page a name and click Create and go to add content
- After the new page loads, find and drag the Form Flow widget onto the page, then click Edit to open the designer.
- Once the designer open, click the Define Flow button to open the Form Flow designer.
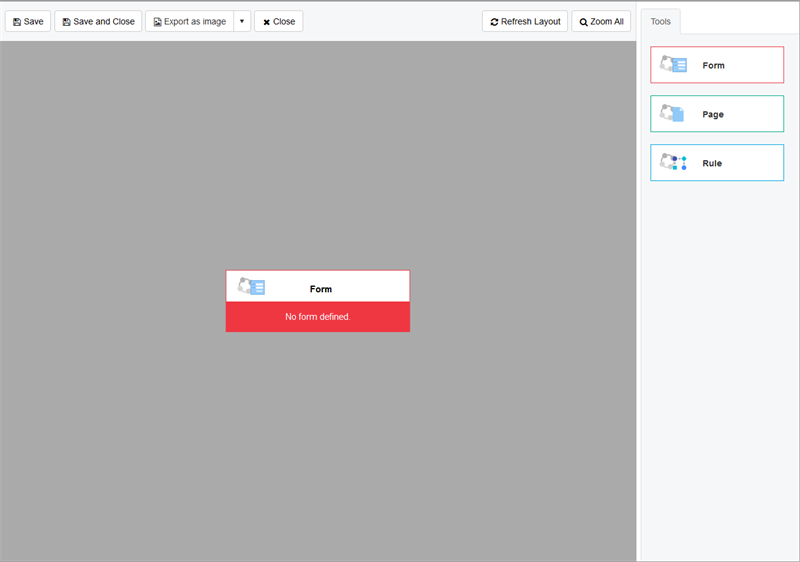
- When the Form Flow designer loads, you should be faced with the following interface:

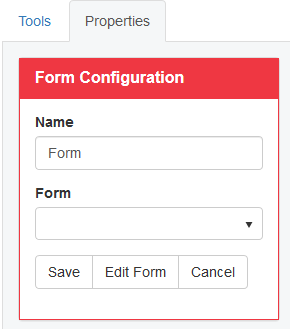
- To open the properties of a node (in this case a form node), simply click the node. In the sidebar, a new Properties tab appears with a Form Configuration panel giving you the ability to select a form and rename the node.

- Select the first form. Once you do, more option will appear relating to the passing of data to the next page. We will not cover these options here but work exactly like the Portal Connector Submit Button options. From here you can edit the form, causing it to open in a new tab or save.
- To create the next step in the flow, click and drag a Form node from the Tools tab of the sidebar and drop it on the existing form node. Doing so will connect the 2 nodes together with an arrow labeled Submit.
- Click the new node and as with the first node, select the form. This time, you will see an additional option in the Form Configuration panel, Show Previous Button. Check this option to enable the Back button on this form. This option was not present on the first node as it is the starting point and there is nothing before it. Click Save.
- Configure the third form the same way you did for the second in the previous step above.
- At this point, we have created the 3 steps in the Form Flow but we are still missing something. Attempting to save as it is will result in a validation message and select the first node it finds with a validation error:

this is because every form node must do something after a form is submitted. This is where the "Thank you page" comes in. - Drag a Page node from the Tools tab and drop it on the 3rd form node. it will attach and allow you to select it. Click it and in the Page Configuration panel select the page you created earlier. Click Save.
- With the 3 forms and 1 page configured in the Form Flow designer, you should see something like this:
 Click the Save and Close button at the top then click the Save button on the Form Flow Page widget, then finally, Click Publish to save the changes to the page.
 - When you are returned to the Pages page, find the page you put the Form Flow and click its View link to open the page and see the first form.
Filling in the first form and submitting it will create a new record and pass the id to the next step in the Form Flow. If this is another form, configured with the same entity, the form will load and when submitted, the fields on this form will be sent to CRM and update the record created on the first step. This works as an example but a more realistic configuration would be to configure the forms to load from the logged in users CRM Contact id. This would then be useful as a user profile wizard.
What about the Rule Node I see?
The Rule node allows you to create simple rules about the form submitted in the previous step. Multiple Rule nodes can be configured next to each other and Form Flow will look back as many steps as needed to find the previous form. Since the first node is always a form, it will always find one. Each rule will send the user down one of 2 paths depending on what was submitted in the form. The first node dragged onto a Rule node will be automatically attached to the True Path. The second one will be attached to the False path. These nodes can be swapped by clicking the Swap Nodes button in the Rule Configuration panel.