RECOMMENDATION: If you are using a version of The Portal Connector higher than 4.0, we strongly recommend utilizing the MVC based widgets and components to create your site. This documentation is for legacy purposes only and will soon be deprecated.
Widget Type:
Page Widgets
TPC Version:
  • 3.3 +
VideoLogos
The CRM Line Chart is a specialized widget that allows you to create a chart to display data. A line chart represents data by multiple plotted points with a line drawn connecting these points. The chart data is fetched by FetchXML via CRM Entities and has the option of choosing a presaved configurations for the chart. Additionally, the option to create a custom chart exists. 

Configuration

Basic Setup


  1. From the Portal Connector (Charts) widget list, click and drag the CRM Line Chart into the body of the page.

  2. In order for the widget to function properly, there are an array of options that must be configured. click on the edit button to display the properties prompt. It should look like this: 

    CRM Line Chart Basic Properties

Data

Next, navigate to the Data tab. It should look like this: 

CRM Line Chart Data Properties

Filters 

Next, navigate to the Filters tab. It should look like this: 

CRM Line Chart Filter Properties

Appearance 

Next, navigate to the Appearance tab. It should look like this: 
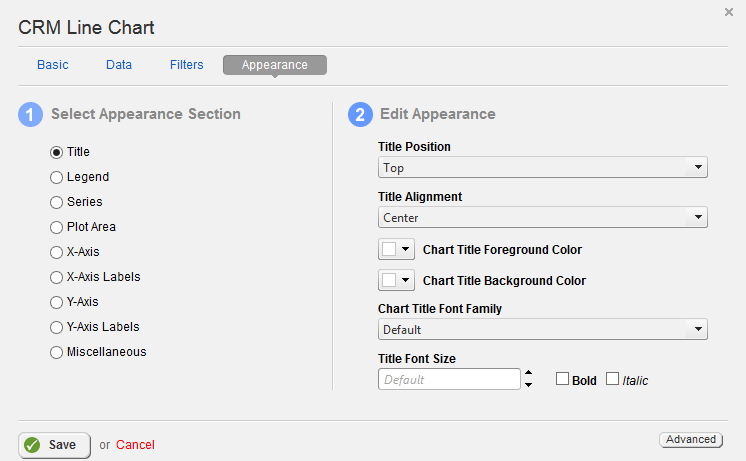
CRM Line Chart Appearance Properties

The Appearance tab offers a myriad of options to customize your chart exactly as you would like it. The CRM Line Chart has unique options for both Series and Miscellaneous.

When you are finished configuring the widget, click on the save button to save it.

Widget Properties

Basic Properties

Axis Y Label Padding

The Axis Y Label Padding advanced property accepts from one to four integers to determine the amount of padding that the Y Axis labels will have. For example: Setting the padding to '15' will set all sides to 15px. Setting the padding to '15 30' will set the top and bottom to 15px and 30px respectively. Setting the padding to '15 30 45' will set the top to 15px, right and left to 30px, and the bottom to 45px. Setting the padding to '15 30 45 60' will set the top padding to 15px, the right to 30px, the bottom to 45px, and the left to 60px.

Axis X Label Padding

The Axis X Label Padding advanced property accepts from one to four integers to determine the amount of padding that the X Axis labels will have. For example: Setting the padding to '15' will set all sides to 15px. Setting the padding to '15 30' will set the top and bottom to 15px and 30px respectively. Setting the padding to '15 30 45' will set the top to 15px, right and left to 30px, and the bottom to 45px. Setting the padding to '15 30 45 60' will set the top padding to 15px, the right to 30px, the bottom to 45px, and the left to 60px.

Base Color Change Amount

The Base Color Change Amount advanced property will determine the percentage (By decimal) that a Base Color will lighten or darken.

Base Color Lighten

The Base Color Lighten advanced property determines if the base color will become lighter or darker. By default this is set to false which causes the series data to become darker.

Base Color

The Base Color advanced property accepts a color in Hexadecimal (#FFFFFF) notation and will alter all series color.

Axis X Label Rotation

The Axis X Label Rotation advanced properly allows you to rotate the X axis labels. The default is zero and the number is in degrees (°).

Axis Y Title Margin

The Axis Y Title Margin advanced property accepts from one to four integers to determine the amount of margins that the Y Axis title will have. For example: Setting the margins to '15' will set all sides to 15px. Setting the margins to '15 30' will set the top and bottom to 15px and 30px respectively. Setting the margins to '15 30 45' will set the top to 15px, right and left to 30px, and the bottom to 45px. Setting the margins to '15 30 45 60' will set the top margins to 15px, the right to 30px, the bottom to 45px, and the left to 60px.

Axis X Title Margin

The Axis X Title Margin advanced property accepts from one to four integers to determine the amount of margins that the X Axis title will have. For example: Setting the margins to '15' will set all sides to 15px. Setting the margins to '15 30' will set the top and bottom to 15px and 30px respectively. Setting the margins to '15 30 45' will set the top to 15px, right and left to 30px, and the bottom to 45px. Setting the margins to '15 30 45 60' will set the top margins to 15px, the right to 30px, the bottom to 45px, and the left to 60px.

Axis Y Label Margin

The Axis Y Label Margin advanced property accepts from one to four integers to determine the amount of margins that the Y Axis labels will have. For example: Setting the margins to '15' will set all sides to 15px. Setting the margins to '15 30' will set the top and bottom to 15px and 30px respectively. Setting the margins to '15 30 45' will set the top to 15px, right and left to 30px, and the bottom to 45px. Setting the margins to '15 30 45 60' will set the top margins to 15px, the right to 30px, the bottom to 45px, and the left to 60px.

Axis X Label Margin

The Axis X Label margins advanced property accepts from one to four integers to determine the amount of margin that the X Axis labels will have. For example: Setting the margin to '15' will set all sides to 15px. Setting the margins to '15 30' will set the top and bottom to 15px and 30px respectively. Setting the margins to '15 30 45' will set the top to 15px, right and left to 30px, and the bottom to 45px. Setting the margins to '15 30 45 60' will set the top margins to 15px, the right to 30px, the bottom to 45px, and the left to 60px.

Null Replacement String

The Null Replacement String advanced property will allow you to replace any null values in a chart with a specified replacement text.

FetchXML

The FetchXML text area determines what sort of data a widget will be populated with. Clicking the Load Default Fetch option will populate the FetchXML area with a default fetch based on the CRM Entity chosen.  By clicking the Build button, we will be sent to another page in order to determine what the widget will look up. For more information on how to use the FetchXML function, please see the FetchXML Builder How-To.

Saved Visualization

The Saved Visualization drop drop list will allow you to choose from a list of preconfigured chart views based on the default CRM Entities. Please note that if a custom FetchXML fetch is provided for the widget, the Saved Visualization drop down should be set to the upper-most, blank field or else the chart will conflict with the custom FetchXML

Horizontal (Category) Axis Label #2

The Horizontal (Category) Axis Label #2 drop down list will further group the fetched records. It is normally not required. For example, a chart has been configured to count the amount of songs per artist. Normally, the Horizontal (Category) Axis Label #1 would be set to Artists while the Vertical Axis Data Field (Series) would be set to Songs. The Horizontal (Category) Axis Label #2 column can be used to add additional organization to the chart by including genres. The chart would then organize each artist into a genre with the count of songs of that genre appearing.

Horizontal (Category) Axis Label #1

The Horizontal (Category) Axis Label #1 drop down list will choose what fetched fields will appear on the X axis of the chart. This drop down list will be automatically populated by the fetched fields from the FetchXML. Please note that if an alias has been set for the fetched field, the drop down list will retrieve that alias instead.

Vertical Axis Data Field (Series)

The Vertical Axis Data Field (Series) drop down list is used to bind data to the Y Axis of the chart. The drop down list is automatically populated via the FetchXML.

Select a Template

The Select a Template drop down list will allow you to select a template for your product to use with the option of creating a new template. If a template is selected, you will be given the additional option of editing the selected template.

Axis-Y Title

The Axis-Y Title text box will determine the name of the Y axis upon the chart.

Axis-X Title

The Axis-X Title text box will determine the name of the X axis upon the chart.

Chart Title

The Chart Title text box will determine the name of the chart. This will appear on the actual chart.

Advanced Properties

Advanced properties provide additional functionality. They can be accessed by clicking on the "Advanced" Button in the bottom right corner of the widget designer.

Axis Y Label Padding

The Axis Y Label Padding advanced property accepts from one to four integers to determine the amount of padding that the Y Axis labels will have. For example: Setting the padding to '15' will set all sides to 15px. Setting the padding to '15 30' will set the top and bottom to 15px and 30px respectively. Setting the padding to '15 30 45' will set the top to 15px, right and left to 30px, and the bottom to 45px. Setting the padding to '15 30 45 60' will set the top padding to 15px, the right to 30px, the bottom to 45px, and the left to 60px.

Axis X Label Padding

The Axis X Label Padding advanced property accepts from one to four integers to determine the amount of padding that the X Axis labels will have. For example: Setting the padding to '15' will set all sides to 15px. Setting the padding to '15 30' will set the top and bottom to 15px and 30px respectively. Setting the padding to '15 30 45' will set the top to 15px, right and left to 30px, and the bottom to 45px. Setting the padding to '15 30 45 60' will set the top padding to 15px, the right to 30px, the bottom to 45px, and the left to 60px.

Base Color Change Amount

The Base Color Change Amount advanced property will determine the percentage (By decimal) that a Base Color will lighten or darken.

Base Color Lighten

The Base Color Lighten advanced property determines if the base color will become lighter or darker. By default this is set to false which causes the series data to become darker.

Base Color

The Base Color advanced property accepts a color in Hexadecimal (#FFFFFF) notation and will alter all series color.

Axis X Label Rotation

The Axis X Label Rotation advanced properly allows you to rotate the X axis labels. The default is zero and the number is in degrees (°).

Axis Y Title Margin

The Axis Y Title Margin advanced property accepts from one to four integers to determine the amount of margins that the Y Axis title will have. For example: Setting the margins to '15' will set all sides to 15px. Setting the margins to '15 30' will set the top and bottom to 15px and 30px respectively. Setting the margins to '15 30 45' will set the top to 15px, right and left to 30px, and the bottom to 45px. Setting the margins to '15 30 45 60' will set the top margins to 15px, the right to 30px, the bottom to 45px, and the left to 60px.

Axis X Title Margin

The Axis X Title Margin advanced property accepts from one to four integers to determine the amount of margins that the X Axis title will have. For example: Setting the margins to '15' will set all sides to 15px. Setting the margins to '15 30' will set the top and bottom to 15px and 30px respectively. Setting the margins to '15 30 45' will set the top to 15px, right and left to 30px, and the bottom to 45px. Setting the margins to '15 30 45 60' will set the top margins to 15px, the right to 30px, the bottom to 45px, and the left to 60px.

Axis Y Label Margin

The Axis Y Label Margin advanced property accepts from one to four integers to determine the amount of margins that the Y Axis labels will have. For example: Setting the margins to '15' will set all sides to 15px. Setting the margins to '15 30' will set the top and bottom to 15px and 30px respectively. Setting the margins to '15 30 45' will set the top to 15px, right and left to 30px, and the bottom to 45px. Setting the margins to '15 30 45 60' will set the top margins to 15px, the right to 30px, the bottom to 45px, and the left to 60px.

Axis X Label Margin

The Axis X Label margins advanced property accepts from one to four integers to determine the amount of margin that the X Axis labels will have. For example: Setting the margin to '15' will set all sides to 15px. Setting the margins to '15 30' will set the top and bottom to 15px and 30px respectively. Setting the margins to '15 30 45' will set the top to 15px, right and left to 30px, and the bottom to 45px. Setting the margins to '15 30 45 60' will set the top margins to 15px, the right to 30px, the bottom to 45px, and the left to 60px.

Null Replacement String

The Null Replacement String advanced property will allow you to replace any null values in a chart with a specified replacement text.

FetchXML

The FetchXML text area determines what sort of data a widget will be populated with. Clicking the Load Default Fetch option will populate the FetchXML area with a default fetch based on the CRM Entity chosen.  By clicking the Build button, we will be sent to another page in order to determine what the widget will look up. For more information on how to use the FetchXML function, please see the FetchXML Builder How-To.

Saved Visualization

The Saved Visualization drop drop list will allow you to choose from a list of preconfigured chart views based on the default CRM Entities. Please note that if a custom FetchXML fetch is provided for the widget, the Saved Visualization drop down should be set to the upper-most, blank field or else the chart will conflict with the custom FetchXML

Horizontal (Category) Axis Label #2

The Horizontal (Category) Axis Label #2 drop down list will further group the fetched records. It is normally not required. For example, a chart has been configured to count the amount of songs per artist. Normally, the Horizontal (Category) Axis Label #1 would be set to Artists while the Vertical Axis Data Field (Series) would be set to Songs. The Horizontal (Category) Axis Label #2 column can be used to add additional organization to the chart by including genres. The chart would then organize each artist into a genre with the count of songs of that genre appearing.

Horizontal (Category) Axis Label #1

The Horizontal (Category) Axis Label #1 drop down list will choose what fetched fields will appear on the X axis of the chart. This drop down list will be automatically populated by the fetched fields from the FetchXML. Please note that if an alias has been set for the fetched field, the drop down list will retrieve that alias instead.

Vertical Axis Data Field (Series)

The Vertical Axis Data Field (Series) drop down list is used to bind data to the Y Axis of the chart. The drop down list is automatically populated via the FetchXML.

Select a Template

The Select a Template drop down list will allow you to select a template for your product to use with the option of creating a new template. If a template is selected, you will be given the additional option of editing the selected template.

Axis-Y Title

The Axis-Y Title text box will determine the name of the Y axis upon the chart.

Axis-X Title

The Axis-X Title text box will determine the name of the X axis upon the chart.

Chart Title

The Chart Title text box will determine the name of the chart. This will appear on the actual chart.