Installation
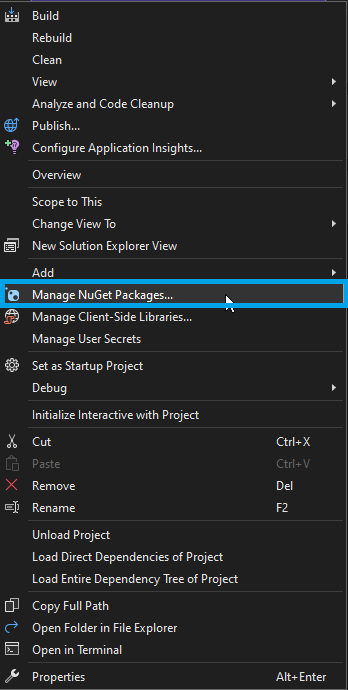
- In the Solution Explorer in Visual Studio on the right-hand side, right-click References and then click
Manage NuGet Packages…

- In the NuGet Package Manager select the package source Sitefinity .

- Upgrade via NuGet to at least the lowest supported to Sitefinity version for 6.2, which is 14.0.7700.
Although we strongly recommend that you upgrade to the latest supported Sitefinity version, which is
15.0.82** (select the latest minor version). Once download is complete, you will get a prompt to Reload
the project, which you should do.

- Drop and replace your old Sitefinity license with new Sitefinity license in directory
App_Data/Sitefinity.
- If you have any build events that point to a directory containing old TPC assemblies (i.e., those dlls
that begin with the name “pavliks”), please remove them by going to Properties of the main
Web App project and selecting Build Events.
- If you did not use build events and directly dropped your TPC assemblies to the bin, then there is no
need to delete them nor do you have to remove the pavliks references as NuGet will take care of updating
this.
- Now we are ready to install the Portal Connector. Change the package source to Portal
Connector.

- Find the PortalConnector.All 6.2 package that matches with your current Sitefinity
version and click the Install/Update button. If you are developing against a class
library rather than a Sitefinity site, you can install the PortalConnector.Core
package.

- The Portal Connector package versions follow a standard convention. We can look at the following example
to understand that convention.
Example: PortalConnector.All - 6.2.150.109
6.2 – This indicates that the package is for The Portal Connector version 6.2.
150 – This indicates that the package is for Sitefinity 15.0 (Any patch version).
109 – This indicates that the package is Revision 109.
10. In order to utilize the latest Razor templating features, The Portal Connector utilizes the package
Microsoft.CodeDom.Providers.DotNetCompilerPlatform. This package should modify the web.config when it is
installed with the product, although in some cases the web.config will not be modified. Verify that the
following code has been added within the configuration element of the web.config, or add it manually.
<system.codedom>
<compilers>
<compiler language="c#;cs;csharp" extension=".cs" type="Microsoft.CodeDom.Providers.DotNetCompilerPlatform.CSharpCodeProvider, Microsoft.CodeDom.Providers.DotNetCompilerPlatform, Version=3.6.0.0, Culture=neutral, PublicKeyToken=31bf3856ad364e35" warningLevel="4" compilerOptions="/langversion:default /nowarn:1659;1699;1701" />
<compiler language="vb;vbs;visualbasic;vbscript" extension=".vb" type="Microsoft.CodeDom.Providers.DotNetCompilerPlatform.VBCodeProvider, Microsoft.CodeDom.Providers.DotNetCompilerPlatform, Version=3.6.0.0, Culture=neutral, PublicKeyToken=31bf3856ad364e35" warningLevel="4" compilerOptions="/langversion:default /nowarn:41008 /define:_MYTYPE=\"Web\" /optionInfer+" />
</compilers>
</system.codedom>
11. Once the package has been installed to your Sitefinity project, Rebuild your solution in
Visual Studio. The project should be ready to run!
Licensing
This section will show you how to apply your new license to your upgraded Portal Connector installation. For
more information on licensing please contact sales at info@crmportalconnector.com
You can read The Portal Connector End-User License Agreement here: https://www.crmportalconnector.com/license/eula.pdf
- Navigate to the license keys page on The Portal Connector web portal found here.
- Select View Keys next to the portal where you wish to install the license.
- On the next page, click View on the appropriate TPC version for your installation.
- Copy the contents of the License Key in the text box to your clipboard.
- Log in to the Sitefinity backend of your portal.
- Under the Administration > The Portal Connector, select Licensing.

- Select Show License, then paste the license key from your clipboard into to the license text area.
- Click Update License.

- If the correct license was copied, the Portal Connector will be licensed with a valid license
Updating Dynamics CRM Solution
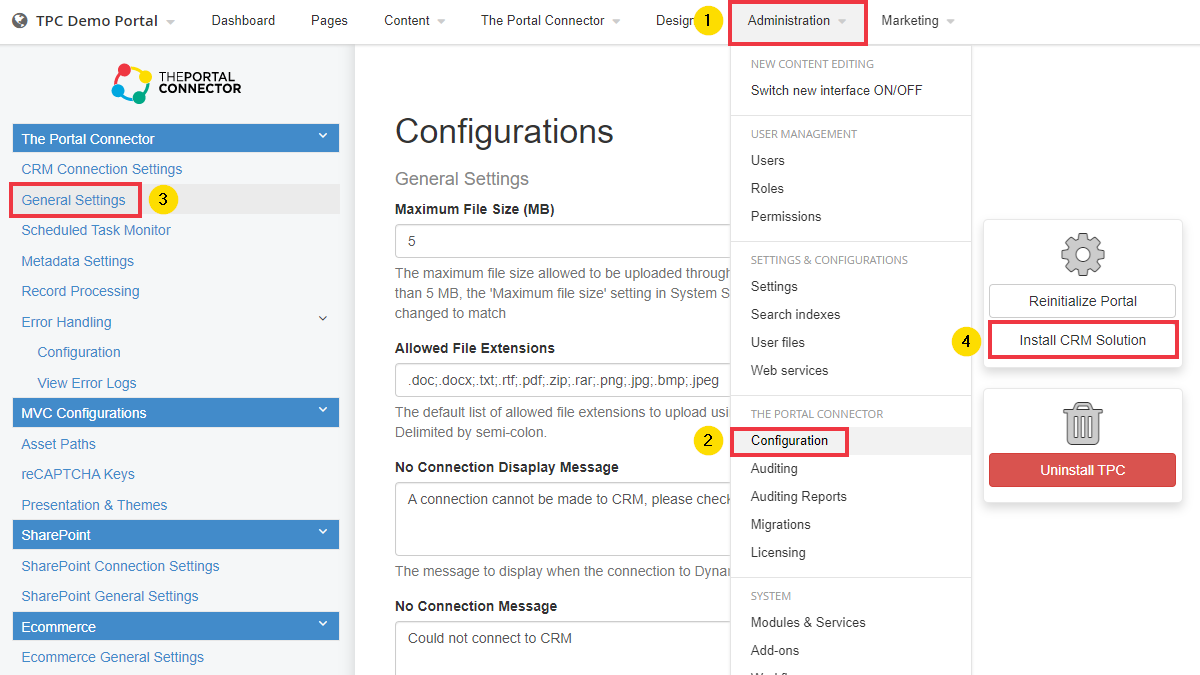
To update the TPC Dynamics solution, log into your Portal Dashboard and navigate
to Administration > The Portal Connector > Configuration > General
Settings, then click on Install CRM Solution.
