Grids Can Get Creative, Can you?
Swap out the The Portal Connector Form with a List View for creative results on Grids
One of the most common ways portal users interact with CRM data is through lists of records presented in grids or list views. Users can be provided with the ability to Add, Edit or View these records as a matter of configuration on the widget. By default, Grid widgets and List View widgets utilize a Portal Connector Form configured to expose the desired attributes of that record to the user, which has been published on a page to be used for one or more of Adding, Editing or Viewing records. Typically, Forms are an ideal way to present the desired contents of a CRM record efficiently and cleanly in a style reminiscent of CRM. While we’ve made this is very quick and easy to build out and configure out of the box, there are some limitations with Forms when it comes to visual presentation.
There are instances where we may want to present a CRM record in a particularly creative read-only format. Examples could include things like generating a Proof of Enrollment form letter for a student, that includes identifiers, relevant dates, and program information from CRM that can be saved or printed as a PDF. Similarly, you may need to present information in a standardized format, as in the case of tax documents. Maybe you just want to show off your style skills… The Portal Connector offers limitless possibilities with List View widget.
The List View widget is most often configured to present lists of records from CRM, but it can easily be configured to display a single, read-only record. The functionality will be very much like a read-only form used to view the details of a record, expect complete freedom to style the presentation using HTML, CSS and the The Portal Connector Template Editor.
Configuration
- Configure the Grid or List View widget that will display your initial list of records.
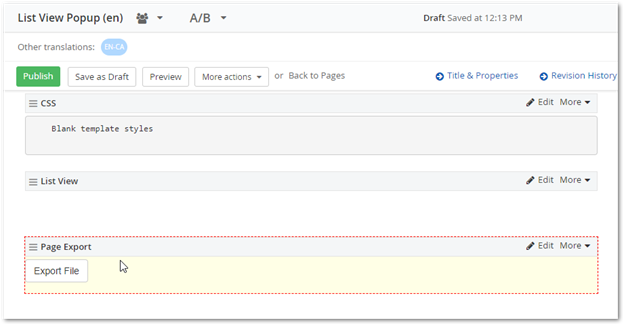
- Create a child page to use as the Edit/View record page on your Grid. I’ve chosen to use a blank style template for the page because I will be presenting it as a popup. We’ll style the page contents later with the List View template. I have also included our Export to PDF widget so that the results can be saved as a PDF.

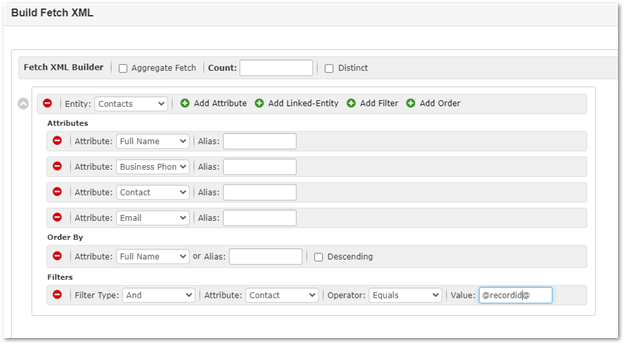
- Add the List View widget and configure it to the same entity as your original Grid. Use the FetchXML Builder to include any additional attributes that you would like to include.
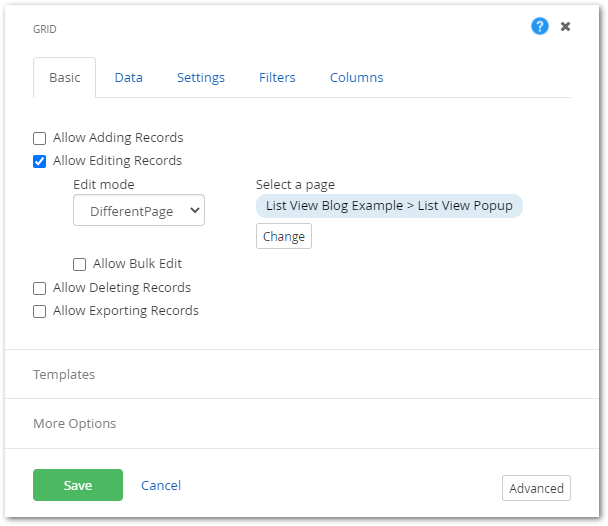
- Edit the Grid and check “Allow Editing Records”. Then set the page just created with our List View.

- Test the link out from the Grid and look for the querystring used to identify the record we are linking to. For example, in the link "https://exampleportal.com/list-view-blog-example/list-view-popup?url=%2Flist-view-blog-example&contactid=7a419c68-e8a7-b4f1-1980-4d9c4635bf4a" the final section "contactid=7a419c68-e8a7-b4f1-1980-4d9c4635bf4a" contains the querystring identifier we'll use to configure the dynamic filter.
- Edit the List View once more and navigate to the Data tab, open the FetchXML Builder, and select Add Filter. Select the attribute that corresponds with querystring identifier and create a name for the variable, then Save and Close.

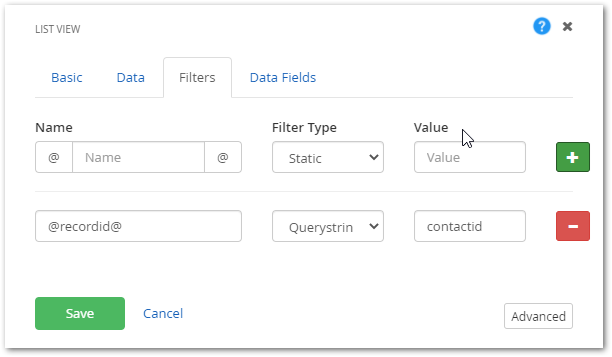
- On the Filter tab, enter your variable name, then set the Filter Type to Querystring and enter the querystring identifier from Step 5. Click the plus sign to add the filter, then save.

- All that’s left is to style your List View Template. Check out these great resources on styling List Views to get started.
How to Create Different Templates using the List View Widget
https://www.crmportalconnector.com/blog/post/2019/01/10/how-to-create-different-templates-using-the-list-view-widget
Thanks for reading.