In this blog post, we will be looking at creating custom filters that can be applied to the DataSource of various TPC Widgets such as: TPC Grid, TPC ListView, and TPC LookUp. This article can be applied to any of the TPC widgets that utilize a DataSource object.
Often when we display data, there are cases when we would like to limit the amount or type of data that specific users have access to. This could be for a variety of reasons including security or ease of use. If we are filtering data for security purposes, we must filter the data on the server side. This can be accomplished through the TPC FetchXML builder. Once data has been filtered on the server-side, there is no way we can access it on the client-side. Although, sometimes we would like to apply filters to the data temporarily, or on subsets of the original data based on user input or conditions. This is where
Kendo Filters come into play. Kendo filters can be utilized to apply or remove a client-side filter from the DataSource with ease via JavaScript.
The simplest filter requirement that we typically see is the addition of a textbox that can be used to filter a TPC Grid or TPC ListView by a search term. This type of filtering has been covered in a blog post by Adam Benoit, which can be found
here. I would highly recommend reading this article to acquire a basic understanding of how filters can be applied to a TPC ListView or TPC Grid. In this blog post we will be covering some more advanced filter requirements.
Dropdown Filters
The next type of filter we will be looking at is the ability to filter a grid based on a dropdown menu selection. Usually this type of selection is used when we want to provide a user with different views. In this example we will be filtering accounts based on a custom field called Genre. Below is a snippet of the HTML and JavaScript required to make a simple dropdown which filters a Grid based on Genre.
<div class="row">
    <div class="col-sm-3 col-sm-offset-9">
        <div class="form-group">
            <div class="row">
                <div class="col-xs-12">
                    <input class="form-control" id='view-selector'/>
                </div>
            </div>
        </div>
    </div>
</div>
$(document).ready(function() {

    //Get Account Grid
    var grid = tpc.page.TpcGridModel.get_grid();

    //Create Dropdown Selections
    var viewSelectionData = [
        {text: "Punk", value:"Punk"},
        {text: "Funk", value:"Funk"},
        {text: "Latin", value:"Latin"},
        {text: "Disco", value:"Disco"}
    ];

    //Initialize Dropdown Menu
    $("#view-selector").kendoDropDownList({
        dataTextField: "text",
        dataValueField: "value",
        dataSource: viewSelectionData,
        height: 100,
        select: selectView
    })
    .closest(".k-widget")
    .attr("id", "view-selector_wrapper");

    var viewSelectionDropdownList = $("#view-selector").data("kendoDropDownList");

    //Select View Function
    function selectView(e) {

        //Get DataSource
        var dataSource = grid.dataSource;

        //Apply Filter
        if (e.dataItem) {
            dataSource.filter({
                logic: "and",
                filters: [
                    {field: "event_genre", operator: "eq", value: e.dataItem.value}
                ]
            });
        }
    };
});
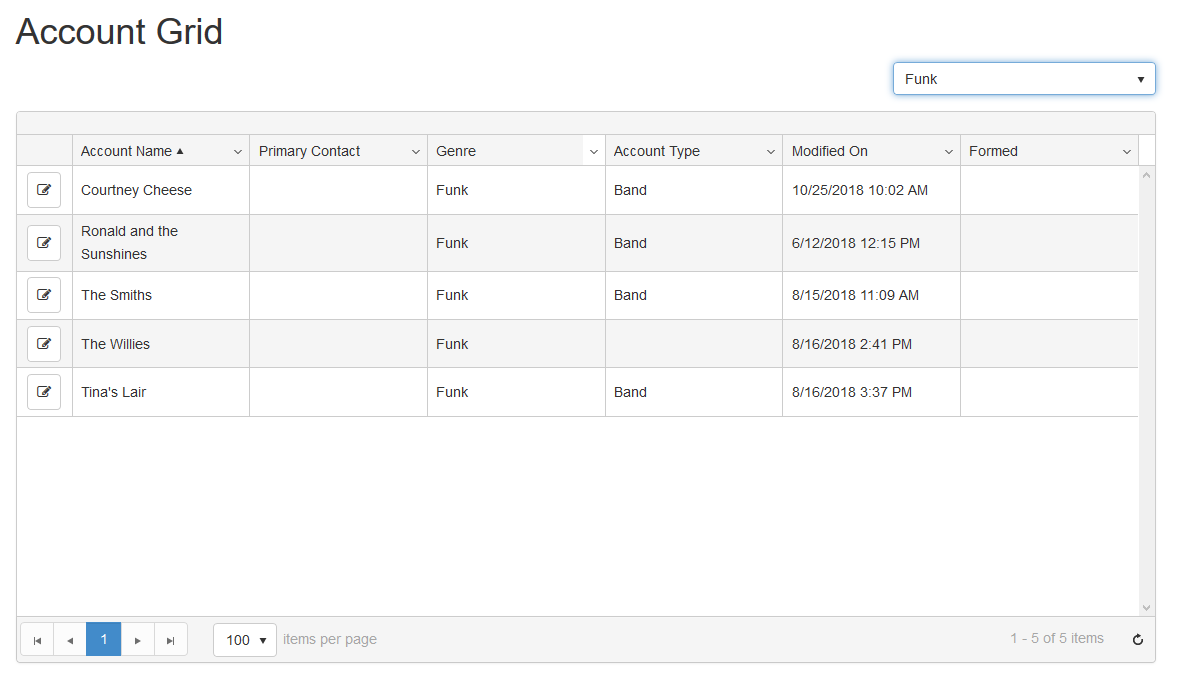
Awesome! So now we have a dropdown filter that can be used to filter the Accounts based on Genre! Although, you may have noticed one small issue. When the grid initially loads, it will not be filtered based on the selected dropdown menu item. This is a common requirement, where the grid is to be filtered based on certain criteria when the data first loads. Below is a snippet which can be used to filter a grid one time, upon the fire of the
Databound event which is when data is bound to the Datasource.
//Get DataSource
var dataSource = grid.dataSource;

//Filter Based on Selected Item
grid.one("dataBound", dataSource.filter({
    logic: "and",
        filters: [
            {field: "event_genre", operator: "eq", value: viewSelectionDropdownList.value()}
        ]
    })
);
TPC Form Filters
When it comes to complicated filter requirements, often we are dealing with a variety of different filters, and a variety of different data types. For filtering requirements like these, one extremely efficient approach is to use a TPC Form as the means of filtering the Grid or ListView. The reason this approach is so effective, is because the TPC JavaScript API allows us to easily get the value of these difficult to handle fields such as Picklists, Lookups, and Status fields.
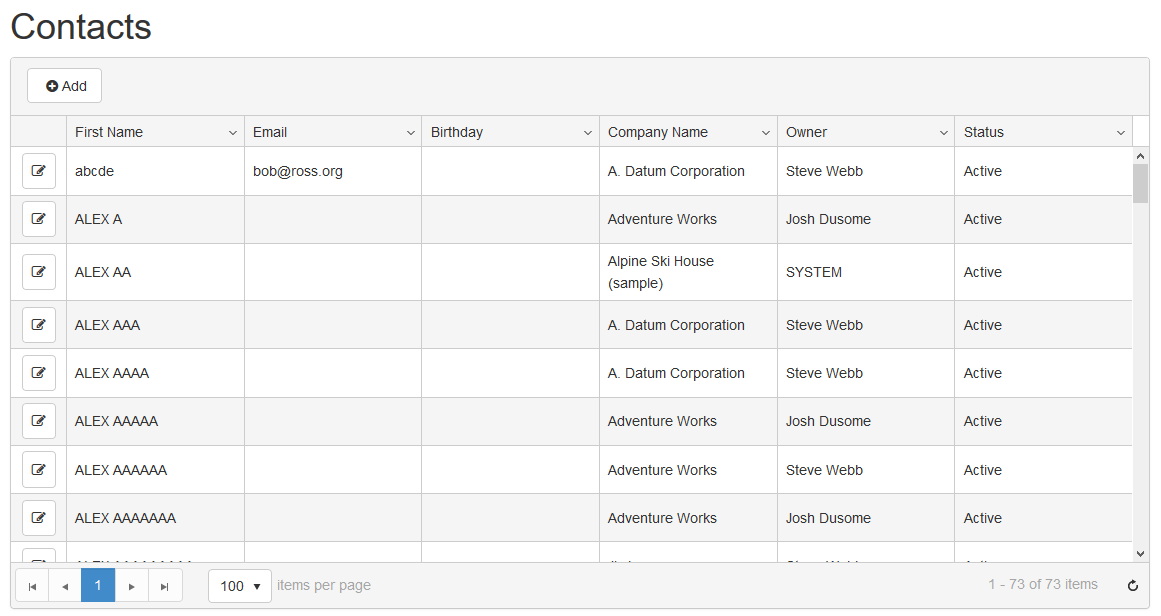
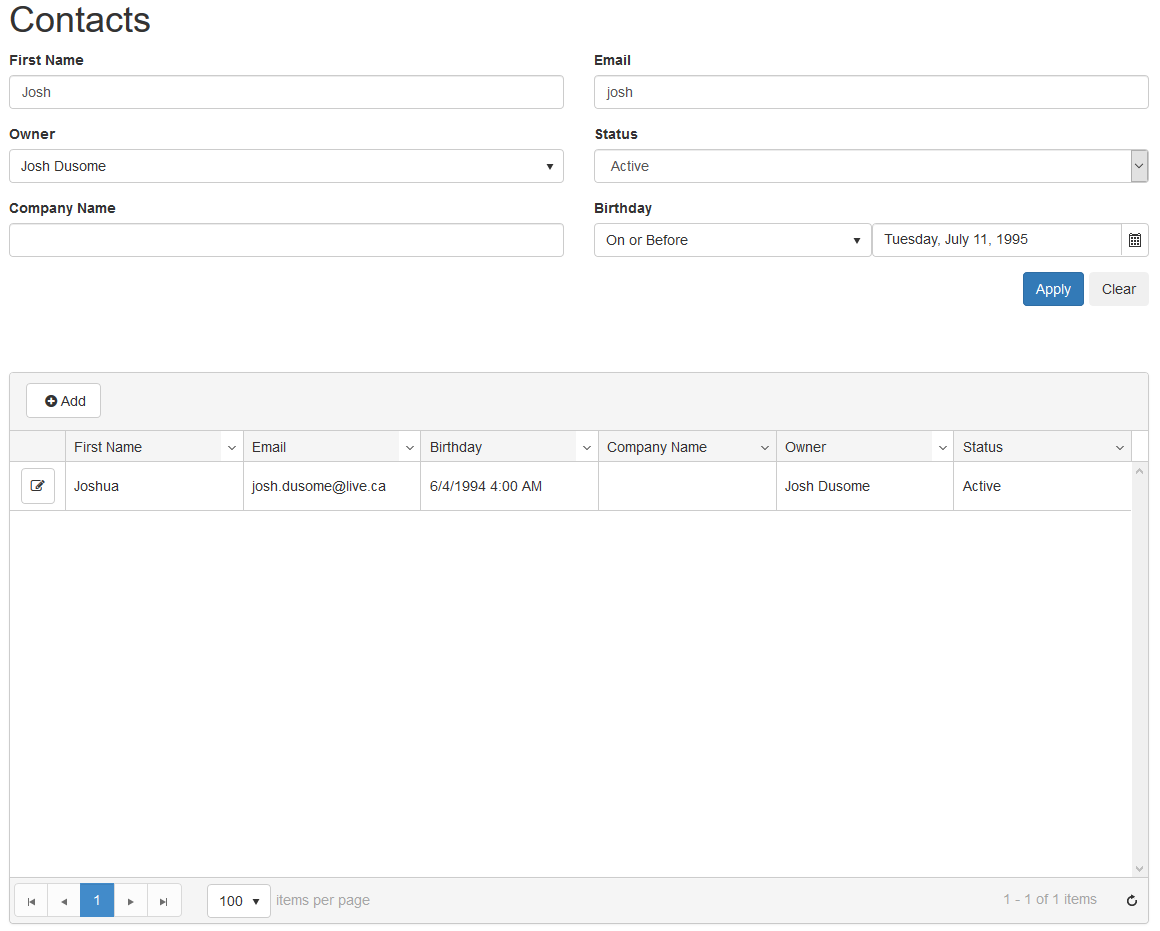
The first step in this approach is to create a TPC Form with the entity that you would like to filter, in our case we will be using Contacts. On this form, you will need to make sure you display all the fields you would like to filter the grid on. In our configuration, most of the fields are simple TPC Form Widgets, with no additional customization. Although, for this example we will filter lookups using both a dropdown selection (Owner), and a text field (Company Name), so the second lookup is custom HTML markup. The other alteration is that to filter based on the birthdate, we need to add an additional dropdown selection that allows us to select the condition of the date filter. This custom date condition selector will be added to a custom “Write” template of the TPC DateTime widget. The last customization to this form configuration is a custom Filter and Clear button. The code for all these customizations are displayed below.
<!-- Custom Time - Filter Condition -->
<input class="form-control" id='date-condition' style="width: 50% !important; box-sizing: border-box !important; float: left; border: none;"/>

<!-- Company Name Textbox -->
<div class="form-group">
    <div class="row">
        <div class="col-xs-12">
            <label class="control-label">Company Name</label>
            <input class="form-control" id='parentcustomerid' data-tpc-role="text-field-input"/>
        </div>
    </div>
</div>
<!-- Submit/Clear Button -->
<div class="form-group">
    <div class="row">
        <div class="col-xs-12 text-right" style="min-height: 85px;">
            <button style="display: inline;" class="btn btn-primary" id="filter" type="button">Apply</button>
            <button style="display: inline; margin-left: 5px;" class="btn btn-secondary" id="reset" type="button">Clear</button>
        </div>
    </div>
</div>
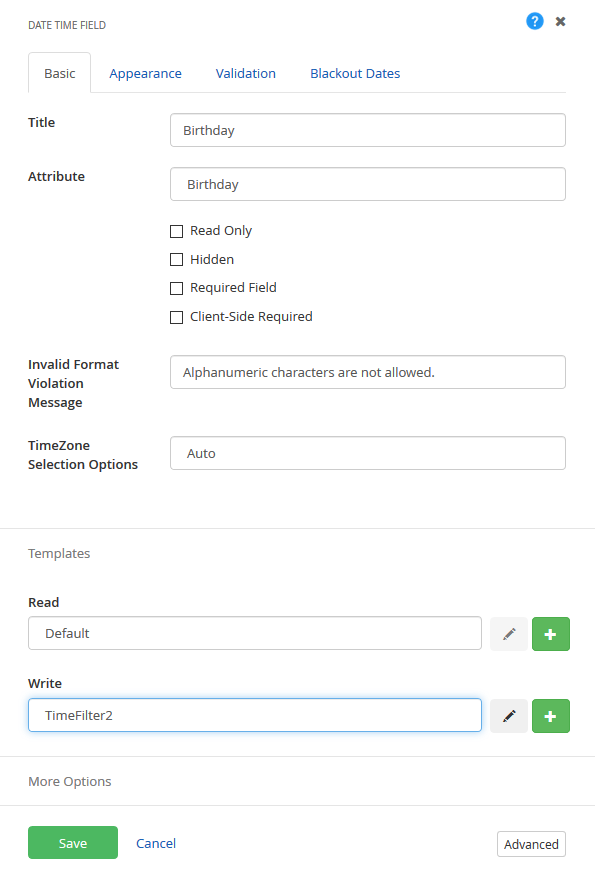
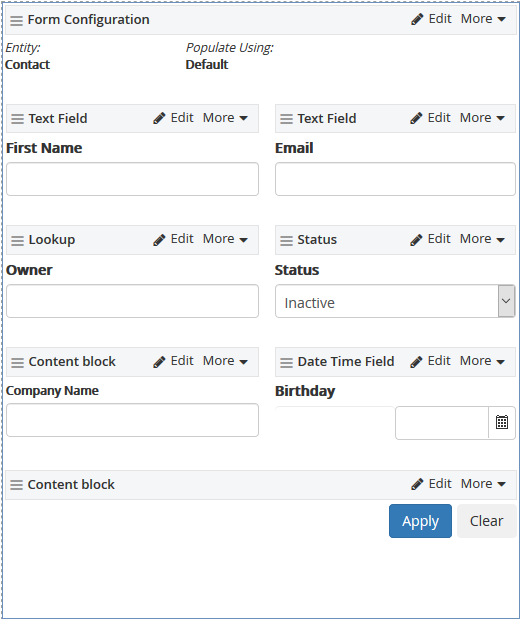
After the form has been configured, the last piece of this requirement is to create the custom JavaScript which will handle our filtering. Essentially the JavaScript is broken down into 3 main parts. The first part handles the initialization of the form, including the event handlers. The second part handles the application of the filters, which is trigger upon pressed “Enter” or the “Apply” button. The third part of this code handlers clearing the filters, which is triggered upon pressing the “Clear” button.
$(document).ready(function() {

    //Variables
    var filterButton = document.querySelector('#filter');
    var resetButton = document.querySelector('#reset');

    //This Section is Used to Initialize Dropdowns
    var timeConditionData = [
        {text: "", value:""},
        {text: "On", value:"on"},
        {text: "On or After", value:"onorafter"},
        {text: "On or Before", value:"onorbefore"},
        {text: "Any Time", value:"isnotnull"}
    ];

    $("#date-condition").kendoDropDownList({
        dataTextField: "text",
        dataValueField: "value",
        dataSource: timeConditionData,
        height: 100
    })
    .closest(".k-widget")
    .attr("id", "date_condition_wrapper");

    var timeDropdownList = $("#date-condition").data("kendoDropDownList");

    //Assign Event Listeners
    filterButton.addEventListener('click', applyFilter);
    document.addEventListener('keyup', function(event){
        event.preventDefault();
        //Enter Key
        if (event.keyCode === 13) {
            applyFilter();
        }
    })
    resetButton.addEventListener('click', clearFilter);

    //Functions

    /**
     * This function is used to apply the filters
     */
    function applyFilter(){

        //Get DataSource
        var dataSource = tpc.page.TpcGridModel.get_grid().dataSource;
        var filters = new Array();

        //Get Values from Form
        var firstName = tpc.forms.sf_contactfilters.firstname.get_value();
        var email = tpc.forms.sf_contactfilters.emailaddress1.get_value();
        var owner = tpc.forms.sf_contactfilters.ownerid.get_kendoInput().text();
        var status = tpc.forms.sf_contactfilters.statuscode.get_value();
        var companyName = document.querySelector('#parentcustomerid').value;
        var birthdateCondition = timeDropdownList.value();
        var birthdateValue = tpc.forms.sf_contactfilters.birthdate.get_value();

        //Create Filters
        if (firstName.trim() != ""){
            filters.push({
                field: "firstname",
                operator: "contains",
                value: firstName
            });
        };

        if (email.trim() != ""){
            filters.push({
                field: "emailaddress1",
                operator: "contains",
                value: email
            });
        };

        if (owner.trim() != ""){
            filters.push({
                field: "ownerid",
                operator: "eq",
                value: owner
            });
        };

        if (status.trim() != ""){
            filters.push({
                field: "statuscode",
                operator: "eq",
                value: status
            });
        };

        if (companyName.trim() != ""){
            filters.push({
                field: "parentcustomerid",
                operator: "contains",
                value: companyName
            });
        };

        if (birthdateCondition.trim() != ""){

            if (birthdateCondition != "isnotnull" && birthdateCondition != "isnull" && birthdateValue != null){
                filters.push({
                    field: "birthdate",
                    operator: birthdateCondition,
                    value: birthdateValue
                });
            }

            else if (birthdateCondition === "isnotnull" || birthdateCondition === "isnull" ){
                filters.push({
                    field: "birthdate",
                    operator: birthdateCondition,
                    value: undefined
                });
            }
        };

        //Add Filters to Data Source
        if (filters.length > 0){
            dataSource.filter({
                logic: "and",
                filters: filters
            });
        }

        else {
            dataSource.filter([]);
        }
    };

    /**
     * This function is used to clear the filters
     */
    function clearFilter(){

        //Get DataSource
        var dataSource = tpc.page.TpcGridModel.get_grid().dataSource;

        //Reset Form Values
        tpc.forms.sf_contactfilters.firstname.clear();
        tpc.forms.sf_contactfilters.emailaddress1.clear();
        tpc.forms.sf_contactfilters.ownerid.clear();
        tpc.forms.sf_contactfilters.statuscode.clear();
        document.querySelector('#parentcustomerid').value = "";
        timeDropdownList.select(0);
        tpc.forms.sf_contactfilters.birthdate.clear();

        //Clear Filters in Data Source
        dataSource.filter([]);
    };
});
There you have it! Enjoy, and happy filtering!