Adding Widget Icons to your Custom Sitefinity MVC Widgets with Code
Creating custom Sitefinity widgets is sometimes a necessary task, whether it will fulfill a missing gap in Sitefinity or satisfy a business requirement; these custom widgets are necessary.
If you are developing a widget that is reusable across multiple sites, odds are you wanted to give this widget an icon to bring it to completion. With Sitefinity, the way that we must go to add icons to widgets is complex. There is no direct way of referencing icons in the toolbox apart from CSS. This guide will show you how to add widget icons to your widgets completely through Visual Studio.
Steps
This guide assumes you have Sitefinity installed and compilable locally using Visual Studio. We also assume that you have a custom widget that you wish to add icons to.
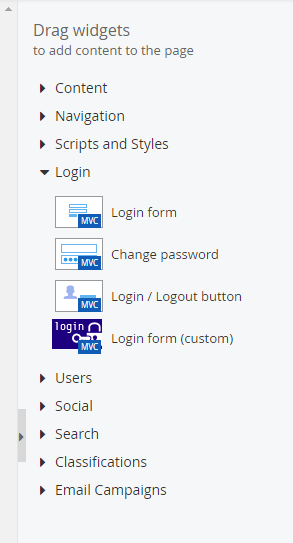
For this example I’ll be working with a modified version of the Sitefinity login form. This widget uses the ControllerToolboxItem attribute to describe how to add this widget to the toolbox, if you are registering your widgets using the Toolbox API you will need to change the following steps appropriately.
- Modify or add the desired CssClass to this toolbox item. Using the class attribute, you can change the CssClass property to include your class name. Since this is an MVC widget, we can also add the “sfMvcIcn” class to show a MVC icon on top of our custom widget icon.
Now that our custom widget’s toolbox item has a CssClass identifier, we will need to create the css file that includes our icon.

-
Create a new css file in your project and set the Build Action of this file to “Embedded Resource”.
- Register the file as a web resource in the assembly info, be sure to include the namespace path to your file:
[assembly: WebResource("SitefinityWebApp.Styles.designer-styles.css", "text/css")]
- Add the following css to your file, replace the class name with your class name and the url with the url to you file. In my example I am using a inline base-64 image to keep things simple.
    .myCustomClassName {
        background: url('YOUR_URL_HERE') no-repeat !important;
        -ms-background-size: 50px !important;
        -moz-background-size: 50px !important;
        -o-background-size: 50px !important;
        background-size: 50px !important;
    }
Note: The maximum size for images for the toolbox icons are 50x30 pixels, however you can use smaller images with transparency as well.
You can use an online converter tool such as this to convert your image to a base64 url string. Once you have your image added to the css class, it will look something like this:

To add widgets icons to designers exclusively using code on runtime, we’re going to have to create multiple custom route handlers to inject our css file into the page. Each backend page type has its own route handler that we need to bind to, Forms, Templates and Pages.
Depending on where you want to add these icons and where your toolbox items show up, you will want to only bind certain route handlers, below is a matrix of the supported route handlers, and where they execute.

Note: The MvcTemplateEditorRouteHandler is marked as internal and not available to use. Capturing this route is not possible as of Sitefinity 10.2.6200, alternate methods of injecting css will be required to modify widget icons on pure MVC page templates.
In our example we’ll be using the MvcPageEditorRouteHandler and PageEditorRouteHandler because our widget is a page widget, the steps below are common and apply to all the types of route handlers.
- Create a new file called “IconInjector.cs” and insert the following code into it:
    public static class IconInjector
    {
        private const string designerStylesKey = "customWidgetIcons";
        internal static void Inject(Page page)
        {
            if (page.IsDesignMode() &&
                page.Header.FindControl(designerStylesKey) == null)
            {
                var designerStyles = new HtmlLink
                {
                    ID = designerStylesKey,
                    Href = page.ClientScript.GetWebResourceUrl(typeof(IconInjector), "SitefinityWebApp.Styles.designer-styles.css")
                };
                designerStyles.Attributes.Add("type", "text/css");
                designerStyles.Attributes.Add("rel", "stylesheet");
                page.Header.Controls.Add(designerStyles);
            }
        }
        internal static void RegisterRoutes()
        {
            ObjectFactory.Container.RegisterType<mvcpageeditorroutehandler,>();
            ObjectFactory.Container.RegisterType<pageeditorroutehandler,>();
        }
    }
    public class MvcPageEditorIconInjectorRouteHandler : MvcPageEditorRouteHandler
    {
        protected override void ApplyLayoutsAndControls(Page page, RequestContext requestContext)
        {
            base.ApplyLayoutsAndControls(page, requestContext);
            IconInjector.Inject(page);
        }
    }
- Modify the resource path of the css file to point to your own resource path including the full namespace.
- Open your Global.asax file and add the following code:
    protected void Application_Start(object sender, EventArgs e)
    {
       Bootstrapper.Bootstrapped += Bootstrapper_Bootstrapped;
    }
    private void Bootstrapper_Bootstrapped(object sender, EventArgs e)
    {
       IconInjector.RegisterRoutes();
    }
- Build the project.
What we did in those steps is add the custom code required to inject icons. The “RegisterRoutes” function in the IconInjector binds the Sitefinity default routes to our custom routes using Ninject. Our custom routes call our Inject function which creates a link tag that points to our custom css file that we then use to inject into the header of the page.
Starting up the project and opening a page with our widget in the toolbox should now yield us a beautiful icon: