The Portal Connector contains a variety of page and form widgets that allow you to build forms and pages to allow users to add, update and delete data from CRM. Sometimes, the functionality that comes out of the box on these widgets need to be augmented or additional validation is needed that cannot be achieved out of the box. In cases where additional front-end customization is needed, the Portal Connector JavaScript API can help.
What is the JS API and what can it do for me?
The Portal Connector JavaScript API exposes functions relating to the widget it is attached to. The text field widget, for example, exposes functions to:
- get_value
- set_value
- get_model
- show/hide/toggle field visibility
- set/unset required
- add/remove value changed event handlers
The above list is just a small sample of what this one widget has. For a complete list of functions available in each widget, please refer to our documentation.
The Rules Manager widget allows for rules to be created that perform actions based on fields in a form. Internally, it uses the JS API to perform the configured action. We do it this way because using the JS API to interact with widgets on the front end is the only supported way of doing so.
Starting with the basics
The simplest way to try out the API is to open the developer console in your web browser and enter commands in the console.
Navigate to your portal and press <F12> to open the browsers developer console. Once open, type into the console:
tpc;
This call will result in an object being returned containing a number of important functions/properties:
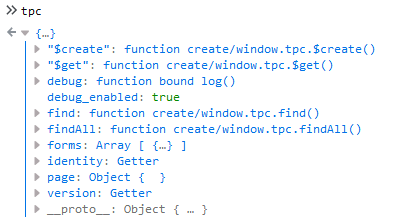
In the above list of items in the tpc object, the most important are:
- page: A collection of page widgets on the current page.
- forms: A collection of all forms on the page. Forms can be referenced by name or by index.
- findAll: A collection of all fields in all forms on the current page.
- find: Called with a field name. Returns the field specified. Returns the first found instance.
- Identity: An object containing details of the currently logged in user including CRM contact id, roles, name and username
- ·version: A string of the currently installed TPC version.
Getting form fields
Now that you know how to get basic information from the JS API, we can start digging deeper to get references to fields in the form. This is done by first knowing about the forms on the page. Typically, there is only one form on a page but more complex implementations can have more than one and even several forms nested within each other.
Let’s use a simple form for an example. The form is configured for the Contact entity and has only two fields: First Name and Last Name. Because there is only one form on the page, we can get the reference to the form by calling it by index:
tpc.forms[0];
Calling this returns a collection of widgets in the form. This includes the form configuration widget and the submit button widget along with the field widgets.
![tpc.forms[0]; tpc.forms[0];](/images/default-source/portal-hero/portal-connector-javascript-api-basics/tpc-forms-0.png?sfvrsn=4c3ed180_0)
Now that we know the field names, we can get one by using the following:
tpc.forms[0].firstname;
While this will display details in the console, it is of little use when used this way. To make it more useful, we should assign the value to a variable:
var firstname = tpc.forms[0].firstname;
With a variable containing a field, we can start doing something more useful with it.
Sounds good, let’s see something more
The simplest thing to do with a field is get the value. To do so, all of the form widgets have a function to get and set the field value. To get the value of our firstname field, we call:
firstname.get_value();
which results in:
.png?sfvrsn=23a28f55_0)
To set a value, we call the set_value function passing in the new value:
firstname.set_value("Frank");
which results in:
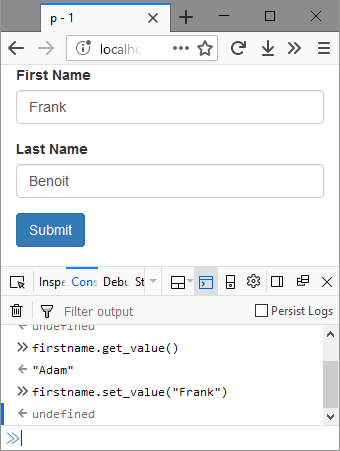
Fantastic, we can now get forms, page widgets, form widgets and their fields. Let’s try something more complex: let’s create a handler for when the field value changes.
var firstname = tpc.forms[0].firstname;
var changed = function (e) { console.log(e); }
firstname.add_valueChanged(changed);
In the above code, we assigned the first name field to a variable. Then we created a simple function to log a value to the console and called the add_valueChanged on the field passing it the handler we defined. Now if we change the value of the field and remove focus we see onChange event data in the console:
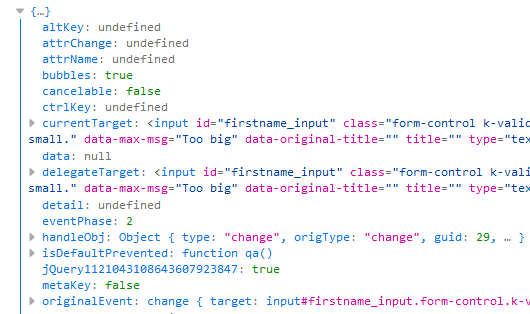
I like what I see, now show me how to do something more complex
Getting and setting field values is straight forward with form widgets but what about more complex widgets? The JS API gives us access to the underlying controls that drive our widgets. For the text field, in our previous example, this is not exactly interesting since it has limited functionality being a text field but how about a Grid? The Grid page widget is a complex widget based on a Telerik KendoUI Grid.
All Grid widgets (Grid, Sub-grid and Sharepoint Grid) have a function that returns the underlying Kendo Grid object that exposes properties such as the datasource, templates and buttons. Let’s conditionally color some grid cells based on value.
The implementation is just a block of JS with some styles. I suggest you recreate the demo on your site and then apply what you learned to your existing grid.
To create this demo:
- Create a new MVC page
- Add an MVC grid
- Edit the grid and set the entity to contact
- Paste in this fetchXML field, overwriting the existing one if present, and click the build link
<fetch version="1.0" mapping="logical" output-format="xml-platform">
  <entity name="contact">
    <attribute name="fullname"/>
    <attribute name="telephone1"/>
    <attribute name="contactid"/>
    <attribute name="createdon"/>
    <attribute name="familystatuscode"/>
    <filter type="and">
      <condition attribute="familystatuscode" operator="not-null">
      </condition>
    </filter>
  </entity>
</fetch>
- Don’t change anything in the fetch builder and click the save button.
- Save the grid designer
- Add a CSS widget below the grid and click its Edit link
- Paste in the following CSS and click the save button
.k-grid tr td.success {
    background-color: #dff0d8 !important;
}
.k-grid tr td.danger {
    background-color: #f2dede !important;
}
.k-grid tr td.warning {
    background-color: #fcf8e3 !important;
}
.k-grid tr td.info {
    background-color: #d9edf7 !important;
}
- Add a javascript widget below the CSS widget and click its Edit link
- Paste in the following JS
$(function(){
    function grid_dataBound(e) {
      var columns = e.sender.columns;
      var columnIndex = this.wrapper.find(".k-grid-header [data-field=" + "familystatuscode" + "]").index();
      var dataItems = e.sender.dataSource.view();

      for (var j = 0; j < dataItems.length; j++) {
        var maritalStatus = dataItems[j].get("familystatuscode");
        var row = e.sender.tbody.find("[data-uid='" + dataItems[j].uid + "']");
        var cell = row.children().eq(columnIndex);
        if (maritalStatus && maritalStatus != null && maritalStatus == "Married")
        {
          cell.addClass("success");
        }
        else if (maritalStatus && maritalStatus != null && maritalStatus == "Single")
        {
          cell.addClass("danger");
        }
          else if (maritalStatus && maritalStatus != null && maritalStatus == "Divorced")
        {
          cell.addClass("warning");
        }
          else if (maritalStatus && maritalStatus != null && maritalStatus == "Widowed")
        {
          cell.addClass("info");
        }
      }
    }

    var grid = tpc.page.TpcGridModel.get_grid();
    grid.bind("dataBound", grid_dataBound);
    grid.dataSource.fetch();
  });
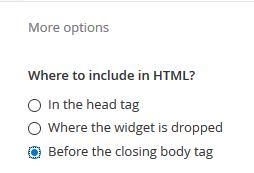
- Click the More Options section to expand it and select the "Before the closing body tag" option and click save.
- Publish the page
When you navigate to your page, you will find that the Marital Status column will have items with data set to one of four colours depending on the value.
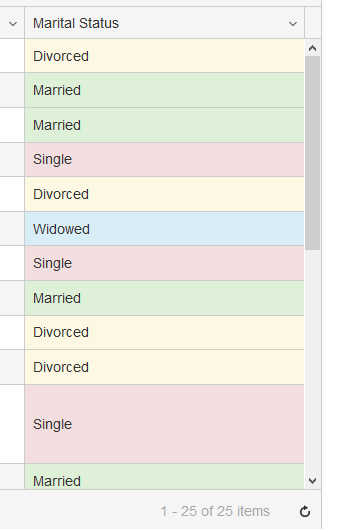
This is accomplished by getting a reference to the underlying Kendo Grid using the JS API and adding a handler for the data bound event that adds a class to each cell in the Marital Status column. The rest is handled by CSS. Because the grid has already loaded by this time, we call the fetch function on the grids dataSource to trigger the dataBound event again to see the effects.
Things to keep in mind
While entering JavaScript into the console directly helps piece together scripts, in real world usage this is simply not a viable option. You will want to write scripts in a separate file or in a JavaScript widget. When you do, there are a couple of important thing to keep in mind:
- All script code must be wrapped in a jQuery document ready code block. This ensures it only executes after jQuery is loaded.
- Scripts should be placed at the end of the document to ensure dependant scripts (jQuery, kendo and the TPC JS API) are loaded and available to your custom code. If using a JavaScript widget, ensure it is set to render before the closing body tag:
- Custom code errors can (and will) stop all script execution on the page. Ensure that your code can handle null/undefined values and fields that do not exist.
Where to go from here?
We have only scratched the surface of what can be done with the JS API. Our clients have implemented various bits of functionality that they required using the JS API:
- Overriding the edit button to take users to different pages based on the record being edited.
- Overriding the edit button to take users to different pages based on the role of the editor.
- Hiding of buttons based on the record status.
- Coloring rows based on status.
- Enabling and disabling fields based on input.