Beyond the Basics: Transforming Portal Connector into an Ecommerce Power Tool

Configuring Product prices in D365 Sales
In Dynamics 365 Sales, you can set pricing attributes of a product by going to Advanced Settings > Product Catalog > Families & Products and selecting a product from the list that appears on the page. Once a product is selected, click on Additional Details tab and scroll down to the Pricing section. For this demo, we have set the Current Cost, List Price, and Quantity On Hand of the product Soccer Ball to $5, $12 and 123 respectively.
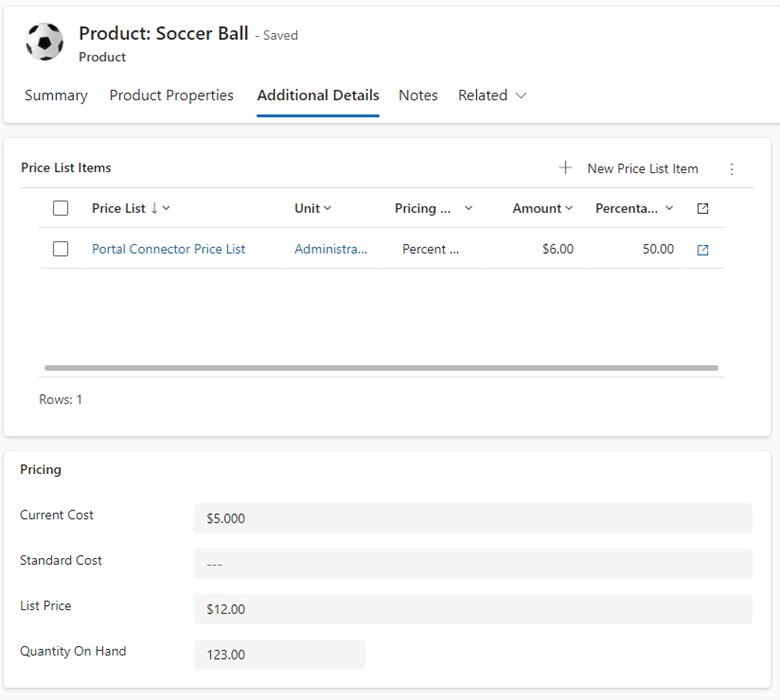
If we draw our attention to the top where the Price List Items section is, we also see that Soccer Ball is part of the Portal Connector Price List and that the price set in this list is $6.00. To see how we determined this price, we can view the Price List item by double clicking on the row and selecting the Pricing information tab from there.
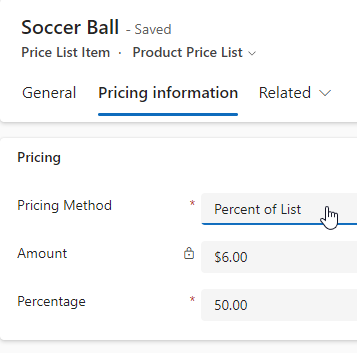
Here we see that the Soccer Ball’s price is 50% of the List Price for the product. Using the Level Up for Dynamics extension, we can see the other Pricing Method options (or the pricingmethodcode attribute) and their corresponding values we:
| Name | Value |
|---|---|
| Currency Amount | 1 |
| Percent of List | 2 |
| Percent Markup - Current Cost | 3 |
| Percent Margin - Current Cost | 4 |
| Percent Markup - Standard Cost | 5 |
| Percent Margin - Standard Cost | 6 |
Knowing this will be important when setting up our Kendo Templates in our Portal Connector site. By default, when a Product is created, the Pricing Method is set to Currency Amount, but since we want to apply a discount to this product, we have chosen option 2. We can use this information to show a discount on our product since you can show a before and after price in your Portal site.
For this blog, I am going to assume you have a 6.2 Portal Connector site with a Product List page, a Product Details page, and a Checkout page. Now I will show how you can customize your Portal Connector site so that product discounts appear on the frontend to your users.
Apply Product-specific Discounts
Product list
On the Portal Connector CMS, go to the backend of the Product List page and open the designer. In the Data tab, you will see a default fetch that queries the productpricelevel entity. This refers to the Price List Item. While it may not show, this fetch is already filtered by the Price list id of the logged in contact (assuming one is assigned). If the contact does not have a Price List id, this how-to article explains how to assign a Price List Id. The Product List widget displays the entire set of Price List Items belonging to the Price List Id.
Let’s modify this fetch to show the original price of the Product that has since been discounted in the Price List. Select build to open this Fetch XML builder. From here, we will:
- Remove the filters on the productid and productnumber.
- Add an attribute for the Pricing Method used to determine pricing.
- Add a Linked-Entity to the Product entity and give it the alias
product. - Add the List Price (or the
priceattribute) to show the original suggested price.
Our final fetch should look like this:
<fetch version="1.0" mapping="logical" output-format="xml-platform">
    <entity name="productpricelevel">
        <attribute name="productpricelevelid" />
        <attribute name="productid" />
        <attribute name="productnumber" />
        <attribute name="pricingmethodcode" />
        <order attribute="productid" descending="false" />
        <link-entity name="product" alias="product" to="productid" from="productid">
            <attribute name="price" />
        </link-entity>
    </entity>
</fetch>
Feel free to copy and paste this directly on the Fetch XML text area rather than using the Fetch XML builder tool to perform the steps I described above.
Now let’s modify our Kendo Template to accommodate some of this fetched data. Go to the Basic tab and open the Template. Around line 90, after the h3 tag that displays the product_name, add a space and insert the following Kendo templated code
#if(typeof amount != 'undefined' && pricingmethodcode.Value === 2){ #
    <p><s>#= productpricelevel_currencysymbol ##= (product_price.Value).toFixed(product_quantitydecimal) # </s></p>
#}#
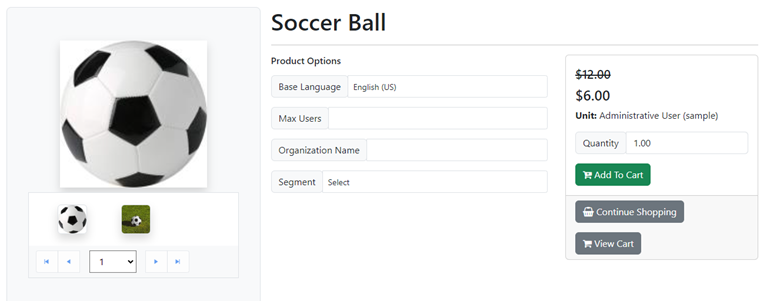
This will display the suggested price in the template with a line struck through it. In the frontend of the page, it will be displayed as follows:

Product details
Go to the backend of the Product details widget page and edit the widget. When we go to the fetch, we will see that the Product details page fetches the Products entity by default. Open the fetch builder and make the following changes:
Add the following attributes to the Products entity:
- Add the following attributes to the Products entity:
- Quantity On Hand
- List Price
- Add a Linked-Entity to Price List Items and give it the alias name of productpricelist.
- Add the attribute Pricing Method to it.
The resulting fetch should look like this:
<fetch version="1.0" mapping="logical" output-format="xml-platform">
  <entity name="product">
    <attribute name="name" />
    <attribute name="productid" />
    <attribute name="productnumber" />
    <attribute name="description" />
    <attribute name="statecode" />
    <attribute name="productstructure" />
    <attribute name="quantityonhand" />
    <attribute name="price" />
    <order attribute="productnumber" descending="false" />
    <link-entity name="productpricelevel" alias="productpricelist" to="productid" from="productid">
      <attribute name="productpricelevelid" />
      <attribute name="pricingmethodcode" />
    </link-entity>
  </entity>
</fetch>
Let’s go to template and before line 121, add the following:
#if(productpricelist.productpricelist_amount && productpricelist.productpricelist_pricingmethodcode === 2){ #
    <p class="h4"><s><small> #: price_formatted # </small></s></p>
#}#
The resulting product details page pricing will look like this:
Applying Volume Discounts
D365 Sales also has the possibility of applying bulk/volume discounts, however, at the time, Portal Connector does not support this feature without getting too code dominant and using workflows.
Limiting orders based on inventory
Recall that I added the attribute Quantity On Hand attribute to the Product details fetch. Also recall that we had 123 soccer balls in stock in D365 Sales. We can add this attribute to our template, so a customer does not order beyond what we have in inventory.
Go to around line 133 of the template and add a conditional statement to check if the quantityonhand is set. Inside that condition, add a max attribute to the “productQuantity” input tag and set it to the quantityonhand data that we retrieve from the CRM.
# if(typeof quantityonhand !== 'undefined'){#
    <input type="number" class="form-control" name="productQuantity" required value="#:unit.unit_quantity#" max=#: quantityonhand # />
#} else { #
    <input type="number" class="form-control" name="productQuantity" required value="#:unit.unit_quantity#" />
# } #
In addition to this, we can customize the generic message that gets returned when a user exceeds the total order beyond what we have on hand. To do this, drag a JavaScript block to the page and set the More options property to “Before the closing body tag”. Inside the code block, add the following:
$(document).on("tpc:ready", function (event, tpcObject) {
    $("[name='productQuantity']").on("input", function (e) {
        // Clear any old status
        this.setCustomValidity("");

        // Check for invalid state
        if (this.validity.rangeOverflow)
            this.setCustomValidity("The selected quantity is more than the stock on-hand. Please select a different amount.");
    });
});
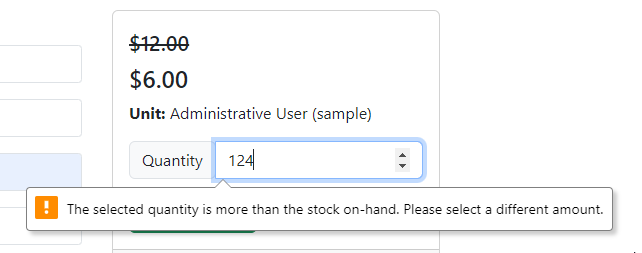
Now we get a human-readable message when someone tries to order 124 items:
States dropdown in the Checkout
In D365 Sales, the State/Province attribute is an open text field. But if you wanted to ensure that users enter the correct name of the state then selecting from a dropdown list would be better. With some frontend jQuery code, this is a possibility. We will start by editing the Checkout widget template.
Open the designer for the Checkout widget and open the template. Scroll down to line 219 and under the State/Province section, add an empty select tag with the id billingStateDropdown before the input for address1_stateorprovince and add a “required” attribute to it. This will serve as our container for our dropdown list. In addition, add a “hide” class to the address1_stateorprovince input as we do not want users to input any text for the bill state. The resulting edits should look like this:
<select id="billingStateDropdown" required></select>
<input type="text" class="form-control hide" data-tpc-name="address1_stateorprovince" data-tpc-id="address_stateorprovince" id="address1_stateorprovince" required />
Scroll down to line 287 and add the another select tag above the input for address2_stateorprovince, except the id should be shippingStateDropdown. There is no need to add the “required” attribute to this tag because this field will only be required if you ship to a different address; we will handle this all dynamically through jQuery. In addition, add a “hide” class to the input. Save and close this template and label it “Checkout with State dropdown” or whatever suitable name you like. Ensure you select this template before saving the widget. These are all the modifications we need to make to the template.
Next, add a JavaScript block to the page. Configure it by selecting More options and set it to “Before the closing body tag”. Before we add any scripts to the code block, I suggest you work on a local JS file and then either copy and paste the script directly into the block or add the file to the file manager of your web app and reference it in the JavaScript block. We will add around 60 lines of code to this .js file.
For this blog, I will hardcode our data source for the dropdown list, however, you can extract this data from a saved query you create in Portal Connector (e.g., if the source was D365 Sales) or get it from a custom web service. The hardcoded data will be in the form of an array of objects representing some states from the US and a single Canadian province. Here is the how the data source will be structured:
// State/Province options for dropdown
const statesData = [
    { ID: "FL", StateOrProvince: "Florida" },
    { ID: "NY", StateOrProvince: "New York" },
    { ID: "CA", StateOrProvince: "California" },
    { ID: "HI", StateOrProvince: "Hawaii" },
    { ID: "ON", StateOrProvince: "Ontario" }
];
Next, I will configure the states dropdown list using Kendo jQuery:
// Initialize the dropdowns for both billing and shipping states
const dropdownOptions = {
    dataValueField: "ID",
    dataTextField: "StateOrProvince",
    dataSource: statesData,
    filter: "contains",
    optionLabel: {
        ID: null,
        StateOrProvince: "Select a State..."
    }
};
In addition to this, I will paste a function to validate an input against the statesData array from above. If a state code from the input exists in an object from the statesData array, it is valid and if it is valid state id, only then I will set the Kendo dropdown list, otherwise, the dropdown will remain null in which case the “Select a State…” option will appear. In case of the shipping state, if the container is visible but a valid shipping state does not exist, get and set the state from a valid billing state. We also add or remove the required attribute on the shipping state depending on its visibility.
Consider the following state validate function:
// Get, validate, and set the state value in the Kendo dropdown list
function validateAndSetState() {
    const isShippingVisible = !$("div.shipping-address").hasClass("d-none");

    // Validate billing state and set dropdown value if valid
    const billingStateCode = $("#address1_stateorprovince").val();
    const validBillingState = statesData.find(state => state.ID === billingStateCode);
    if (validBillingState) {
        $("#billingStateDropdown").data("kendoDropDownList").value(validBillingState.ID);
    }

    // Validate shipping state only if shipping section is visible
    if (isShippingVisible) {
        const shippingStateCode = $("#address2_stateorprovince").val();
        const validShippingState = statesData.find(state => state.ID === shippingStateCode) || validBillingState;

        if (validShippingState) {
            const shippingDropdown = $("#shippingStateDropdown");
            shippingDropdown.data("kendoDropDownList").value(validShippingState.ID);
            shippingDropdown.attr("required", "true");  // Mark shipping dropdown as required
        }
    } else {
        $("#shippingStateDropdown").removeAttr("required");  // Remove 'required' if shipping is hidden
    }
}
Next, I will use the tpc:checkout-step-change event to detect when the DOM is ready and perform three actions:
- Call a jQuery kendoDropDownList function on both the billing and shipping select tags and pass the dropdownOptions object we created earlier to it as an argument.
- Call the validateAndSetState function to set the billing state and call it whenever the checkbox that reads “the shipping address same as billing address” is clicked. On click, a new container for shipping details is either shown or hidden. The potentially new address must be validated and set whenever you click this.
- Listen to the click on the “Continue to Shipping Options” button and set the hidden state input field to match the option set in the states dropdown.
Consider the following code inside the TPC checkout step change event:
$(document).on("tpc:checkout-step-change", function () {
    // create the states dropdown list in the select tags using Kendo jQuery
    $("#billingStateDropdown").kendoDropDownList(dropdownOptions);
    $("#shippingStateDropdown").kendoDropDownList(dropdownOptions);

    // Set the billing state from CRM data if valid
    validateAndSetState();

    // Set the shipping state when "shipping address same as billing address" checkbox is clicked
    tpc.page.TpcCheckout.get_container().on("click", "#shippingAddressSameAsBillToAddress", validateAndSetState);

    // Update state inputs on clicking "Continue to Shipping Options"
    $('[data-tpc-id="continue-to-shipping-options"]').click(function () {
        const billingState = $("#billingStateDropdown").data("kendoDropDownList").value();
        const shippingState = $("#shippingStateDropdown").data("kendoDropDownList").value();
        const isShippingVisible = !$("div.shipping-address").hasClass("d-none");

        $("#address1_stateorprovince").val(billingState);
        if (isShippingVisible)
            $("#address2_stateorprovince").val(shippingState);
    });
});
Now that the frontend code is complete, the dropdown for State should look something like this:

This completes the frontend modifications for the Checkout widget. To learn how you can add dynamic state tax logic to each dropdown selection, be sure to read part 2 of this blog series on how to Customize State Taxes dropdown.