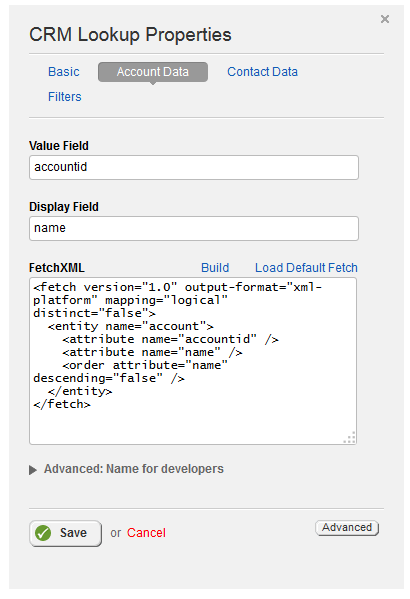
For Beginners; the Load Default Fetch Option
The Load Default Fetch option will automatically load a fetch based on the current CRM Entity. Typically, this will include the unique identifier field for the chosen entity, as well as the name field for the respective entity. For example, if you were to use the Accounts entity, the default fetch would include the account id and account name. This would appear like this:

Please note that the Value and Display text boxes inherit their contents from the attribute names in the FetchXML box below. Remember that the Display text box will be what options are visible for you to select while the Value text box will be what will actually gets selected and submitted through the form.
For Advanced Users; the Build Option
The FetchXML also includes an advanced option for choosing exactly what fields you would like to be retrieved by the widget. When you click on the Build option, you will be directed to a page like this:

If this page doesn’t appear to be there, click and drag the gray bar on the left to expose it. Firstly, the
Aggregate Fetch checkbox will allow you to group the retrieved records by a particular attribute.The
Count text box will limit the amount of records fetched by the number entered. A blank value will not apply a limit the number of records retrieved. The
Distinct checkbox will only look up unique records determined by the chosen field. The
Entity drop down list will allow you to choose the
CRM Entity that the widget will target.
By using the
Add Attribute button, you can add attributes for the widget to retrieve. The
Attribute list will determine what data fields the widget will fetch. This will change depending on the chosen
Entity. Please note that this won’t necessarily be shown in the actual widget unless defined through the
Column Builder. The
Alias textbox will allow you to determine a 'nickname' for the attribute to use in the
FetchXML Builder and other widgets but this isn’t required. The
Add Linked-Entity button will allow you to fetch attributes from other entities by similar identifiers (Or foreign keys) similar to the SQL command INNER JOIN. For example, a list of orders will have a connection to customers because customers can have orders and vice-versa.

In the case of
Accounts, a primary contact ID connects
Accounts to
Contacts.
The
Add Filter option will allow you to include or disregard pieces of data based on what one or more of their fields contain.

In the image above, accounts from the
Accounts entity will be retrieved by the widget, but all records with the Account Name of 'A. Datum Corporation' will be ignored. The
Filter option allows you to use the logical operators
AND or
OR to filter data. The
Attribute drop down list will allow you to choose the data field that the filter will be looking through. The
Operator drop down list will allow you to check what state the filter is looking for. In the case above, it is looking for all pieces of data that do not share the name of ‘A. Datum Corporation’. The
Value textbox is what the filter will be looking for.
The
Add Order button will allow you to order the data that’s retrieved by the
widget.

The
Attribute text box will allow you to choose what is being ordered. This can even be an attribute that won’t appear in the widget, such as the Account ID. The
Alias text box will allow you to target an attribute by its alias instead. The
Descending checkbox will allow you to order things from big to small or Z-A. Leaving this unchecked will order your data in
Ascending order which is from small to big or A-Z.
When you are finished, click the
Save Fetch button to save your work and return to the previous page. The
FetchXML text box should be populated with XML. This will determine what fields are retrieved from the database, even if they aren't visible on the widget (In effect, meaning that if you were to export a grid as a spreadsheet, these retrieved fields would be included in the spreadsheet file). In order to determine what columns are going to be visible in the widget, please see the
Column Builder guide.