Typically, most widgets that use a grid will have a
Columns tab. The
Columns tab allows you to define custom columns for your widgets to use. This example will use the
CRM Sub-Grid View widget in order to show you how to define custom columns.
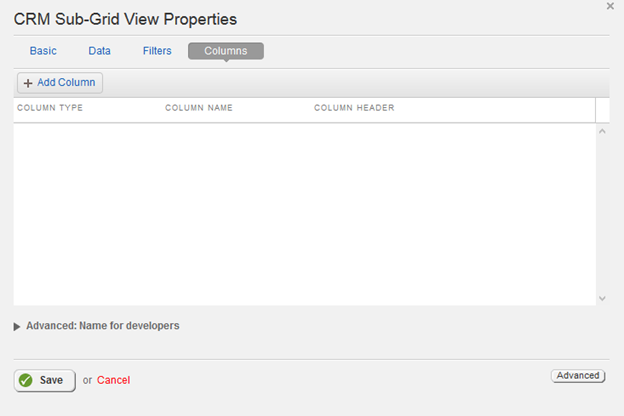
- From the selected widget properties (In this case, the CRM Sub-Grid View), click on the Columns tab. It should look like this:

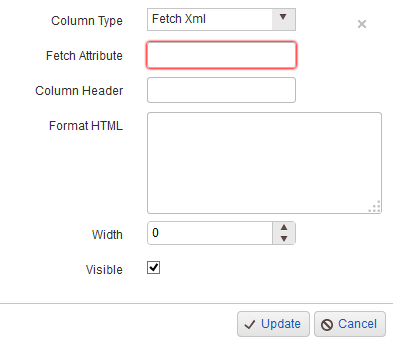
- Click on the Add Column button to display a prompt for adding a new column to your grid. Please note that the Fetch Attribute text box is named after the attribute names in your BuildXML list. It should look like this:

- When you are finished configuring the custom column, click the Update button to see your changes and save the new column.
For Beginners; a Simple Usage Case Scenario
In this simple usage case, a column for the CRM Add Edit Grid View will be applied. Please note that editing columns works the same way for all widgets that use this editor.
- From the CRM Add Edit Grid View properties list, click on the Data tab. For this example, it should look like this:

- Notice that the FetchXml is set to retrieve four attributes: Name, Primary Contact ID, telephone number, and account ID. Next, navigate to the Columns tab to define a new column for the grid to use. It should look like this:

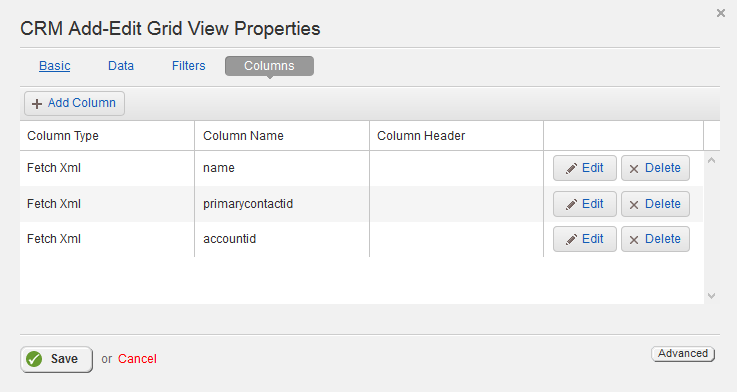
- Notice that three columns have been defined here. However, the FetchXML was defined to retrieve another attribute, telephone1. Let's add a new column. click on the Add Column button to display the prompt. It should look like this:

- Please note that the Fetch Attribute text box is the only one that really needs to be filled. The 'telephone1' fetch attribute directly refers to the FetchXml as the attribute that retrieves the telephone number data field was named as 'telephone1'. The new column can be configured to use a literal column, which employs more advanced functionality. In addition, you may also define the column header, insert some HTML, or determine the width and visibility of the new column.
- When you are finished configuring the new column, click on the Update button to be brought back to the Columns tab which should now have your newly defined column.
For Developers; Format Strings
The Column Editor can be used to return a multitude of things about a particular record and row. This primarily uses the Format HTML text box to accomplish a variety of tasks.
Format String Number
|
Description and Usage
|
| {0} |
This string format is only used with the Fetch XML column type. It will return the attribute that the column is associated with.
Date Formatting Information
Numeric Formatting Information
|
| {1} |
This string format is only used with the Fetch XML column type. It will return the column header or if one isn't present, the default name of the column. |
| {2} |
This string format will return the record's primary ID as an unencrypted GUID. |
| {3} |
This string format will return the name of the field or attribute that contains the primary key that belongs to the selected column. |
| {4} |
This string format will return the entity's logical name that is associated with the row's records. |
| {5} |
This string format is a special case explained below. In short, it returns the HTML structure of the cell, row, and table that it is inserted into, including the table mark-up and any data that the cell might contain.. |
| {6} |
This string format will return the record's primary ID as an encrypted GUID. |
{5}; The Special Case
The format string of {5} can be used to great effect. In general, it can be used to return the HTML structure, element and ID about the cell, row, and table that it is inserted into. For example, if you were to insert {5} into a column's Format HTML text box of your choice and then write a quick Javascript function to read {5} into a browser's console, it will return all of the HTML structuring (Cell (<tr>), row (<td>), and table (<table>) and their respective IDs from that row. In addition, it will return the primary ID of that row, the attribute that happens to be the primary key, and any data that the cell contains.
Please note that if {5} is used on an invisible column, the cell, row, and table's returned element will be null because the column is invisible.