This one is for the less technical crowd. Maybe you've just signed up for a portal trial and are wondering where to begin or you have some basic questions. Maybe you're not familiar with working in C#, JavaScript or HTML but want to experiment and see what the portal connector can do. While most of this information can be found in our excellent documentation, this is a 1-stop-shop for the most popular requested info and tricks for beginners to get you off and running with your portal.
The Blue Box (TPC Form Layout)
You've established a connection to your CRM and have published some CRM entities. Next, users will typically want to start creating a form to see TPC in action and start to build out a form. Possibly in the excitement of dragging and dropping widgets onto their form, users will forget the first step of creating a form which is to drag over a
TPC Form Layout widget. If you are building a form and the entities/attributes are not populating with any of your CRM data, you've likely forgotten this first, important step. The
TPC Form Layout specifies which of the added widgets will be sending data to/receiving data from your CRM. It will also tie the form configuration widget to any other widgets that are dragged inside this very important blue box.

For more info, see our documentation for
Create a Portal Form.
Multiple Entities on a Single Form
Multiple entities can be easily added to a single form. Again, we just need to remember our blue boxes. We need to make sure we add a
TPC form layout for every entity we wish to add to the form. With our initial
TPC form layout on the page, drag your second
TPC form layout inside the first.
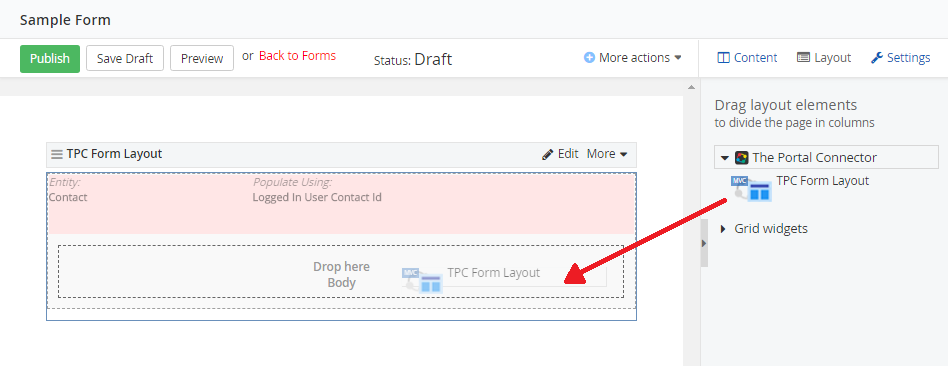
Then we can drag another form configuration widget inside this border. When editing the 2nd form configuration widget, we need to be sure to set the relationship as it relates to the first entity. Click Edit on your new Form Configuration widget and go to the Relationship tab. Here you define the type of relationship (1:N, N:1 or N:N) then select the specific relationship that you've created in your CRM that ties your new entity to your first entity, and then click save. You're all set, be sure to add any widgets related to the new entity inside the new
TPC Form Layout. Adding more than 2 entities is possible, just be sure additional entities are added in the same fashion.
Simple Customization of the Navigation Widget
The first thing you may want to do when it comes to changing up the feel of the default portal is to update the navigation bar with your own personal branding. For a simple update of the navigation logo/text, navigate to the
Design tab in the back-end of your portal and click
Widget Templates. Find and open the widget titled "NavigationView.default". In the template code for the Navigation widget, locate line 23 (of the default template).

You can upload an image of your choosing to your sitefinity images (under Content>Images) and publish it for embedding in the navigation widget. For those not familiar with HTML, select the published image and locate the
Embed (paste in HTML) field in the right-hand pane. Here you can customize the image size by clicking
Customize Embedded Image and grab the HTML embed link to paste in the above line of the navigation template. Also on this line in the template code, you can update the text ("The Portal Connector") to your personal branding, or remove it if the image you added contains your logo text.
Filters
The filters tab will appear on a variety of widgets such as grids and lookups. They're used to narrow down the results you are retrieving from your FetchXML. To specify a filter for your fetchXML, click Build from the Data tab to open the fetchXML builder and click Add Filter. In the added filter line, specify the Filter Type, Attribute and Operator that you would like to filter by and input a value of your choosing in the Value field wrapped by @ symbols (e.g. @user@) and click Save.

Now that we have our filter set up in our fetch XML, we can navigate to the Filters tab. Here we will specify the value from our fetchXML under the Name field, the Filter Type and a Value, if applicable. In this example, we will filter a grid of cases based on if the case's customer is equal to the currently logged in user. We specify the Name as the value we entered in our fetchXML (the @ symbols are added automatically here), and set the filter type as Contact ID, then click the green plus button to add this as a filter.
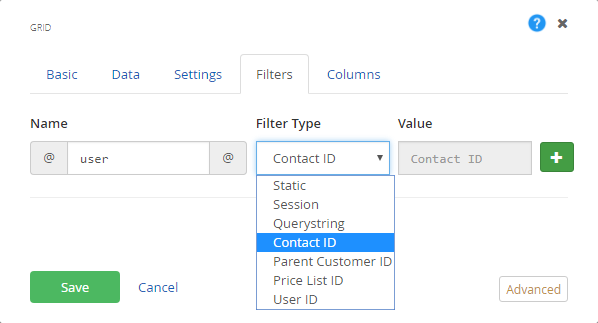
We can also filter by a static value that is set under the Value field, a querystring that we can pass forward in the pages URL, a session variable as well as several other options.
To explore filter options further, you can view our documentation on How to Filter Records.
Hyperlinks on Grid Records
Grids are great for displaying a list of records for a given entity, but you may want to add some interactivity to the displayed records. Outside of using the edit button to redirect to a new page, we can update our grid records with hyperlinks. To do this, click
Edit on your already configured grid and navigate to the
Columns tab.
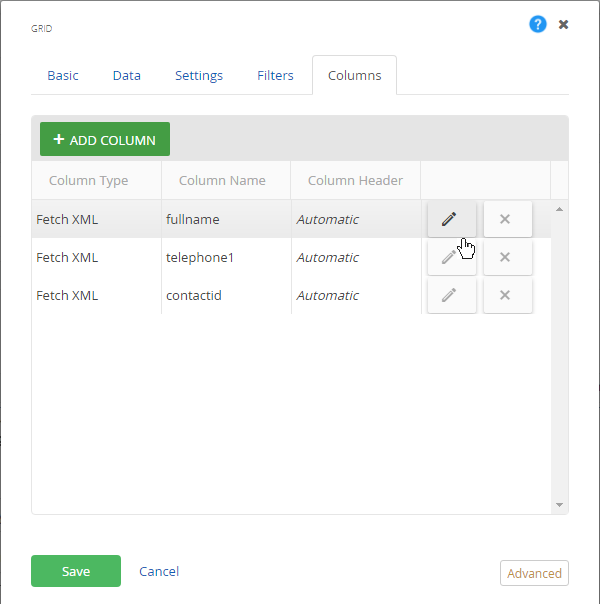
From here, we can add some simple HTML into the
Format HTML field:
<a href="/profile">{0}</a}
Where "/profile" is a page on our portal we wish to redirect to (this can just as easily be updated to an external location e.g. "https://www.example.com" and {0} will place the hyperlink on the attribute being displayed in the column (in this example, the hyperlink will be placed on the full name of the contact that is displayed in our contacts grid). Then click Update and Save.
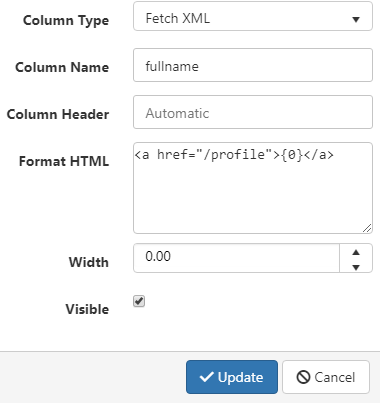
Additionally, you can use the following format string numbers to pass information from the grid forward in the hyperlink as a query string:
Format String Number
|
Description and Usage
|
| {0} |
This string format is only used with the Fetch XML column type. It will return the attribute that the column is associated with.
Date Formatting Information
Numeric Formatting Information
|
| {1} |
This string format is only used with the Fetch XML column type. It will return the column header or if one isn't present, the default name of the column. |
| {2} |
This string format will return the record's primary ID as anunencryptedGUID. |
| {3} |
This string format will return the name of the field or attribute that contains the primary key that belongs to the selected column. |
| {4} |
This string format will return the entity's logical name that is associated with the row's records. |
| {5} |
This string format is a special case explained below. In short, it returns the HTML structure of the cell, row, and table that it is inserted into, including the table mark-up and any data that the cell might contain.. |
| {6} |
This string format will return the record's primary ID as anencryptedGUID. |
For more info on how to work with the column editor, you can check out
How to use the Column Editor.
Getting Started with List Views
A list view can be a little intimidating if you're unfamiliar with C# or HTML, but is a very powerful widget for displaying entity information. To finish out our list, we'll go over how to pull basic information with a list view and a helpful trick for pulling a records entity image from CRM for use on your portal. It starts out the same as with a grid; Enter the necessary information in the
Basic and
Data tabs. Return to the Basic tab and click
Templates, then click the
Green Plus Button next to the drop down list of our available templates. If you don't know what you're looking at, don't panic! Find line 64, or if your template looks slightly different than the example, the first line that looks like line 64.
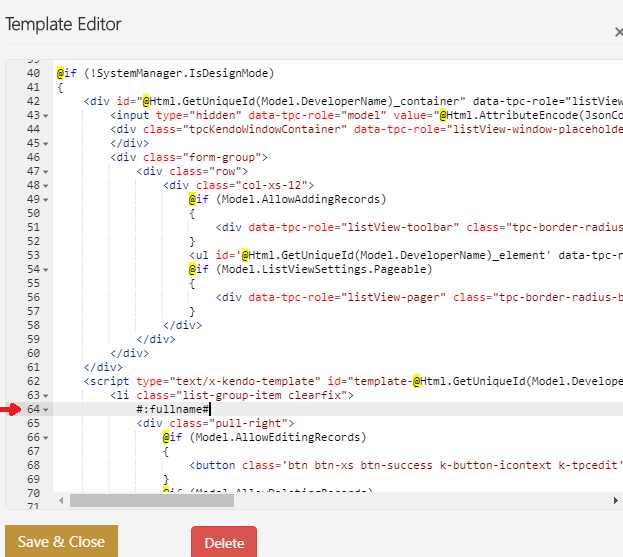
Here is where we will choose what the list view shows. Using the attributes you added to your built fetchXML on the data tab, add the attribute name below line 64 following the syntax from the screenshot (i.e.
#:example
#). Be sure to enter the same attribute name from your fetchXML to the list view e.g. if we built our fetch to grab Address1, the attribute from the fetchXML will show "address1_composite". Now we'll click Save and name our template.
Back on the Basic tab of our list view, make sure to change the template from default to your newly created one and click Save. You will now have a very basic list view showing your desired information that can be styled to your choosing with HTML if you so wish.
Lastly, a quick trick with list views to pull in an image from our record. Click
Edit on the list view widget and select the
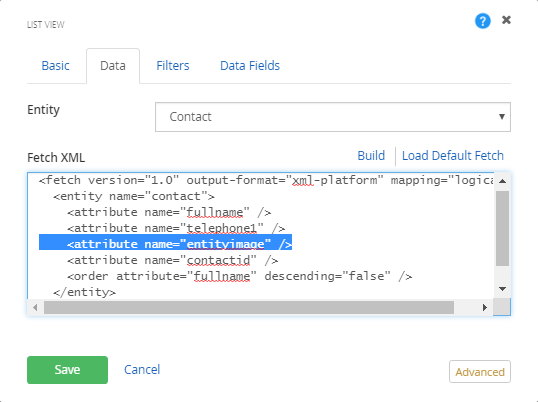
Data tab. In here, we will add the following line to our FetchXML box:
<attribute name="entityimage" />
Return to the
Basic tab and edit our newly created template by clicking the
Grey Pencil button. In the same location as before (roughly line 64), paste the following string:
<img alt="#:name# Image" height="144px" width="144px" src="data:image/png;base64,#= btoa(String.fromCharCode.apply(null, new Uint8Array(typeof entityimage === 'string' ? entityimage.split(',') : entityimage))) #"></img>
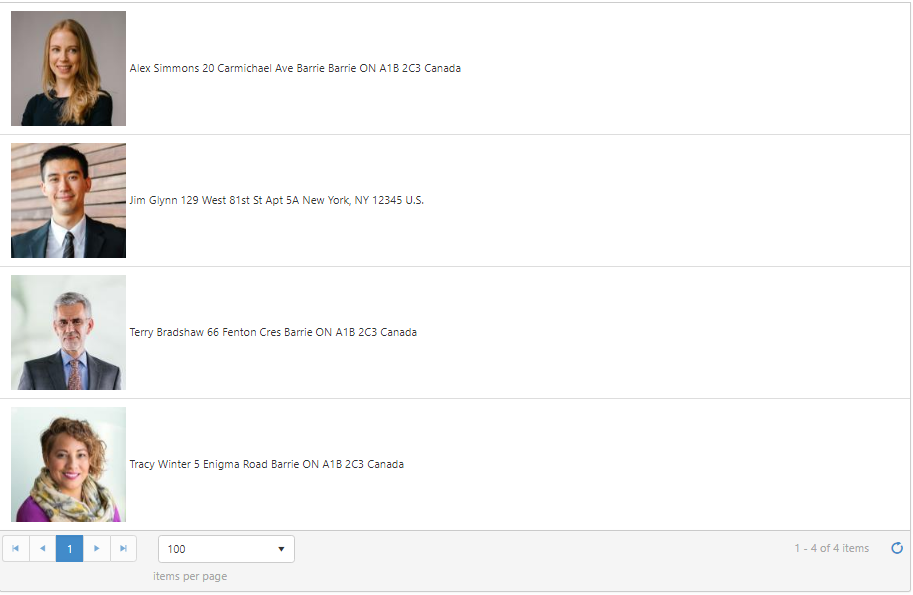
This will display the image from your CRM record in your list view. Save the template and changes to the widget, then publish the page and take a look at it from the front end. You should now have a very basic list view that should look something like this:
That's all for now folks. Happy Portalling!