Integrating Kendo UI Widgets with Portal Connector Saved Queries
Saved queries are one of The Portal Connector's most powerful features. They allow you to create secure and dynamic RESTful JSON endpoints that you can utilize in your code all across the portal.
In this article, we’re going to walk through how to bind a Kendo UI Scheduler widget to a Portal Connector Saved Query to display and interact with Dynamics CRM/365 data.
This article assumes you have some sort of event entity in your Dynamics CRM/365 instance that has these fields at a minimum:
- Title – the title of the event
- Description – a short description of the event
- Start Date/Time – the start time of the event
- End Date/Time – the end time of the event
These fields can be named anything as long as the data types are correct.
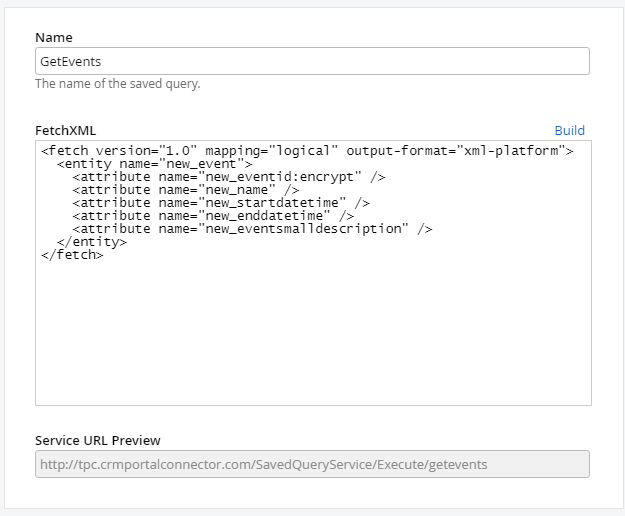
- Create a new Saved Query. Saved Queries can be created from “The Portal Connector > Saved Queries” menu item in the backend.
- Set the name of the Saved Query to “GetEvents” or whatever is relevant to your data
- Build the Fetch XML to encompass all of the events you want to show in the calendar. Make sure you include all of the columns as described above.

- Copy the service URL of the Saved Query to use in the JavaScript code at a later step.
- Publish the Saved Query.
- Create a page in the location of your site that you want your event listing to be.
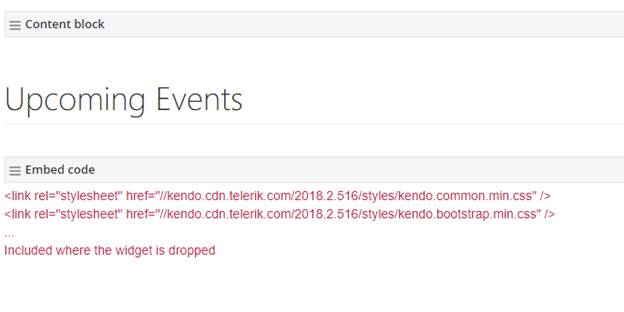
- Drag on an Embed Code widget and paste in the following code:
<link rel="stylesheet" href="//kendo.cdn.telerik.com/2018.2.516/styles/kendo.common.min.css" />

<link rel="stylesheet" href="//kendo.cdn.telerik.com/2018.2.516/styles/kendo.bootstrap.min.css" />

<script src="//kendo.cdn.telerik.com/2018.2.516/js/kendo.all.min.js" type="text/javascript"></script>

<div id="schedule">
</div>

<script src="/schedule.js" type="text/javascript"></script>
The code above adds the prerequisite scripts and styles for the Kendo UI Scheduler as well as sets up a container with the id “schedule” where we will place the widget in code.
If you have access to the filesystem, create a new JavaScript file where your scripts are located and update the “schedule.js” reference in the above code to point to it. If you do not have access to the filesystem, drag a new JavaScript widget on to the page and put all the code in the upcoming steps into that. Ensure that “Before the closing body tag” is selected under “More options”

- Open the JavaScript file or JavaScript widget you created in step 7 to start modifying the code and creating the integration.
- Firstly, we need to wrap our code in a document ready event to ensure that it only runs when Kendo is ready to execute. We also want to define the service URL for our Saved Query service to use in the data source later.
$(function(){

    var serviceUrl = "http://tpc.crmportalconnector.com/SavedQueryService/Execute/GetEvents";

});
Put all the code in the next steps inside the document ready function.
- Now we’re going to use JQuery to find our “schedule” element that we created in step 7 and attach the Kendo Scheduler functionality to it.
$(function(){

    var serviceUrl = "http://tpc.crmportalconnector.com/SavedQueryService/Execute/GetEvents";

    $("#schedule").kendoScheduler({

        showWorkHours: true,

        views: [

            {type: "workWeek", selected: true},

            "week",5

        ],

        eventTemplate: "<div>#: title #</div><br/><small>#: description #</small>",

    });

});
This code snippet will create a Kendo Scheduler and attach it to the “schedule” div. We also set up some basic settings such as the available views as well as a simple template for the events.
- The last step here is to bind the Kendo Scheduler to our Saved Query. To do this we need to create the data source for the Kendo Scheduler as well as define a schema so the widget knows how to read our Dynamics CRM data. Paste the following code inside the Kendo Scheduler settings block right after “eventTemplate”
dataSource: {

    transport: {
        read: {

            url: serviceUrl,

            type: "GET",

            dataType: "json"

        }

    },

    schema: {

        model: {

            id: "new_eventid",

            fields: {

                title: { from: "new_name" },

                start: {type:"date", from: "new_startdatetime"},

                end: {type:"date", from: "new_enddatetime"},

                description: {from: "new_eventsmalldescription"}

            }

        },

        parse: function(response) {

            var events = [];

            var dateRegex = /\/Date\(([+-]?\d+)[+-]?\d*\)\//;

            for(var i = 0; i < response.data.length; i++) {

                var event = response.data[i].Attributes;


                event.new_startdatetime = new Date(+event.new_startdatetime.replace(dateRegex, '$1'));

                event.new_enddatetime = new Date(+event.new_enddatetime.replace(dateRegex, '$1'));


                events.push(event);

            }

            return events;

        }

    }

}
The above code defines the data source for the Kendo Scheduler widget.
In the transport.read option we define our service path (serviceUrl that is defined at the top of the file), the method type of the service (GET) as well as the data type returned (JSON).
In the schema.model option we define the identifier field, as well as all of the other fields that are present in our saved query. You must change the id field as well as the “from” attributes in the fields section to match the attribute logical names of the attributes defined in your Fetch XML.
The schema.parse function translates the data coming back from the Saved Query into something that the Kendo Scheduler widget can work with. Special handling is necessary for the date fields and an example of that is present in the code above. You will need to change the “new_startdatetime” and “new_enddatetime” to the respective start/end date time fields that your included in your Fetch XML.
- Save changes to your file or widget, and then publish the page.
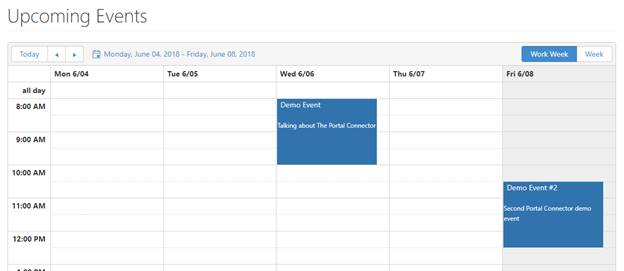
- If all goes well, you should have a basic Kendo Scheduler widget that is showing Dynamics CRM events data.

Here is a link for a slightly more advanced version that allows users to double-click the events to drill down into the event details on a Portal Connector page using the TPC Form Manager.