What is UX and UI?
User Interface (UI) and User Experience (UX) are two vital parts of any website, and reputation of the website can largely depend on these two factors. Therefore, it is very important to get these two right!
As an analogy, think of building a website like building a house. Before we start building a house we need to think about which kind of a house we are going to build. Is the house going to be Bungalow or townhouse? Likewise, when we are building the website we need to think ask questions such as, is this website going to be mobile responsive? Or is it just going to be a desktop website?
Next when building a house, we need to think about where the living room and the dining area are going to be in the house. Similarly, in a website we need decide where the menu is going to be, how many menus we are going to have in the footer, if our website is going to have a side bar, and so on and so forth.
Then, when we start building the house, the first step is to establish a solid, concrete foundation. Without this, the house is not going to stand very strong.
In our case of building a website, the foundation would be the website layout template. The website layout file can contain all the CSS, JS, and other related files to the website. In this layout file we can structurally divide the website into sections. There are 3 main sections to almost all websites, outlined below:
- Header – Navigation menu, company logo, login, language selectors and any other calls to action are commonly featured here. The header can also be divided into sections to suit your design needs.
- Body – The main body copy will go here, and any sliders, sidebars etc. can go in this section as well.
- Footer – Usually includes copyright information, social media links, and any other quick links. Similar to the header, the footer also can be divided into sections based on your design needs.
Back to our house analogy, now that we have the structure of the house jotted down, we must think about functionality of the house; how are the doors are going to operate? Do we have sliding doors? What kind of flooring we are going to have? In the same way, when we are building our website we need to think about the user interaction, such as how the buttons are going to operate, how many sliders are we going to have, etc.
Website Design
At this stage, we have a general idea of how we are going to build the website. Therefore, let’s now have a look at how we can structurally divide an actual website design into Header, Body and Footer. Please see the diagram below.
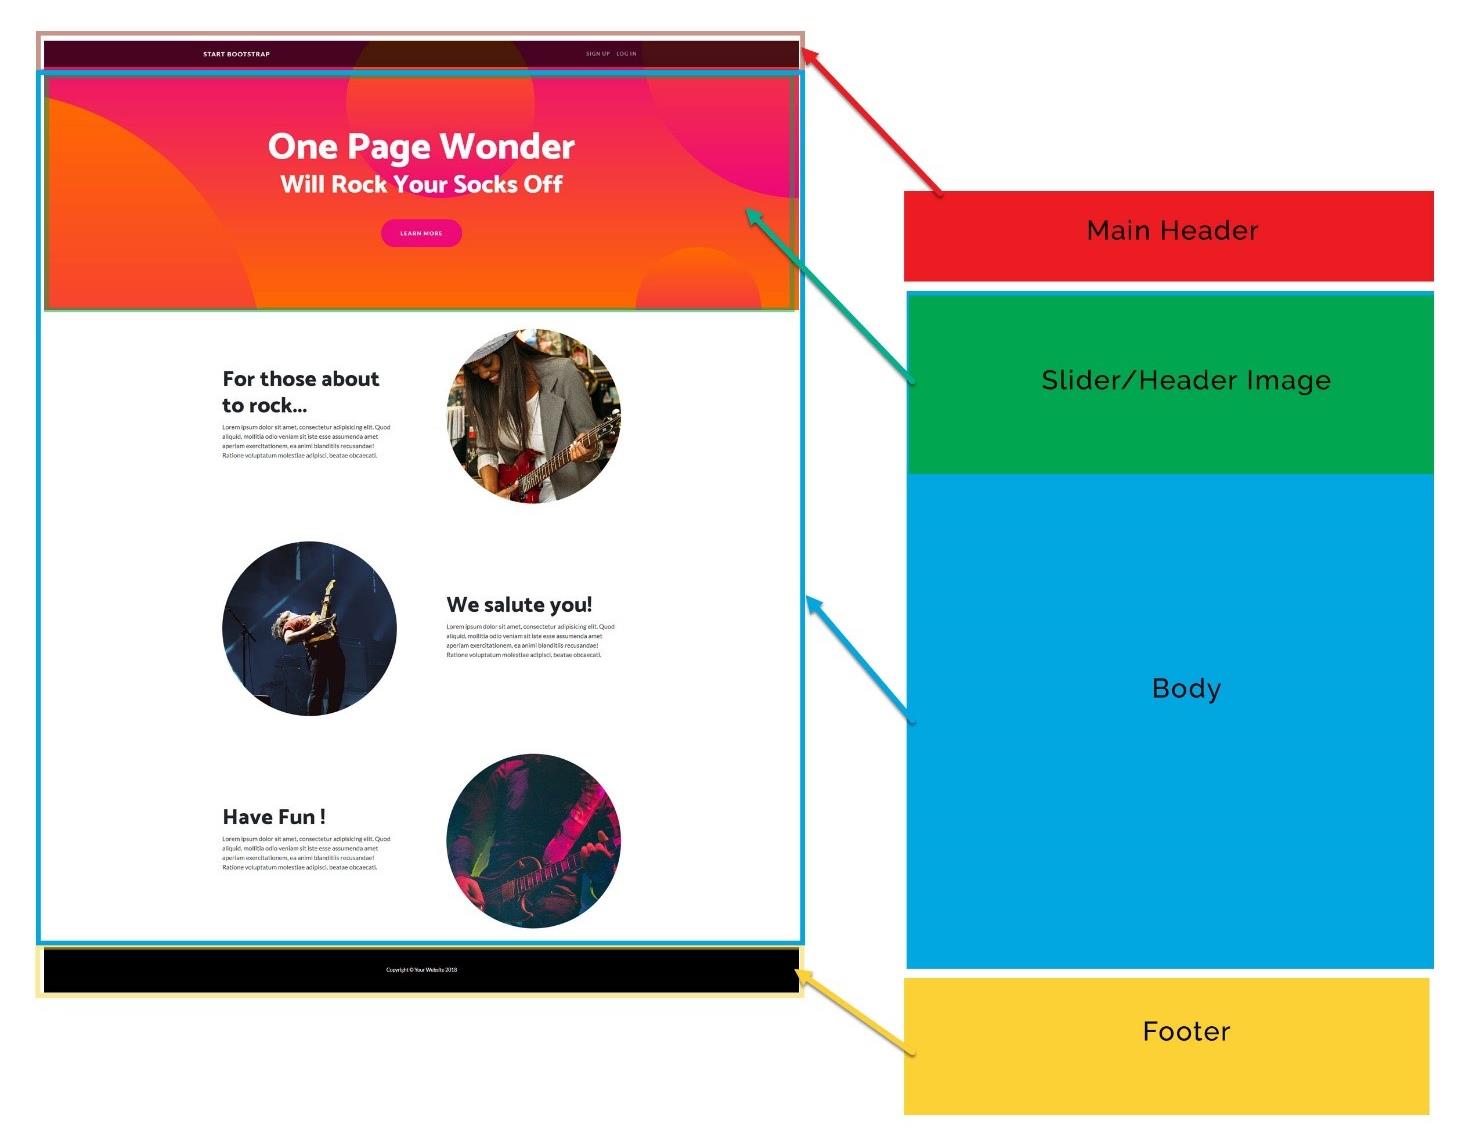
Figure 1 – Components of Website Design
Creating Sitefinity MVC Templates based on the design.
Adding Resource Packages
Sitefinity has a separate folder in the root of the site called “Resource Packages” and sometimes we must include this folder in our project manually. By default, this folder contains “Bootstrap Resource Package”. This package contains frontend assets, CSS source files, and widget templates, based on the frameworks. More information about these packages can be found here: https://github.com/Sitefinity/feather-packages.
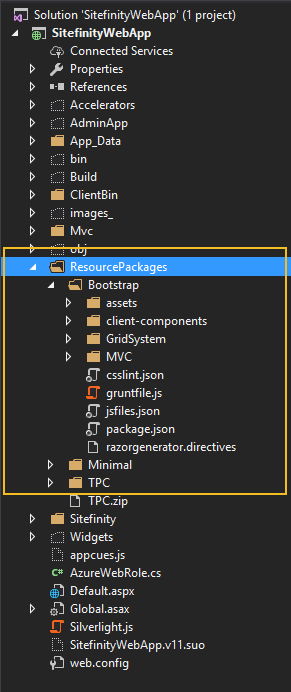
Figure 2 – Sitefinity Resource Packages
Sitefinity recommends creating your MVC page template inside the Resource Packages, and we recommend duplicating the default Resource Package and renaming it to your project name. In this regard, we can keep our custom files separately in a one package. In this example, we have duplicated the default Bootstrap Resource Package and renamed it to “TPC”.
Creating the Page Template
There are two ways to create a page template:
Option 1 (Recommended way):
You need to locate the Layout folder, using the following path:
~/ResourcePackages/YourPackageName/MVC/Views/Layouts.
Under the Layouts folder, you can see the default.cshtml file. We strongly recommend that you duplicate this file and rename it to your project name to avoid any confusion with the original templates.
Option 2:
You need to locate the Views folder under ~/MVC/Views/.
Then you must create a folder and name it “Layouts”. Next, you need to add a code file, and name it as your page template name. e.g.: mypagetemplate.cshtml
NOTE: The template and the layout file are connected via the naming convention. If you rename the layout file, the relationship with the page template breaks and a new page template is created. For this reason, we strongly recommend you name your template and layout files accordingly and do not rename them.
Creating Custom CSS and JS
You can add your custom CSS file under ~/ResourcePackages/YourPackageName/assets/dist/css folder.
Initially, there will be no folder for your custom JS. Therefore, you can create a JS folder under ~/ResourcePackages/YourPackageName/assets/dist/. In our example, we named our custom JS folder as “scripts”.
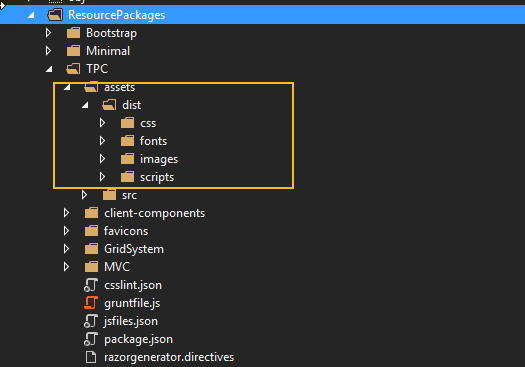
Figure 3 – Custom JS Folder
Linking Custom CSS and JS and Built-in Libraries
Once we create your custom CSS and JS, we must link these files to our layout file. You can link your files as shown below.
@* Add custom styles from your resource package to section " head "*@
@Html.StyleSheet(Url.WidgetContent("~/ResourcePackages/Bootstrap/assets/dist/css/yourcustomstyles.css"), "head")


@*  Add custom java script from your resource package to section*@
@Html.Script(Url.Content("~/ResourcePackages/TPC/assets/dist/scripts/yourcustomjavascript.js"), "top")


@*  Add Sitefinity's built-in jQuery and Kendo to section "top". Note: We must make sure we are only adding this in the front-end of the site, since these are already included in Sitefinity’s back-end. *@
@if(!SystemManager.IsDesignMode){
 @Html.Script(ScriptRef.JQuery, " top")
 @Html.Script(ScriptRef.KendoAll, "top")
 }


@* Adding sitefinity embeded resources to the template. Again, we also must make sure we are only adding embedded resource in the front-end of the site. *@
@if(!SystemManager.IsDesignMode){
 @Html.StyleSheet(Url.EmbeddedResource("Telerik.Sitefinity.Resources.Reference", "Telerik.Sitefinity.Resources.Scripts.Kendo.styles.kendo_common_min.css"), "top")
 @Html.StyleSheet(Url.EmbeddedResource("Telerik.Sitefinity.Resources.Reference", "Telerik.Sitefinity.Resources.Scripts.Kendo.styles.kendo_default_min.css"), "top")
 @Html.StyleSheet(Url.EmbeddedResource("Telerik.Sitefinity.Resources.Reference", "Telerik.Sitefinity.Resources.Scripts.Kendo.styles.kendo_bootstrap_min.css"), "top")
}
More information about linking files can be found here: https://docs.sitefinity.com/feather-refer-to-resources-inside-views
NOTE: You must make sure you are including the Script libraries such as jQuery, Kendo or any other libraries first. This way, you can use them in your custom JS file.
Detailed View of the Template
Now that we have a better understanding of how to create the layout file and how to connect our CSS and JS files, let’s have a look at how we can build our template.
Bootstrap provides a basic starter template that we strongly recommend using when starting to build your template. You can find it here: https://getbootstrap.com/docs/3.3/getting-started/#template
Refer to the below example, based on the design we have shown previously (Figure 1):
@using System.Web.Mvc;
@using Telerik.Sitefinity.Frontend.Mvc.Helpers;
@using Telerik.Sitefinity.Modules.Pages;
@using Telerik.Sitefinity.UI.MVC;
@using Telerik.Sitefinity.Services;
<!DOCTYPE html>
<html @Html.RenderLangAttribute()>
<head>
 <meta charset="utf-8">
 <meta http-equiv="X-UA-Compatible" content="IE=edge">
 <meta name="viewport" content="width=device-width, initial-scale=1">


 <title>Your Website Name </title>
 @Html.Section("head")
 <!--Google fonts or font awesome styles  -->
 <link href="//fonts.googleapis.com/css?family=Lato:400,700,900" rel="stylesheet">
 <link href="//fonts.googleapis.com/icon?family=Material+Icons" rel="stylesheet">
 <script defer src="https://use.fontawesome.com/releases/v5.0.6/js/all.js"></script>
 <!--Make sure you are still using the Bootstrap resource package frame work file -->
 @Html.StyleSheet(Url.Content("~/ResourcePackages/Bootstrap/assets/dist/css/main.css"), "head")
 <!-- custom CSS files  -->
 @Html.StyleSheet(Url.Content("~/ResourcePackages/yourcustomRecourcePackage/assets/dist/css/yourcustom.css"), "head")
 @Html.StyleSheet(Url.Content("~/ResourcePackages/yourcustomRecourcePackage/assets/dist/css/yourcustom.ui.css"), "head")


</head>
<body>
 @Html.Section("top")
 <!-- Header Section  -->
 <div class="container-fluid tpc-header-area">
  <div class="row">
   <!-- Main Logo -->
   <div class="col-xs-3 tpc-main-logo">
    @Html.SfPlaceHolder("HeaderLogo")
   </div>
   <!-- Main Header, this can include main menu, login , lanugage selector etc -->
   <div class="col-xs-9 tpc-main-header">
    @Html.SfPlaceHolder("MainHeader")
   </div>
  </div>
 </div>
 <! -- Body Section -->
 <div class="tpc-main-body container-fluid">
  <! -- header section: this can include main image or slider -->
  <div class="row tpc-main-body-header">
   @Html.SfPlaceHolder("MainBodyHeader")
  </div>
  <! -- Body copy of your site -->
  <div class="tpc-main-body-content">
   @Html.SfPlaceHolder("MainBody")
  </div>
 </div>
 <! -- Footer Section: your copyright information etc. -->
 <div class="container-fluid tpc-footer">
      @Html.SfPlaceHolder("Footer")
   </div>


 <! -- Inline editing -->
 @* Inline editing scripts and helpers. They should be available only when inline editing is possible. *@
 @if (Html.ShouldRenderInlineEditing())
 {
  @Html.Script(ScriptRef.MicrosoftAjax, "top")
  @Html.Script(ScriptRef.MicrosoftAjaxCore, "top")
  @Html.Script(ScriptRef.JQuery, "top")


  @Html.Script(Url.EmbeddedResource("Telerik.Sitefinity.Resources.Reference", "Telerik.Sitefinity.Resources.Scripts.jquery.ba-outside-events.min.js"), "top")
  @Html.Script(ScriptRef.KendoAll, "top")
  @Html.Script(ScriptRef.KendoTimezones, "top")
  @Html.Script(Url.EmbeddedResource("Telerik.Sitefinity.Resources.Reference", "Telerik.Sitefinity.Resources.Scripts.RequireJS.require.min.js"), "top")
  @Html.InlineEditingManager(false)
 }
 @Html.Section("bottom")
 <! -- Adding Sitefinity resources -->
 @if(!SystemManager.IsDesignMode){
  @Html.Script(ScriptRef.JQuery, "head")
 }
 @Html.Script(Url.Content("~/ResourcePackages/yourcustomRecourcePackage/assets/dist/js/yourcustom.js"), "top")
</body>
</html>
You can simply copy this code into your layout file. Once you create this file, you can find this template in the Sitefinity backend under Design > Page Templates. In our example, we have named our template as “tpc-dashboard”.

Figure 4 – Page Templates
Once you open this template file, it will look like this:
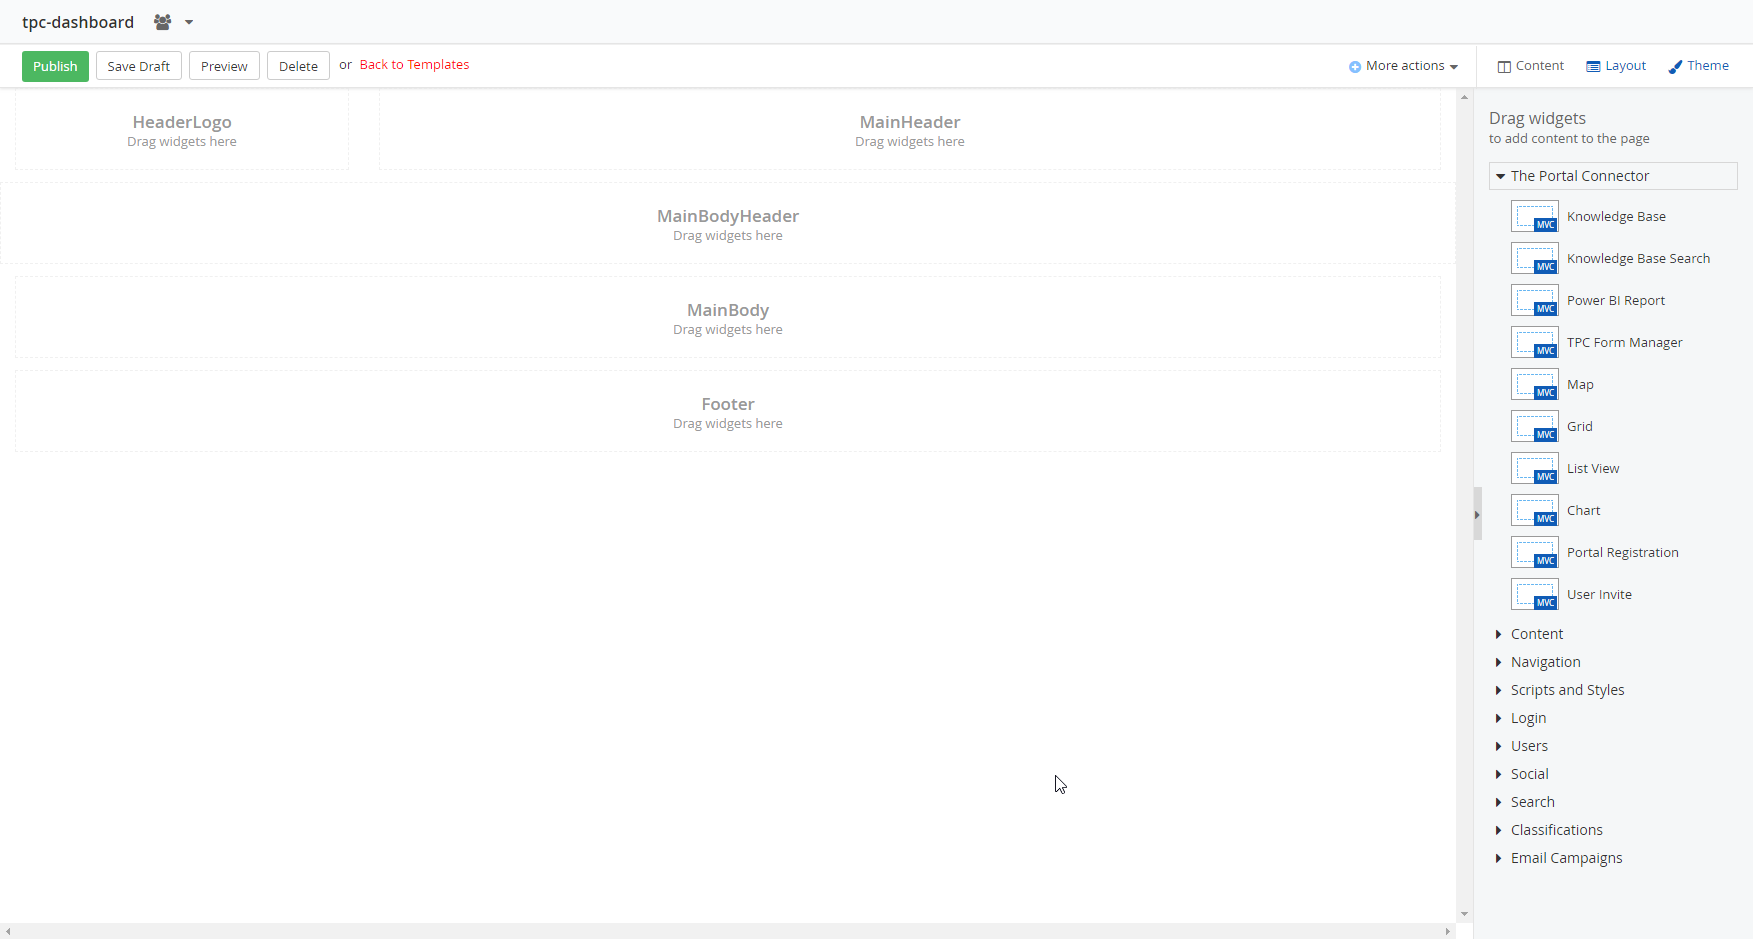
Figure 5 – Template File
Now you can add your logo into the “HeaderLogo” placeholder, and any other widgets such as login, site search, language selector on the “MainHeader” placeholder. Any of the sliders are going to go in the “MainBodyHeader” placeholder. Add Footer content such as contact information and social links in the “Footer” placeholder.
Best Practices.
Best Practice 1
It is best to add only the header and footer content into your main template file (yourtemplatename.cshtml) using the Sitefinity backend. Thus, you can re-use this template and simply customize the body content based on each page you will add to your site. Most of the time, the homepage of your website is going to look different than other pages. Therefore, we strongly recommend creating 2 templates:
- Home-template
- Inner-template
Both templates are going to be based on your template layout file (yourtemplatename.cshtml). Follow the steps below:
- First go into Sitefinity backend and navigate to Design > Page Templates
- Click on “Create a template”
- From the designer, add your template name
- Select “Use Template”
- select another Template.
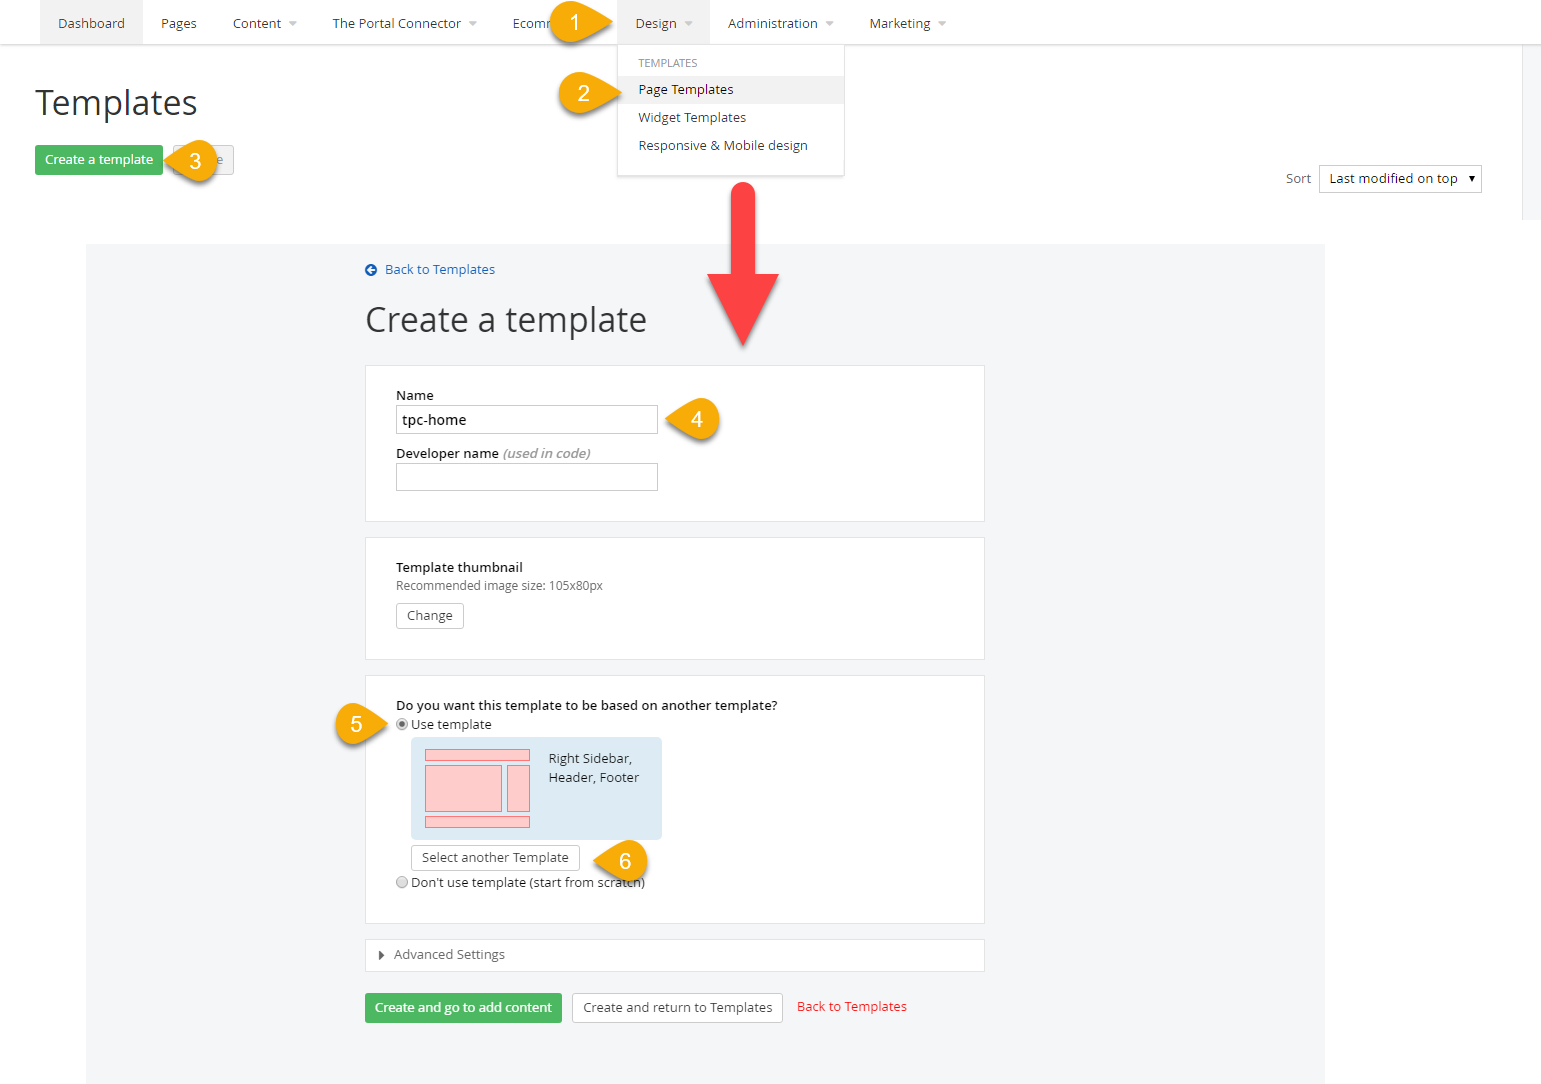
Figure 6 – Create a Template
From the next popup (see below), you need to find your resource package template and select your base template/layout file. Once you finish, click “Done” and then “Create and go to add content”.
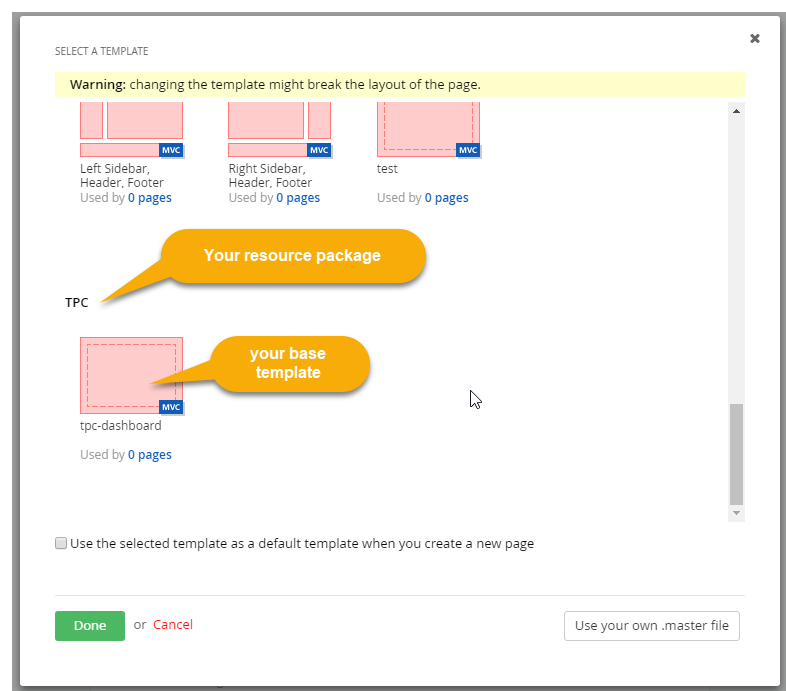
Figure 7 – Resource Package and Base Template/Layout File
Now if you create your home template and you have an Image slider that needs to be added into the homepage, you can do so by adding this slider widget into the home template you have created. Then you can set the homepage template to the new home-template that you have created. A similar creation process applies to the Inner template, and it must be based on the layout template file.
Best Practice 2
When you are styling the widget templates, it is best to duplicate the current widget template file and rename it before making any changes. You will add your custom classes for styling purposes to this new file. This way, if you still want to use the original unaltered widget template, you can do so and it would not be affected by your custom styles.
All the widget files can be found under ~/ResourcePackages/YourPackageName/MVC/Views/.
As an example, let’s say we are going to style the Login Status widget. Find the template for the Login Status widget, duplicate the template and rename it (see below).
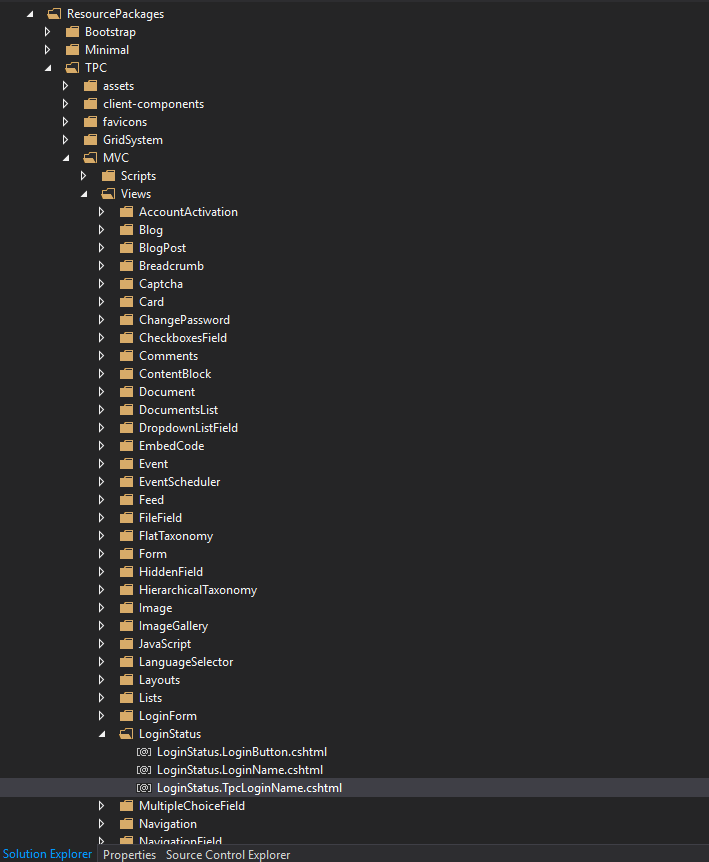
Figure 8 – Login Status Widget
NOTE: If you are creating the widget in an external project, in the Properties section of the file, set its Build Action to “Embedded Resource”.
Helpful Links
In this blog, we have covered how to add resource packages to your site, creating custom templates with an example of how to divide your site design into sections for coding purposes. Additionally, we have discussed how to create new templates and best practices creating templates.