The grid widget is one of the most commonly used widgets offered by The Portal Connector. One of the main reasons for the overuse of this widget is due to the ease of use. Simply select your entity with its attributes that you want to work with and save your changes. You'll be able to see all your data nicely organized in a modern kendo grid widget.
One might ask if all can be done with The Portal Connector grid widget? Certainly not!
The recent release of The Portal Connector 6.1 release has few new features that spiced up the grid widget functionality.
Therefore, we are going to discuss a few new features such as
- Inline grid editing
- Creating responsive grids
- How to customize the columns using TPC API (using custom code)
- Add search functionality using TPC API (using custom code)
This is going to be very interesting so stick around.
In-line grid editing
In-line grid editing feature enables users to edit grid records by simply clicking in the record column. To enable this functionality, first we are going to go into the sitefintiy backend > your page and drag-and-drop a grid widget. Next, you can edit the grid widget. For simplicity let’s select contact entity, from the fetch builder select first name, last name, birthday, gender attributes which will allow us to demonstrate a few attribute types.
.png?sfvrsn=7899b31a_0)
Next, let's go into the settings tab, and click on the “Enable inline editing” check box which will now enable the inline editing feature on the grids. Then, let's go into the Columns tabs and edit the “firstname” column, which will look like this:
.png?sfvrsn=b2536e17_0)
From this pop up click on the edit check box and click on update. Do the same to all the other attributes that you wish to make inline editable, then once you are done click on save and publish the page.
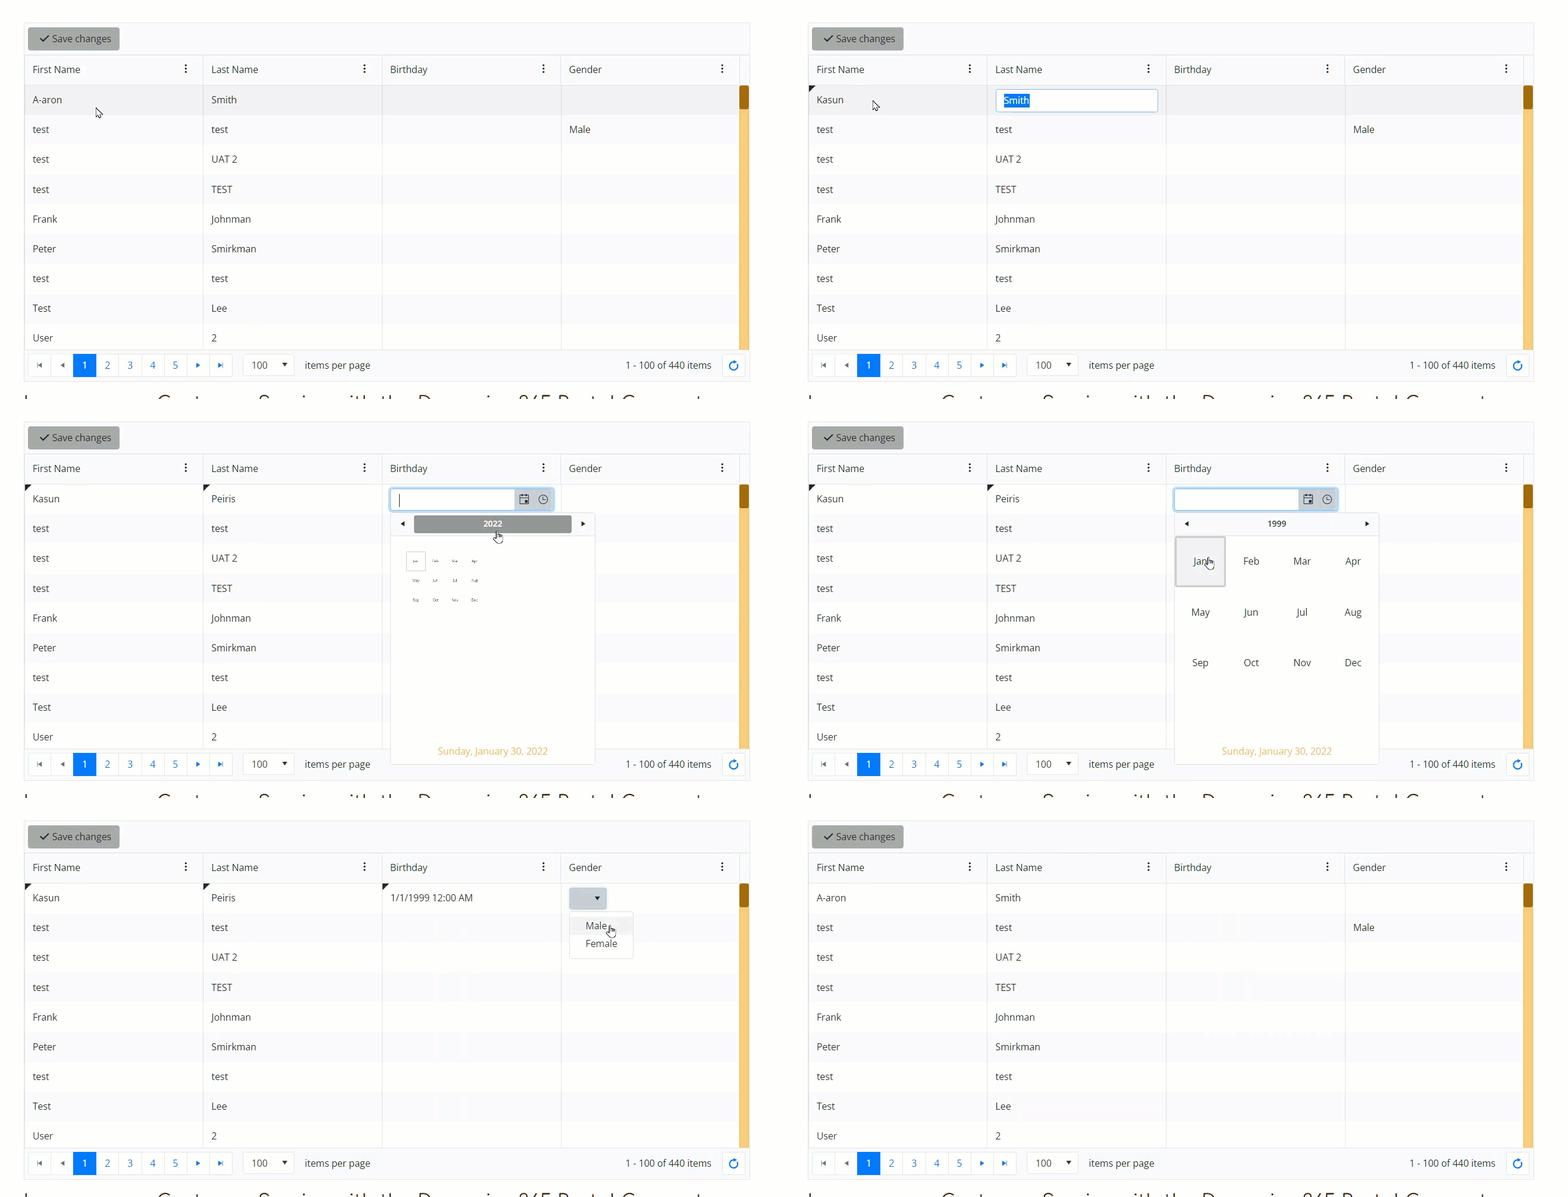
Now let's go and check out the grid in the front end view.
.png?sfvrsn=3a07b0a7_0)
This grid looks normal, however there is a new save changes button on the top. If you try to click on any of the record columns you can see they are changing into user inputs such as text boxes, dropdowns, or date and time fields based on the attribute type.

Wola, so your grid is not inline editable.
Responsive Grids
Let's have a look at how we can make the grids responsive. First, lets go back into our page, and edit the same grid that we are working on. We don't have to configure the data as in our previous step, we have already configure the data on this grid. 'therefore, lets go in to the settings tab. In here you will see there is another check box called “enable responsive grids”, click on this then it will show a pop up like this.
.png?sfvrsn=46a9569f_0)
Basically, we can't use inline editing as well as the responsive grids feature at the same time. Therefore we need to decide if we want our grids to be inline editable or responsive. In this case, I'm going to click on ok as we are demonstrating how to set up the responsive grids.
Next, go into Advanced properties in the designer > Model > GridSettings.
In here you can see a few properties that will be useful based on your requirements.
- EnableCustomResponsiveGridColumnTemplate - if this property is set to true, you can create your own custom responsive grid column
- ResponsiveGridColumnHeaderTitle - This is where you can change the responsive column name as all the columns are going to stack into one column. By default the value is “Grid Items”
- ResponsiveGridColumnMediaBreakPoint - this is where you can change the media query for Responsive Column. By default it is set to (max-width: 768px)
- GridColumnMediaBreakPoint - this is where you can change the media query for all the grid columns. By default its set to (min-width: 768px)
ResponsiveGridColumnMediaBreakPoint VS GridColumnMediaBreakPoint
The behavior of the responsive grids is that the standard columns are going to hide based on the GridColumnMediaBreakPoint value. Recommended media queries for this property would be:
- Max-width
- Max-device-width
- Orientation:landscape or Orientation:portrait (based on the requirement)
Once the exciting columns are hidden we need to show the responsive (generated or custom) column using ResponsiveGridColumnMediaBreakPoint. Recommended media queries for this property would be:
- Min-width
- Min-device-width
- Orientation:landscape or Orientation:portrait (based on the requirement)
Responsive grids continued..
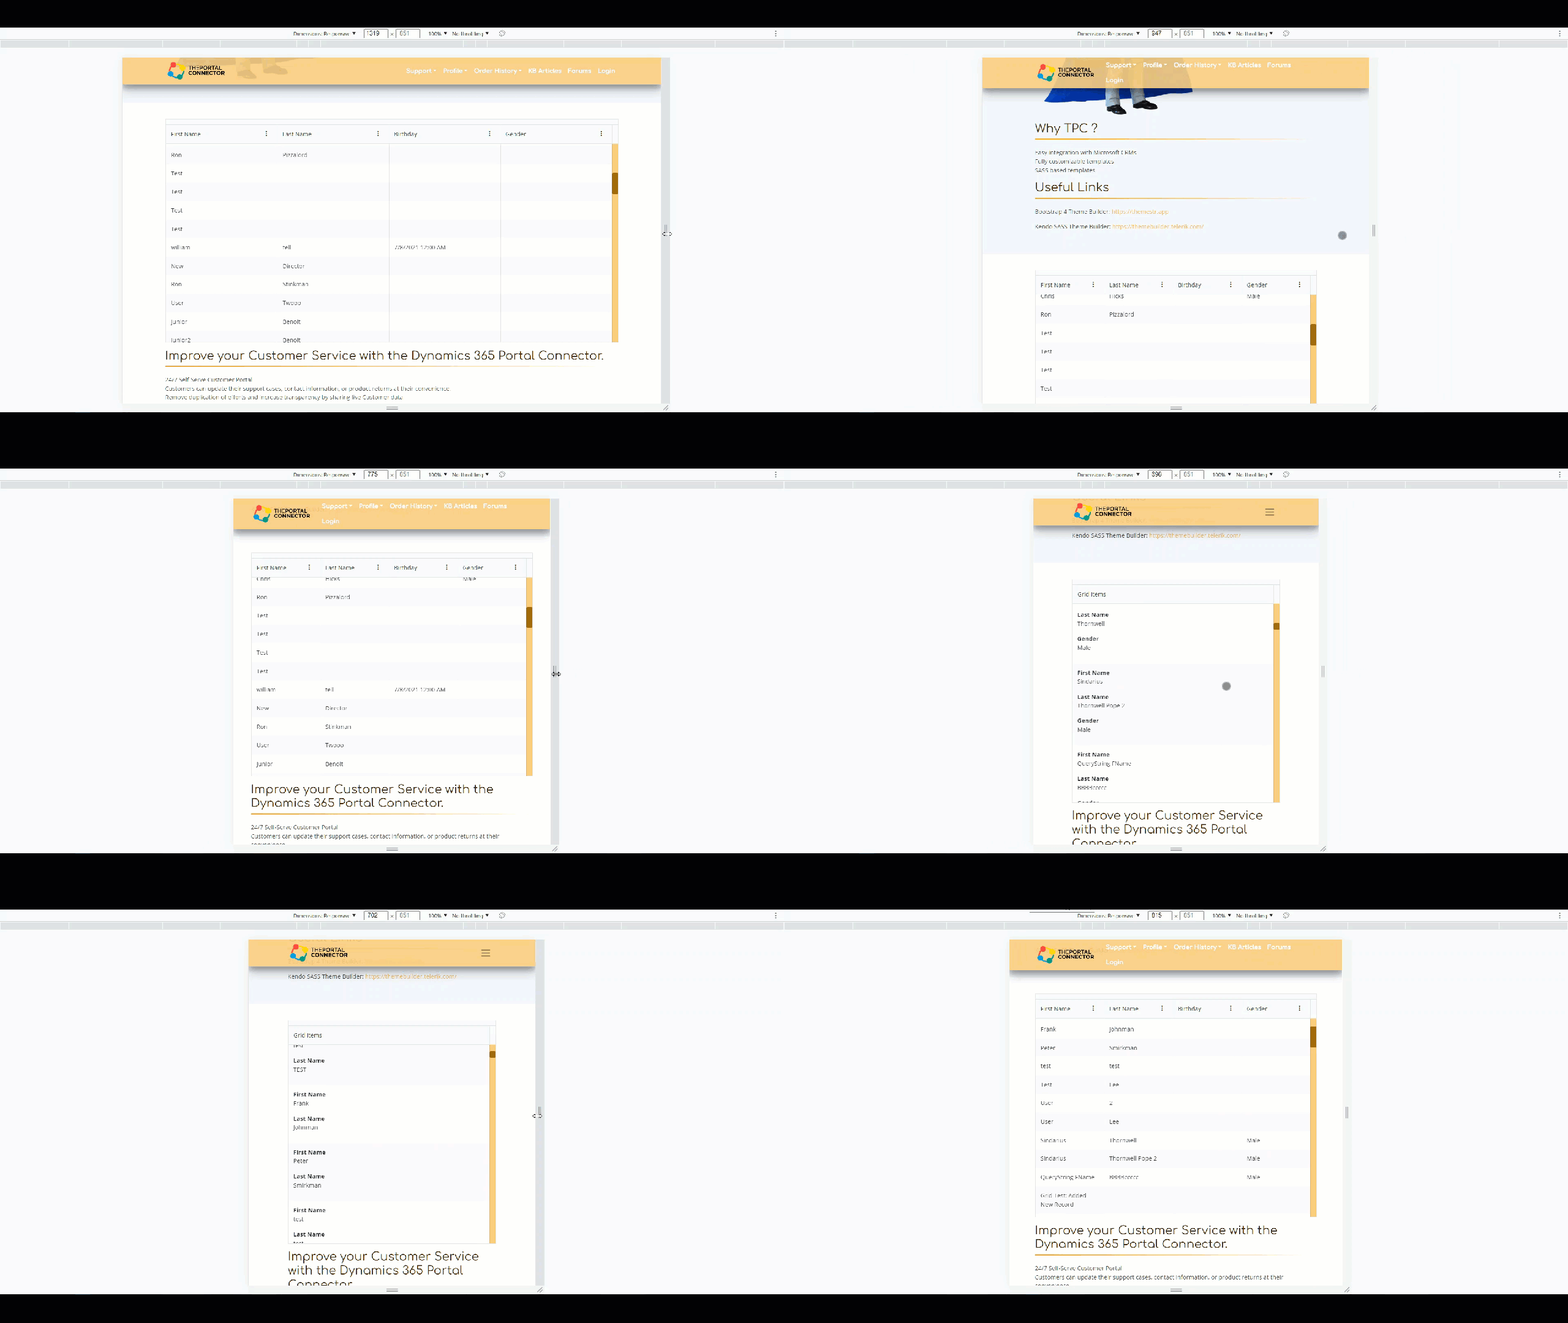
Once you have set up all the model properties based on your used case, save the designer view and publish the page. In my case, I have only enabled the responsive grids from the front end and I left all the other properties as their default values.
Let's have a look at the behavior of the grid in the front end (refer to the screenshot):

Now you know how to make your grids inline editable as well as making them responsive.
Customizing the Grid Columns Using TPC API
Let's have a look at how we can customize the grid column so we can show an icon instead of a text. In our example, we are going to look at how to add an icon to gender column based on the value. First lets go in to font awesome and find 3 icons.
Here is the list of icons that I will be using:
<i class="fa fa-male" aria-hidden="true"></i>(https://fontawesome.com/v4.7/icon/male)

<i class="fa fa-female" aria-hidden="true"></i> (https://fontawesome.com/v4.7/icon/female)

<i class="fa fa-question-circle-o" aria-hidden="true"></i>(https://fontawesome.com/v4.7/icon/question-circle-o)
Next, we are going to write some code using tpc javascript api. Here is the JS code and I'll explain what the code is doing using comments.
//make sure to put the code in "tpc:ready" event as we need to wait until all the tpc widgts loaded to excute our code
$(document).on("tpc:ready", function () {
	//get the kendo instance of the grid on the page.
	var grid = tpc.page.TpcGridModel.get_grid();

	//set up a data bound event
	 grid.bind("dataBound", function(e){
		 //get the rows of the grid
		var rows = e.sender.tbody.children();
		//loop through each row
        for (var i = 0; i < rows.length; i++) {
            var row = rows[i];
            // get the index of the gender cell in the row
            var gender = row.cells[4];
			//check to see if the gender cell is available
            if (gender) {

				//switch through the cell based on the text Male or Female
                switch (gender.textContent) {
                    case "Male":
						//clear the text
                        $(gender).text("");
						//add the male icon to the grid cell
                        $(gender).append("<i class='fa fa-male fa-2x  d-block text-center'></i>");
                        break;
                    case "Female":
                        //clear the text
                        $(gender).text("");
						//add the female icon to the grid cell
                        $(gender).append("<i class='fa fa-female fa-2x  d-block text-center'></i>");
                        break;
                    case "":
                        //clear the text
                        $(gender).text("");
						//add the female icon to the grid cell
                        $(gender).append("<i class='fa fa-question-circle-o fa-2x  d-block text-center'></i>");
                        break;
                }
            }
        }
	 });
	//refresh the grid
	grid.refresh();
});
Copy this code and go back to the page that you have the grid widget on. Then Drag and Drop a javascript widget. Paste the code in there. Please make sure to put the widget “before closing body tag” by selecting this option under more options (refer to the screen shot) and also add a description of the widget under description.
.png?sfvrsn=cf71828f_0)
Next publish the page.
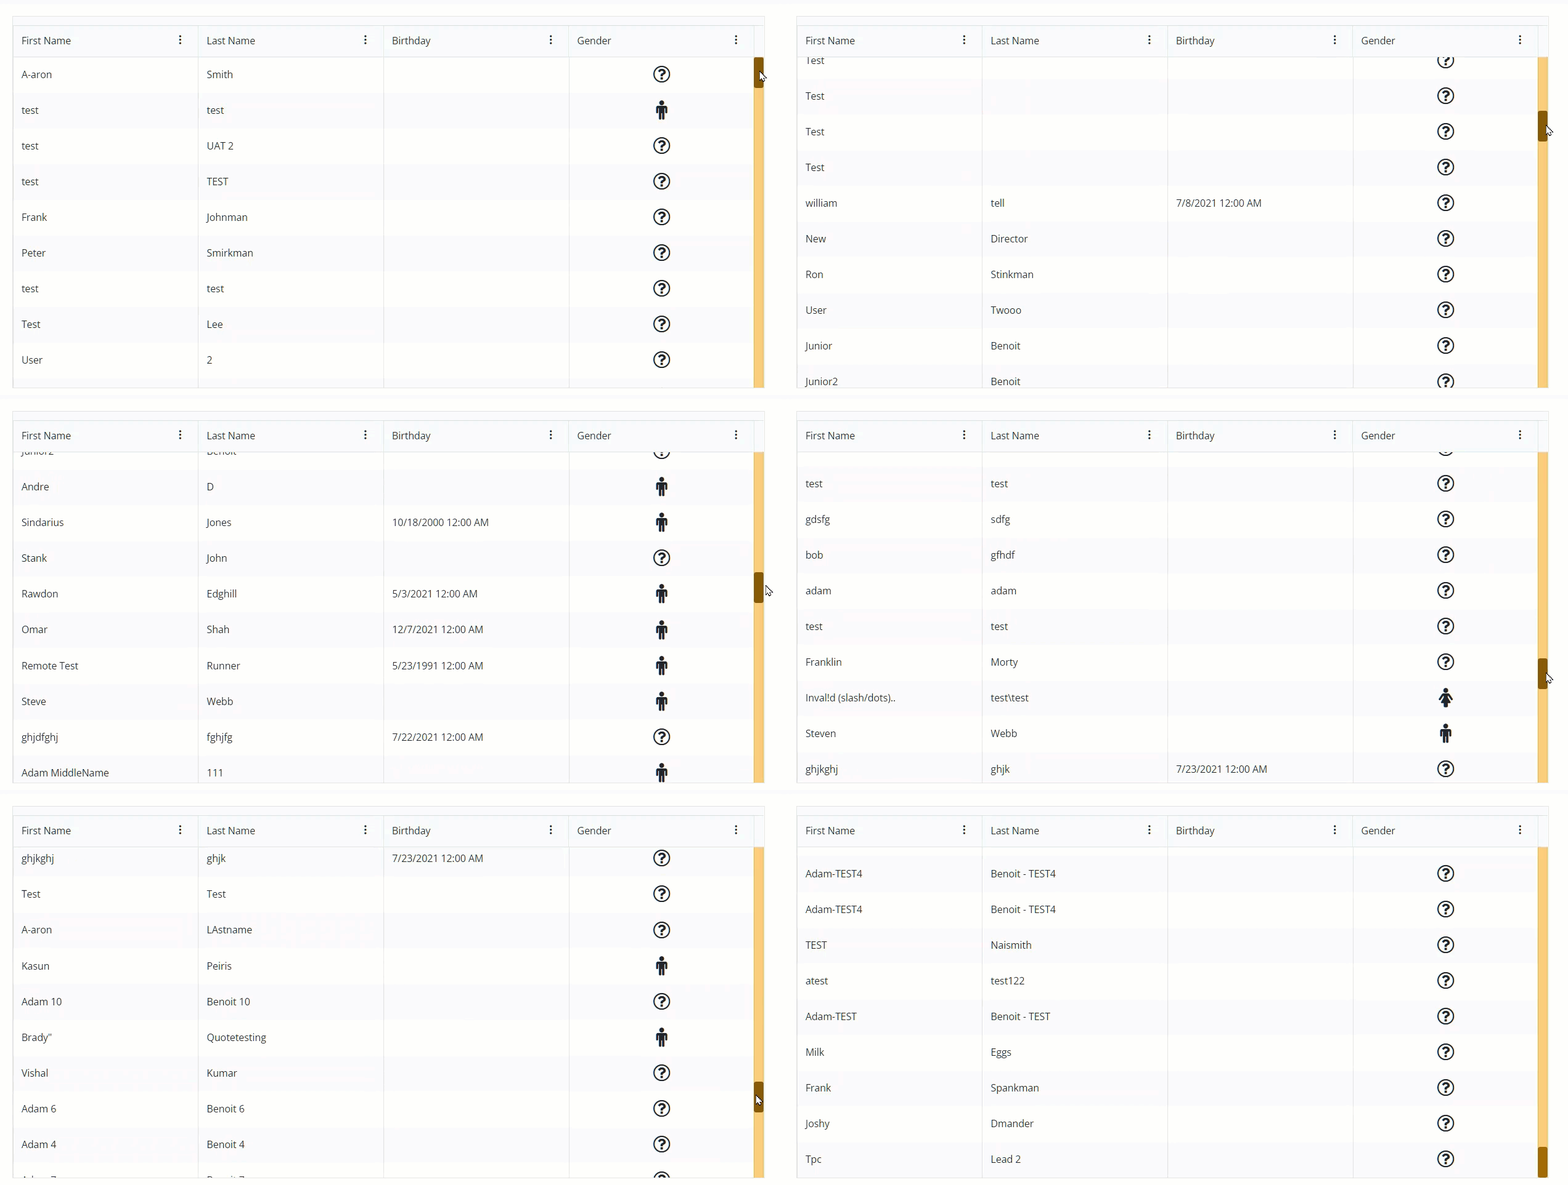
Let’s have a look at the behavior in the front end of our grid widget.

As you can see our gender column is showing icons instead of plain text.
Adding a Search Functionality to the Grid Using TPC API
Let's have a look at how we can add a search functionality to the grid widget. This way we can search records on the grid. Since we have the previous code that we wrote for adding icons, I'm going to add a few lines of code to the same code block.
Here is the code for the search functionality:
//make sure to put the code in "tpc:ready" event as we need to wait until all the tpc widgts loaded to excute our code
$(document).on("tpc:ready", function () {
	//get the kendo instance of the grid on the page.
	var grid = tpc.page.TpcGridModel.get_grid();

		//Getting the grid options
	   var gridOptions = grid.getOptions();
	   //push the seach options to the grid tool bar
		gridOptions.toolbar.push("search");
		// set wich field you want to search by
		gridOptions.search = { fields: ["firstname"] };
		//Set the options in the grid again with the update grid options
		grid.setOptions(gridOptions);
});
Here is what is returned by the grid options, and where you can get the file name to put it as the one of the fields:
.png?sfvrsn=9ac75aed_0)
Copy this code and go back to the page that you have the grid widget on. Drag and drop a another javascript widget. Paste the code in here. Please make sure to put in the widget “before closing body tag” by selecting this option under more options (refer to the screen shot) and add a description of the widget under description.
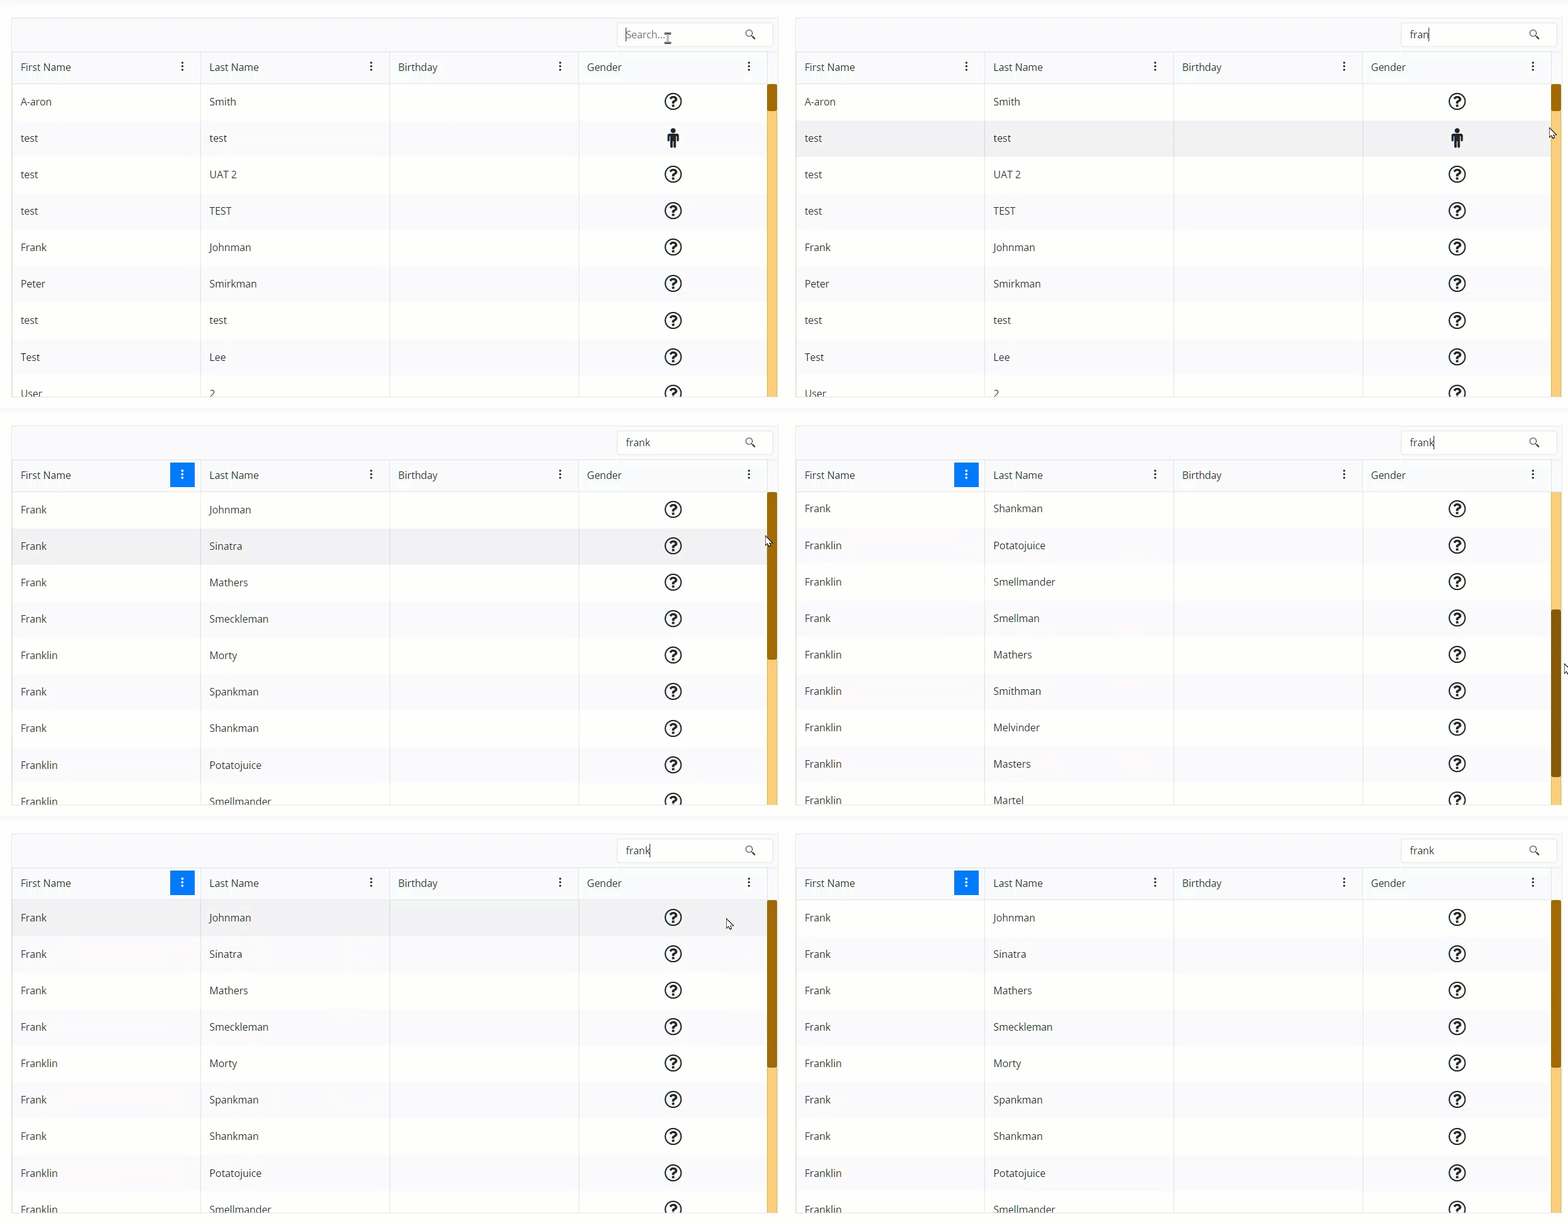
Next publish the page. Let’s have a look at the behavior in the front end of our grid widget.

Our girds are now searchable. Last thing I would recommend is to consolidate the two scripts that we put on the page so its cleaner and tidier.
Here is the consolidated code:
//make sure to put the code in "tpc:ready" event as we need to wait until all the tpc widgts loaded to excute our code
$(document).on("tpc:ready", function () {
	//get the kendo instance of the grid on the page.
	var grid = tpc.page.TpcGridModel.get_grid();

	// Setting up the Grid Search
	//Getting the grid options
    var gridOptions = grid.getOptions();
    //push the seach options to the grid tool bar
	gridOptions.toolbar.push("search");
	// set wich field you want to search by
	gridOptions.search = { fields: ["firstname"] };
	//Set the options in the grid again with the update grid options
	grid.setOptions(gridOptions);


	// Setting up the Grid Column Icons
	//set up a data bound event
	 grid.bind("dataBound", function(e){
		 //get the rows of the grid
		var rows = e.sender.tbody.children();
		//loop through each row
        for (var i = 0; i < rows.length; i++) {
            var row = rows[i];
            // get the index of the gender cell in the row
            var gender = row.cells[4];
			//check to see if the gender cell is available
            if (gender) {

				//switch through the cell based on the text Male or Female
                switch (gender.textContent) {
                    case "Male":
						//clear the text
                        $(gender).text("");
						//add the male icon to the grid cell
                        $(gender).append("<i class='fa fa-male fa-2x  d-block text-center'></i>");
                        break;
                    case "Female":
                        //clear the text
                        $(gender).text("");
						//add the female icon to the grid cell
                        $(gender).append("<i class='fa fa-female fa-2x  d-block text-center'></i>");
                        break;
                    case "":
                        //clear the text
                        $(gender).text("");
						//add the female icon to the grid cell
                        $(gender).append("<i class='fa fa-question-circle-o fa-2x  d-block text-center'></i>");
                        break;
                }
            }
        }
	 });
	//refresh the grid
	grid.refresh();
});
Thanks for following, now go have fun with Grids!